Віддалений моніторинг та керування Keenetic
Система віддаленого моніторингу та управління Keenetic (RMM)
Keenetic RMM (Remote Monitoring and Management (RMM)) https://rmm.keenetic.com/ — це хмарна багатосайтова система віддаленого моніторингу та керування, спеціально розроблена для малого та середнього бізнесу, яка допомагає підтримувати важливі сайти та інфраструктуру 24/7.
Вона забезпечує централізований моніторинг стану всіх вузлів у будь-який час з будь-якої точки світу. Доступ до служби Keenetic здійснюється через веб-браузер, що дозволяє працювати на різних платформах з будь-якого типу пристрою та операційної системи.
Важливо
Keenetic RMM розроблено для пристроїв Keenetic з KeeneticOS версії 4.1 або вище (всі моделі з індексом KN-XXXX, вироблені з 2018).
Keenetic RMM пропонує функції, які дозволяють вам керувати своїми сайтами швидше, зручніше та ефективніше:
Додавати маршрутизатори віддалено за сервісним кодом або адресою KeenDNS
Надає доступ до вебінтерфейсу кожного вузла
Дозволяє бути в курсі подій та отримувати своєчасні сповіщення про критичні події на сайті за допомогою сповіщень у режимі реального часу, які доставляються через месенджер Telegram
Надає можливість створити команди та налаштовати доступ для кожного учасника, щоб разом керувати спільними сайтами
Для того, щоб переглядати детальну й актуальну інформацію про кожен сайт, вузол і клієнтський пристрій, не потрібна публічна IP-адреса або додаткова конфігурація брандмауера
Можливість оновлення або перезавантаження кількох пристроїв Keenetic одночасно або пакетно за допомогою групових операцій
Зберігає ключові мережеві події, які відбуваються на ваших сайтах, і дії, які виконує ваша команда, у журналі подій
Просту та інтуїтивно зрозумілу функцію глобального пошуку для пошуку усіх ваших підконтрольних сайтів, вузлів та клієнтських пристроїв
Можливість персоналізації інтерфейсу Keenetic RMM, світла або темна теми
Використовуйте Keenetic Account щоб отримати доступ до вебсайту Довідкового центру, хмарного сервісу Keenetic RMM і Мобільного додатку Keenetic.
Примітка
Keenetic RMM знаходиться в стадії активного розвитку і ми маємо великі плани щодо цього. Ми цінуємо зворотний зв’язок користувачів із нашими інженерами технічної підтримки або безпосередньо розробниками, щоб ми могли знаходити помилки та виправляти їх якомога швидше.
У нас є спеціальний розділ Форум спільноти де ви можете залишити свої запитання, відгуки, перші враження про наш продукт, а також обговорити плани розвитку або запропонувати нові функції.
Getting started
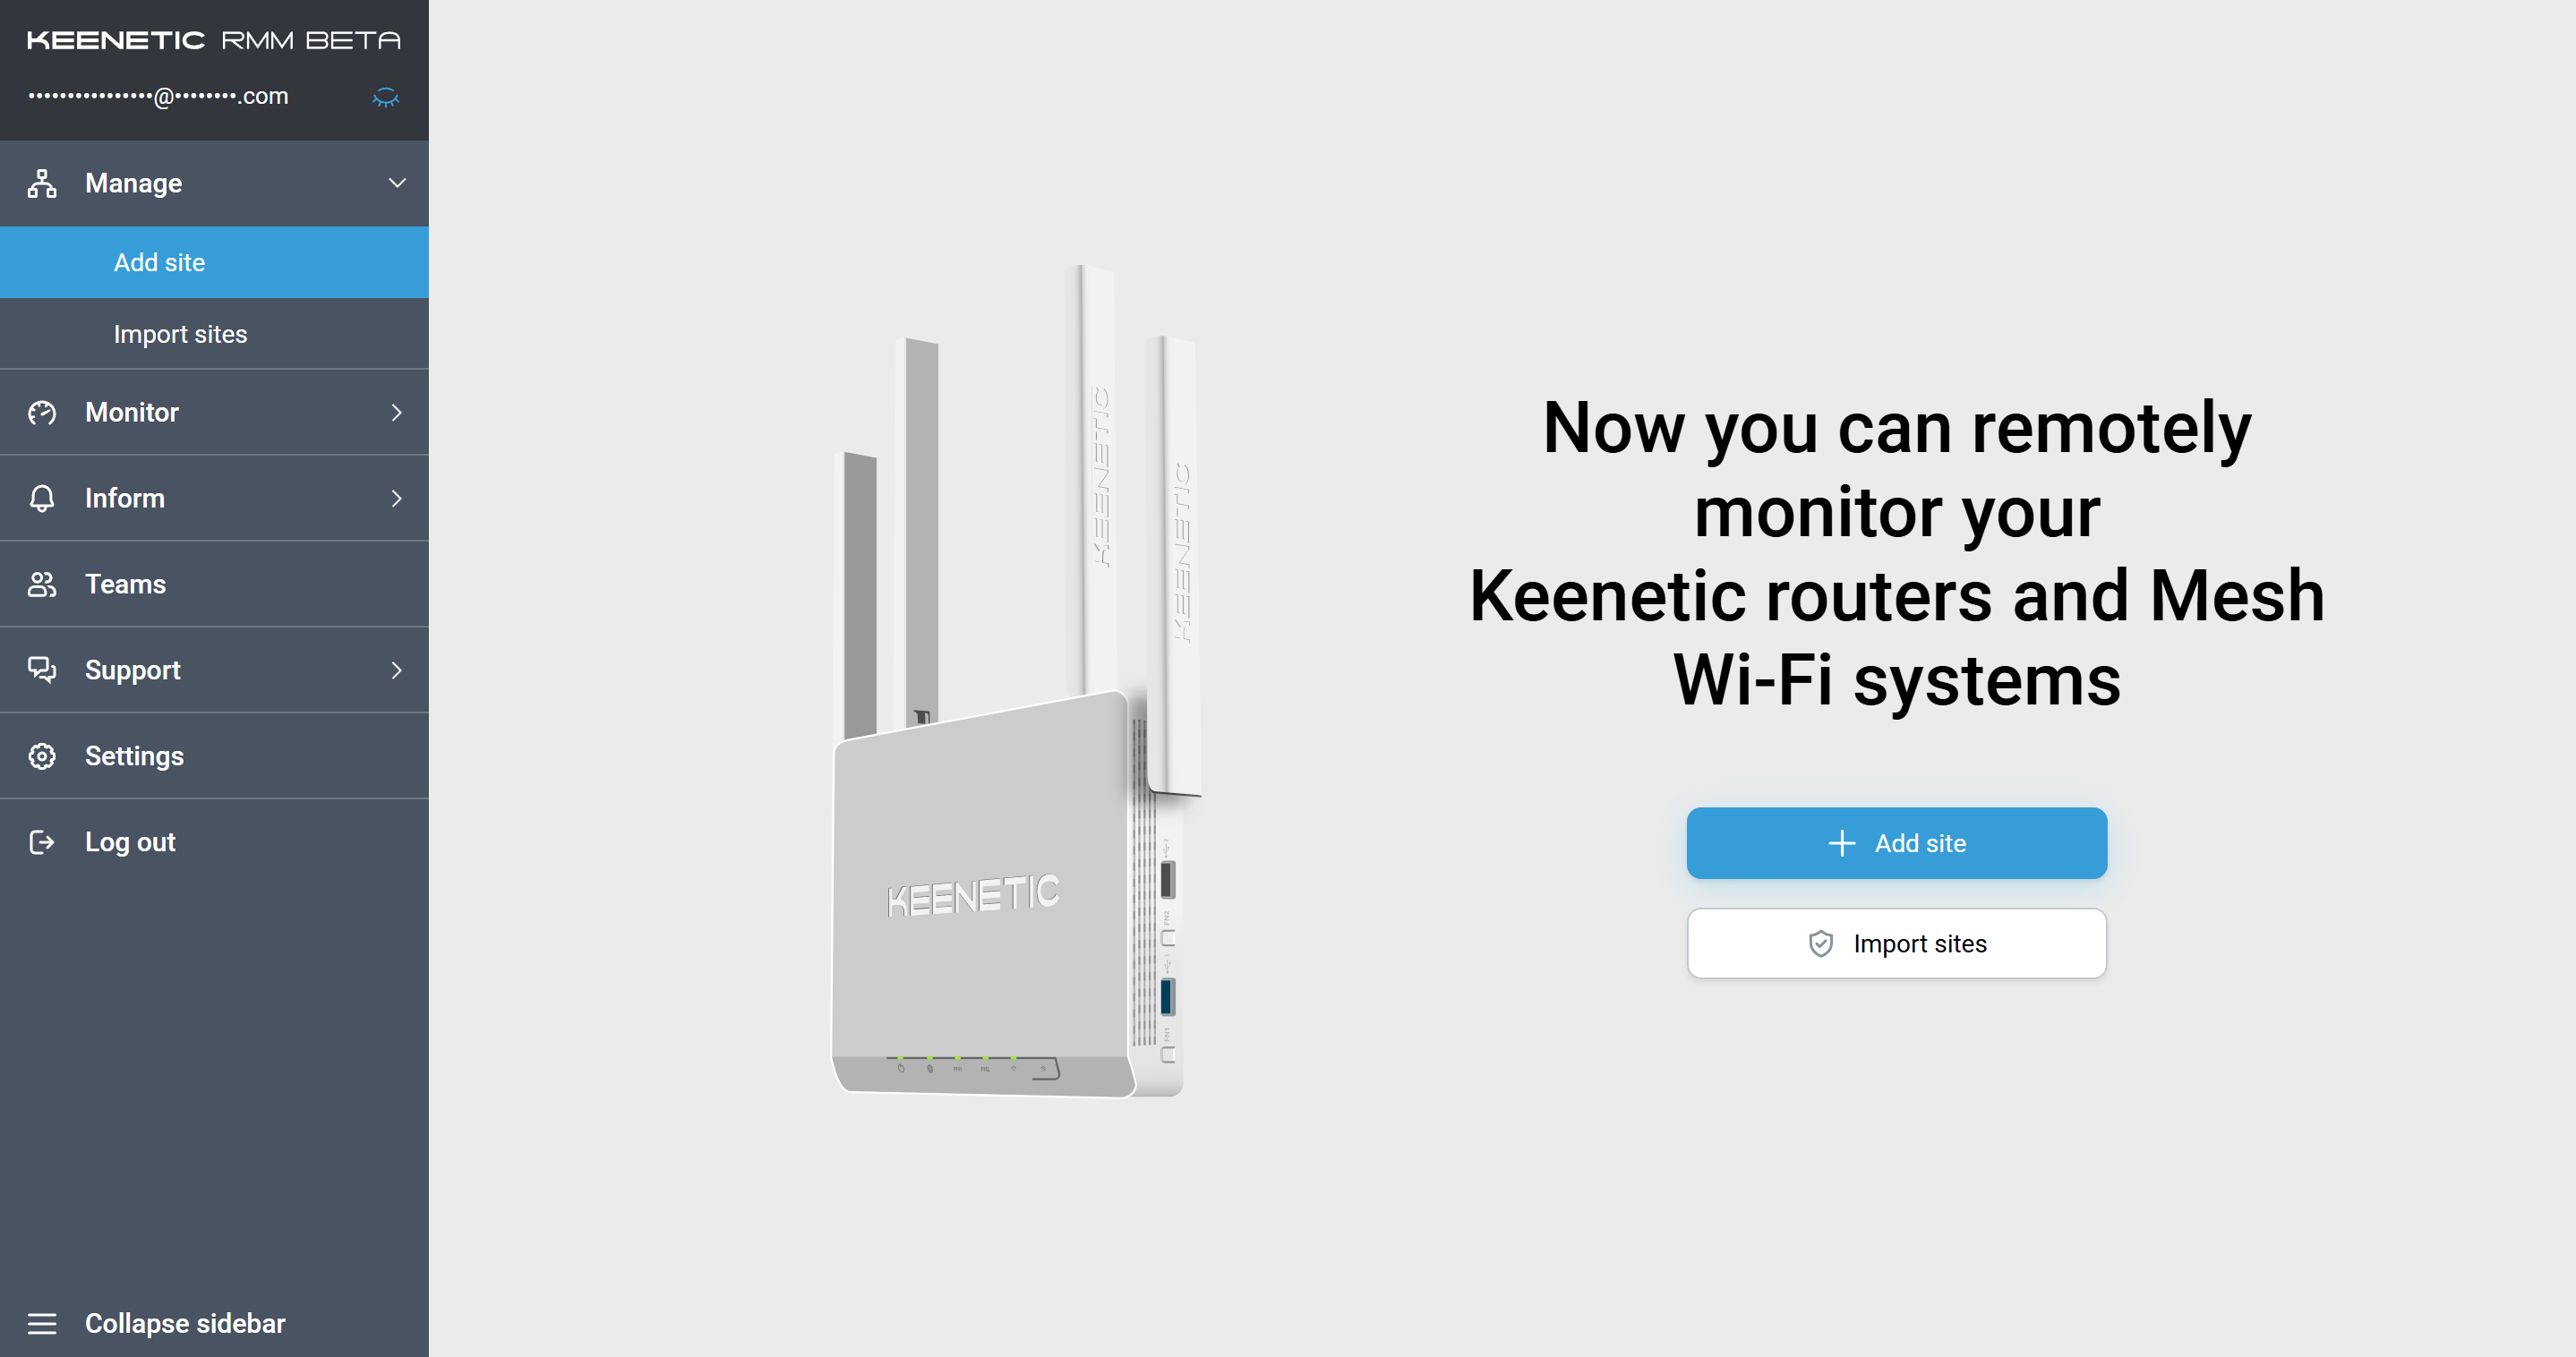
A Site is the main entity in Keenetic Remote Monitoring and Management (RMM) system (https://rmm.keenetic.com/), so adding a new site is necessary to start working with the system.
A Site is Keenetic routers, combined into a Wi-Fi System, creating a seamless network throughout your home or office.
A Site always consists of a Controller, the main Keenetic router. In the case of a Wi-Fi system, it can also include Extenders — Keenetic devices in an additional operating mode. These Extenders are connected to the Controller over Wi-Fi via mesh or wired connection.
After adding a Site to Keenetic RMM, you can access the Nodes and Clients sections.
The term “Nodes” refers to Keenetic routers; both Controllers and Extenders appear in the list.
The term “Clients” refers to client devices connected to routers either via Wi-Fi (smartphone, tablet, laptop, TV, etc.) or wired (PC, NAS, webcams, etc.).
Підказка
Keenetic RMM offers seamless access to the web interface of router when following conditions are met:
Access to the web interface from the Internet is enabled on the router
KeeneticOS version
3.8.2or higher is installed on the routerThe router is powered on and has an “Online” status
SSL certificate is valid
There are currently no update or reboot tasks running on the router
Keenetic RMM also offers features that allow for faster, more convenient, and efficient management and monitoring of sites:
Adding and Importing sites
Dashboard
Site details page
Telegram notifications
OS update and reboot of nodes
Operations with clients
Event Log
Teams
Tags
Автентифікація
Щоб увійти в Keenetic RMM, перейдіть до https://rmm.keenetic.com/.
Потім натисніть «Log in | Sign up”, щоб отримати доступ до Keenetic RMM.
Вхід здійснюється через єдиний сервіс автентифікації користувачів Keenetic Account.
Якщо у вас немає облікового запису Keenetic, зверніться до статті Keenetic Account.
Важливо
Двофакторна автентифікація доступна в Keenetic Account. Активація двофакторної автентифікації не є обов'язковою. Це функція покращення безпеки на додаток до вашого звичайного логіна та пароля.
Якщо ви забули свій пароль, скористайтеся формою відновлення пароля, натиснувши «Забули пароль?”.
Ви можете увійти в свій Keenetic Account кількома способами, виберіть той, який вам найкраще підходить:
Логін і Пароль. Використовуйте свій
e-mailв Keenetic Account у якості логіну.Доступ через створений раніше обліковий запис Google, Facebook або Apple.
Підказка
Якщо у вас є обліковий запис Google, Facebook або Apple, ви можете підключитися до Keenetic Account використовуючи один із цих облікових записів замість реєстрації. У цьому випадку процес реєстрації займе менше часу, і вам не потрібно буде проходити етап підтвердження електронною поштою.
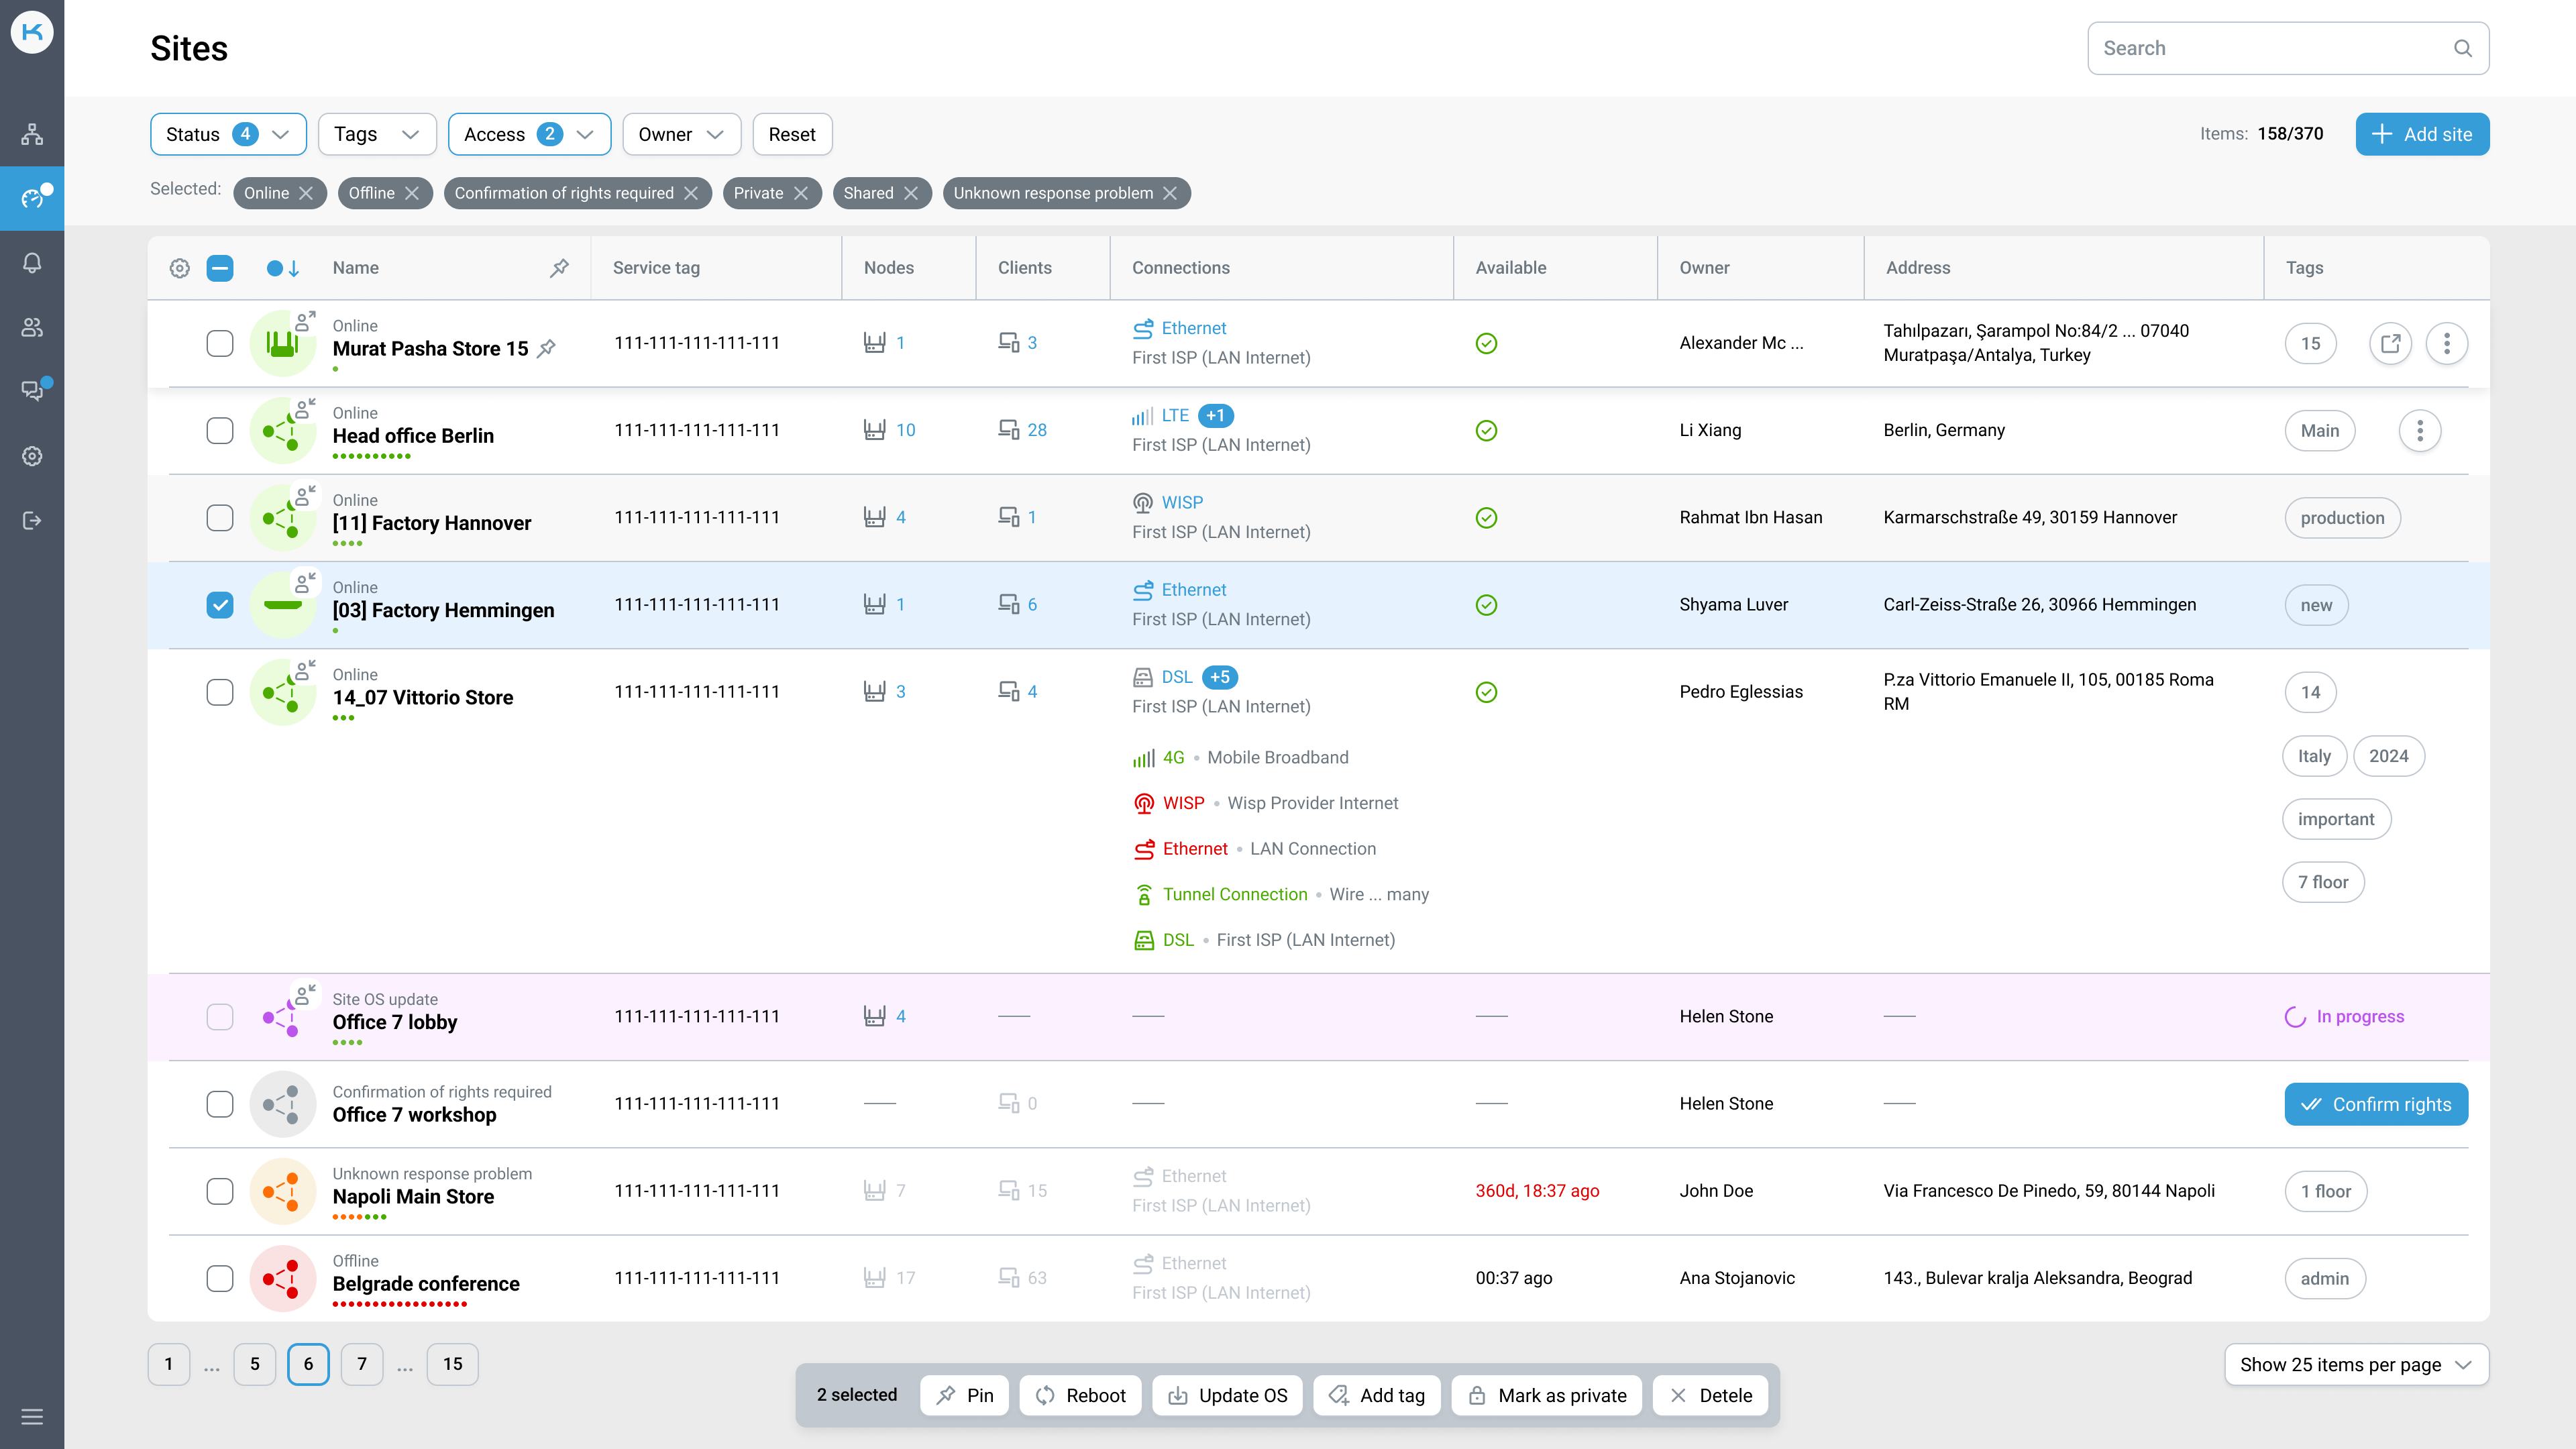
Додавання сайту
Щоб додати сайт, натисніть "Add site” на сторінці Sites або в меню бічної панелі:
Через “Сервісний код», надрукований на етикетці пристрою Keenetic, або ви можете знайти його на сторінці Системний монітор в меню Статус в Вебінтерфейсі пристрою. Це 15-значний ідентифікаційний код XXX-XXX-XXX-XXX-XXX.
Далі введіть логін і пароль для свого пристрою Keenetic.
Ви також можете призначити назву сайту, ввівши його в поле Site name. Якщо поле залишити незаповненим, сайту буде присвоєно назву вашого пристрою Keenetic.
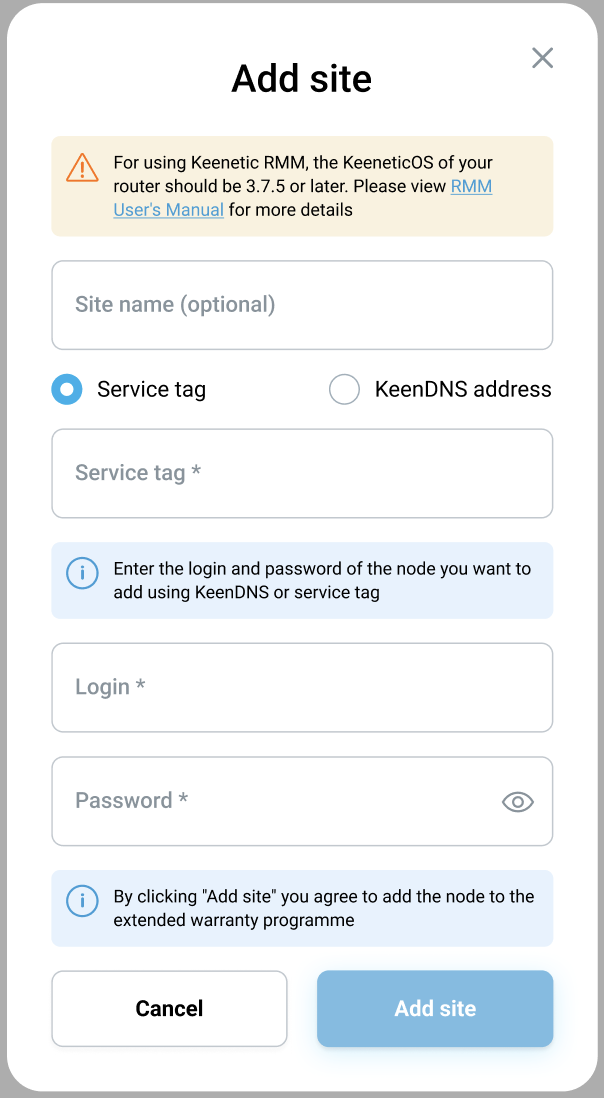
Важливо
Зауважте, що Подовжувачі не зареєстровані в обліковому записі Keenetic раніше, автоматично покриваються гарантійною програмою коли Основний маршрутизатор Mesh Wi-Fi системи імпортується в Keenetic RMM.
Please note that Keenetic Account only includes devices with EU, UA and TR region codes in the warranty program.
Імпорт роутерів
Ви можете імпортувати пристрої зареєстрований в обліковому записі Keenetic у Keenetic RMM. Щоб імпортувати, натисніть "Import routers" на головній сторінці або в бічній панелі меню:
Виберіть пристрої, які потрібно імпортувати в Keenetic RMM:
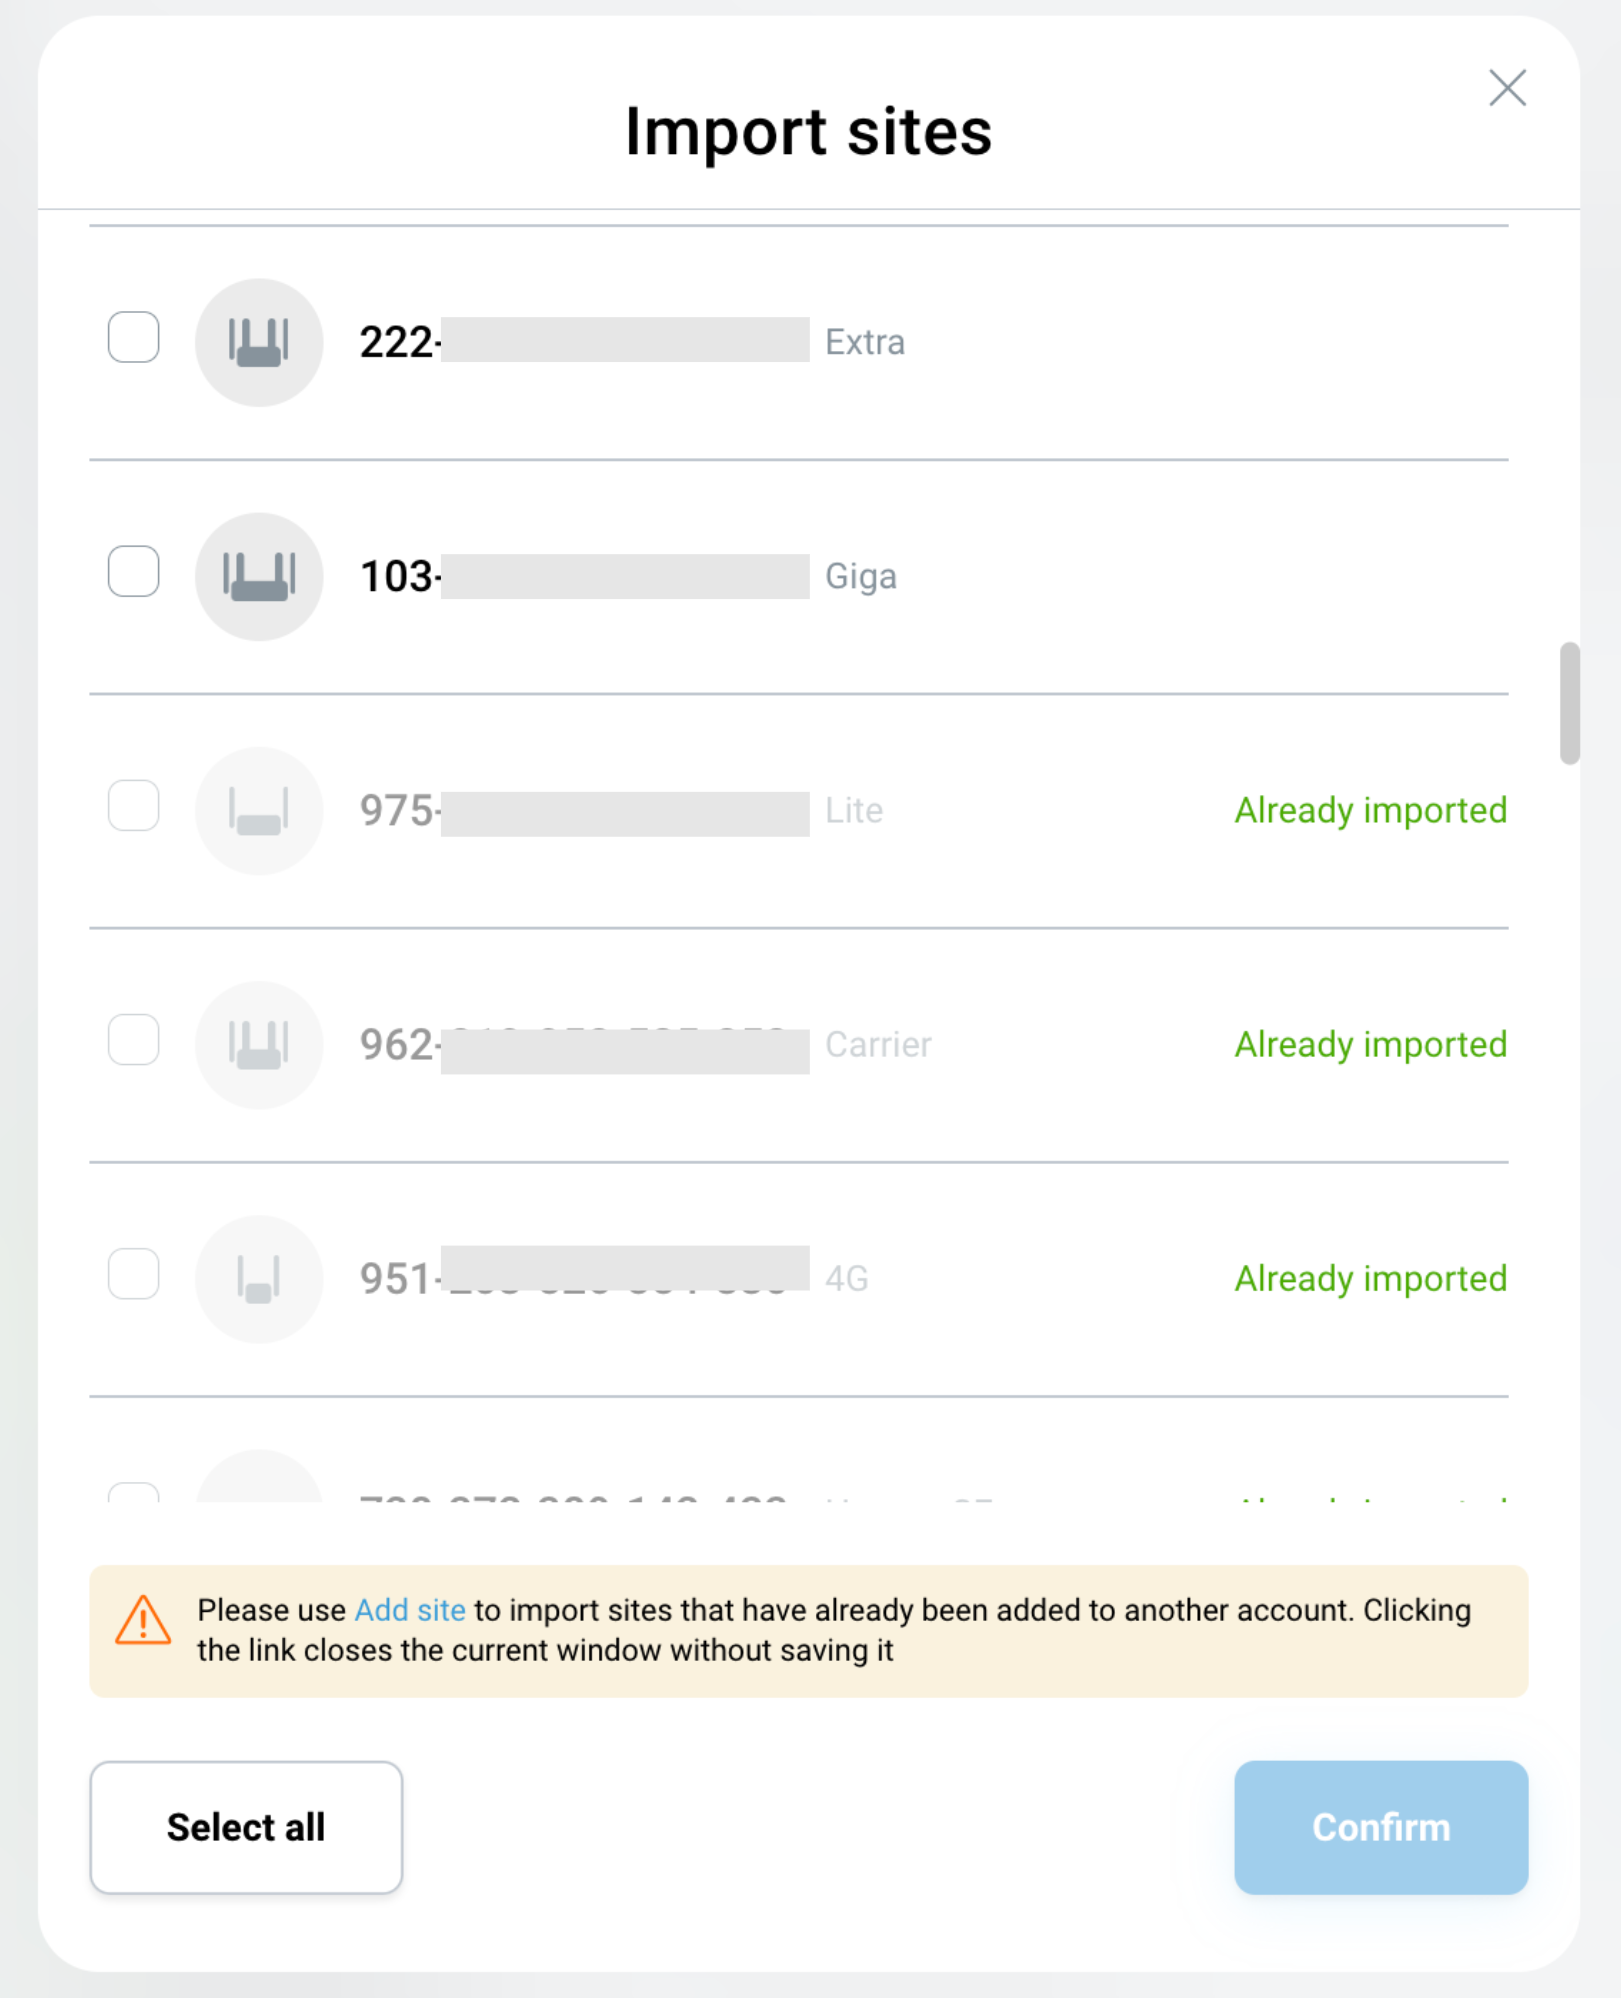
Після вибору натисніть "Confirm". Після завершення імпорту всі імпортовані сайти з'являться на сторінці Sites зі статусом «Confirmation of rights required”.
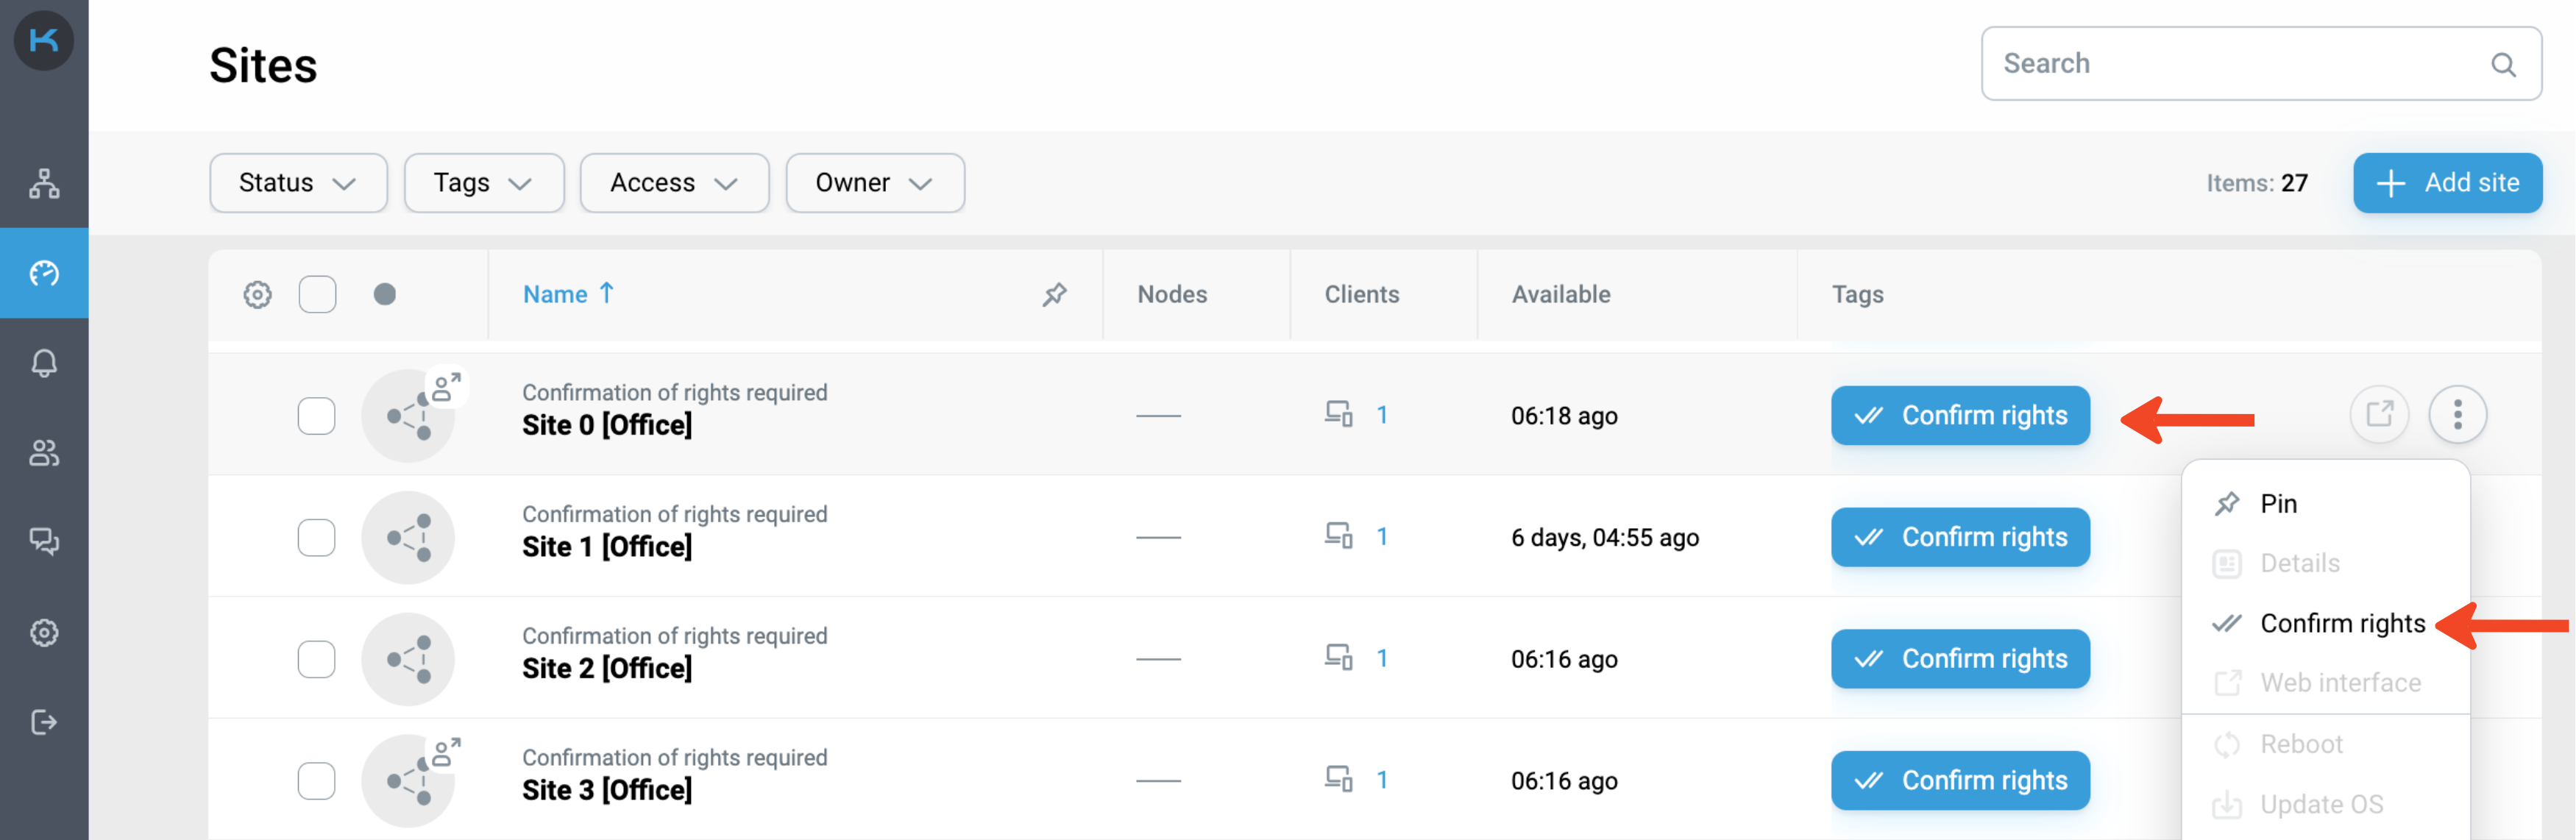
Натисніть кнопку "Confirm rights" в списку сайтів або в контекстному меню і введіть логін і пароль роутера. Цей крок необхідно виконати для кожного імпортованого сайту.
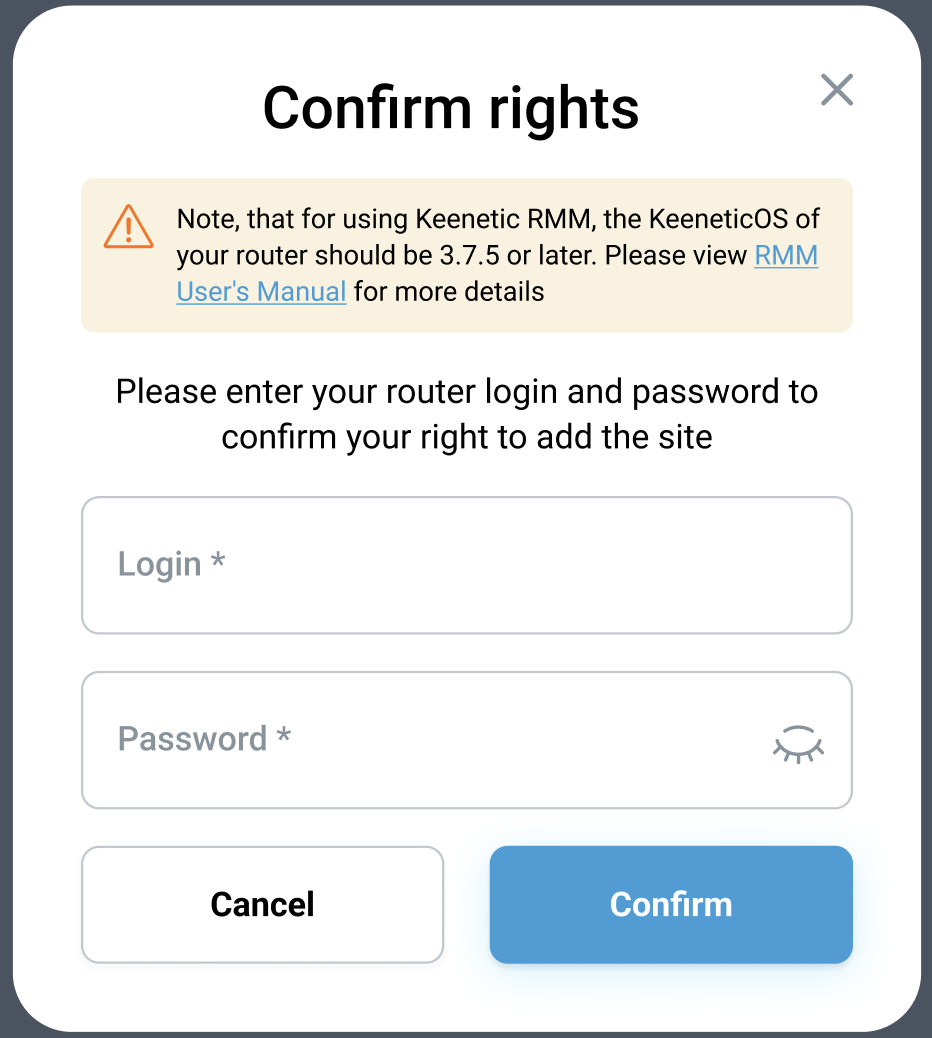
Після введення логіна та пароля натисніть «Confirm. Тепер ви матимете повний доступ до керування та моніторингу сайту.
Важливо
Зауважте, що Подовжувачі не зареєстровані в обліковому записі Keenetic раніше, автоматично покриваються гарантійною програмою коли Основний маршрутизатор Mesh Wi-Fi системи імпортується в Keenetic RMM.
Please note that Keenetic Account only includes devices with EU, UA and TR region codes in the warranty program.
Сторінка подробиць сайту
Щоб дістатися до Site detail page, натисніть на Site name на сторінці Sites або Details у контекстному меню.
На Site detail page ви можете отримати інформацію про різні важливі параметри, такі як:
стан і швидкість підключення до Інтернету,
параметри завантаження ЦП і оперативної пам'яті роутера,
кількість підключених клієнтів,
детальну інформацію про кожне підключення,
графіки споживання трафіку клієнтами та типами підключення,
розподіл підключених клієнтів по сегментах.
Ви також можете "seamlessly" (одним кліком миші) перейти до вебінтерфейсу основного маршрутизатора сайту. Тут ви можете дізнатися, як налаштувати доступ з Інтернету до вебінтерфейсу.
Сторінка подробиць сайту складається з 4 вкладок:
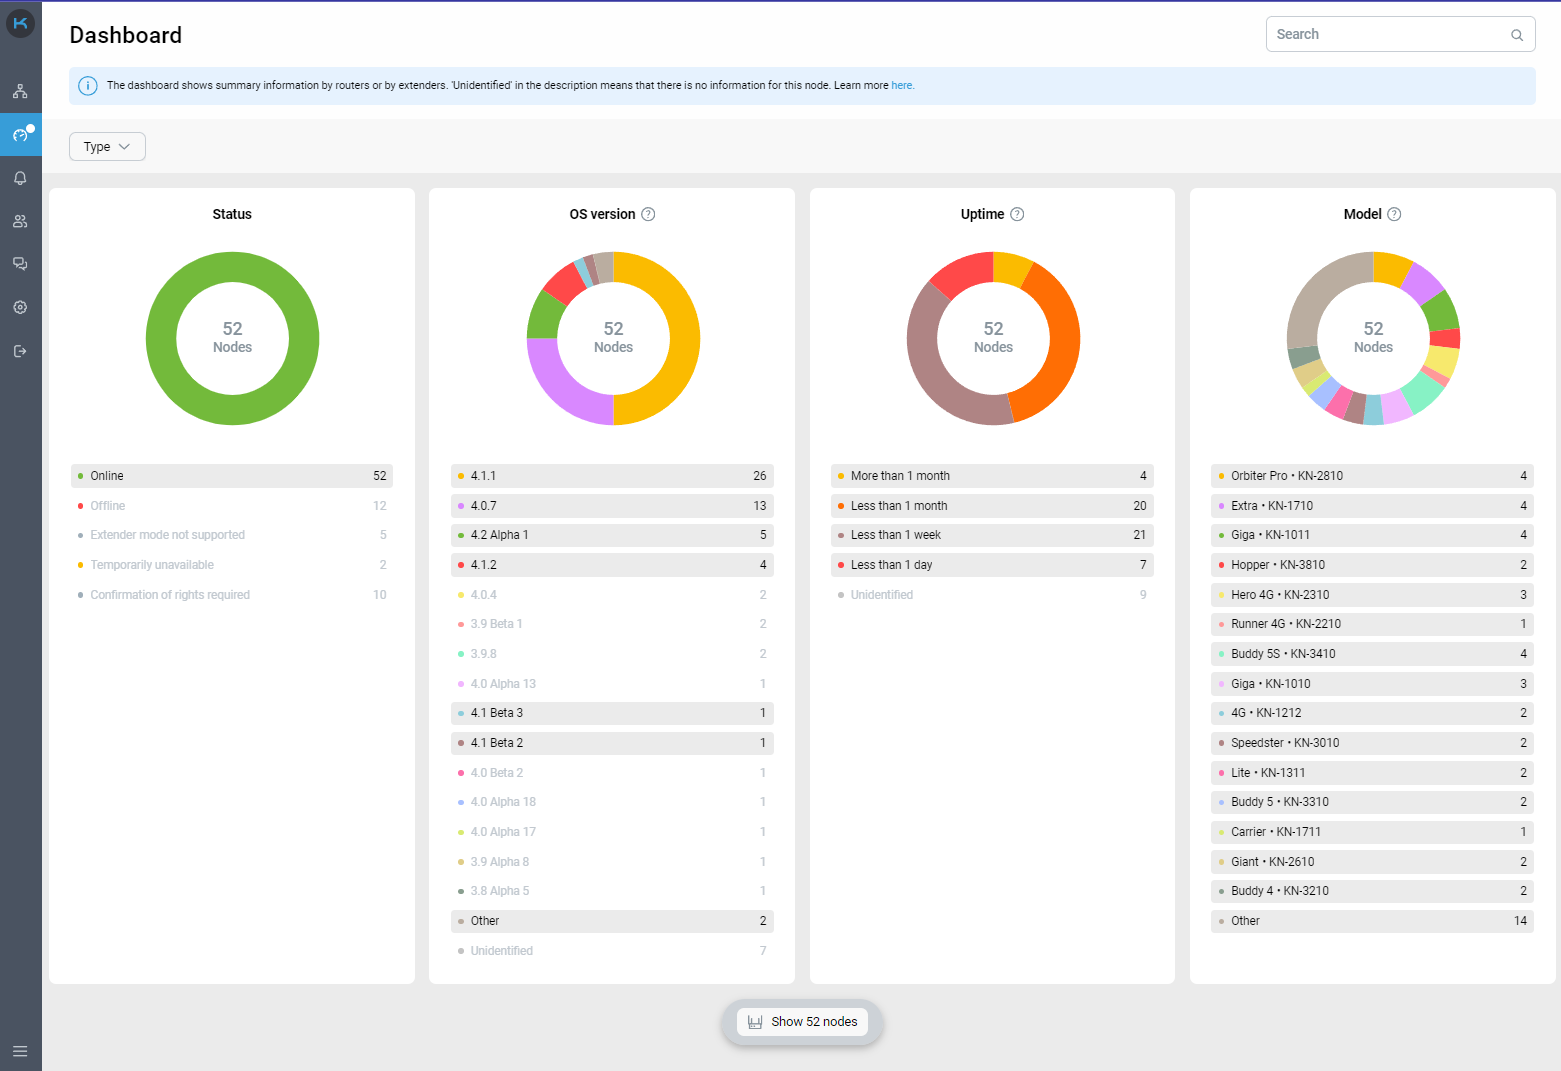
Dashboard
Dashboard — відображає важливу та актуальну інформацію для моніторингу стану сайту. Інформація може мати різний вигляд.
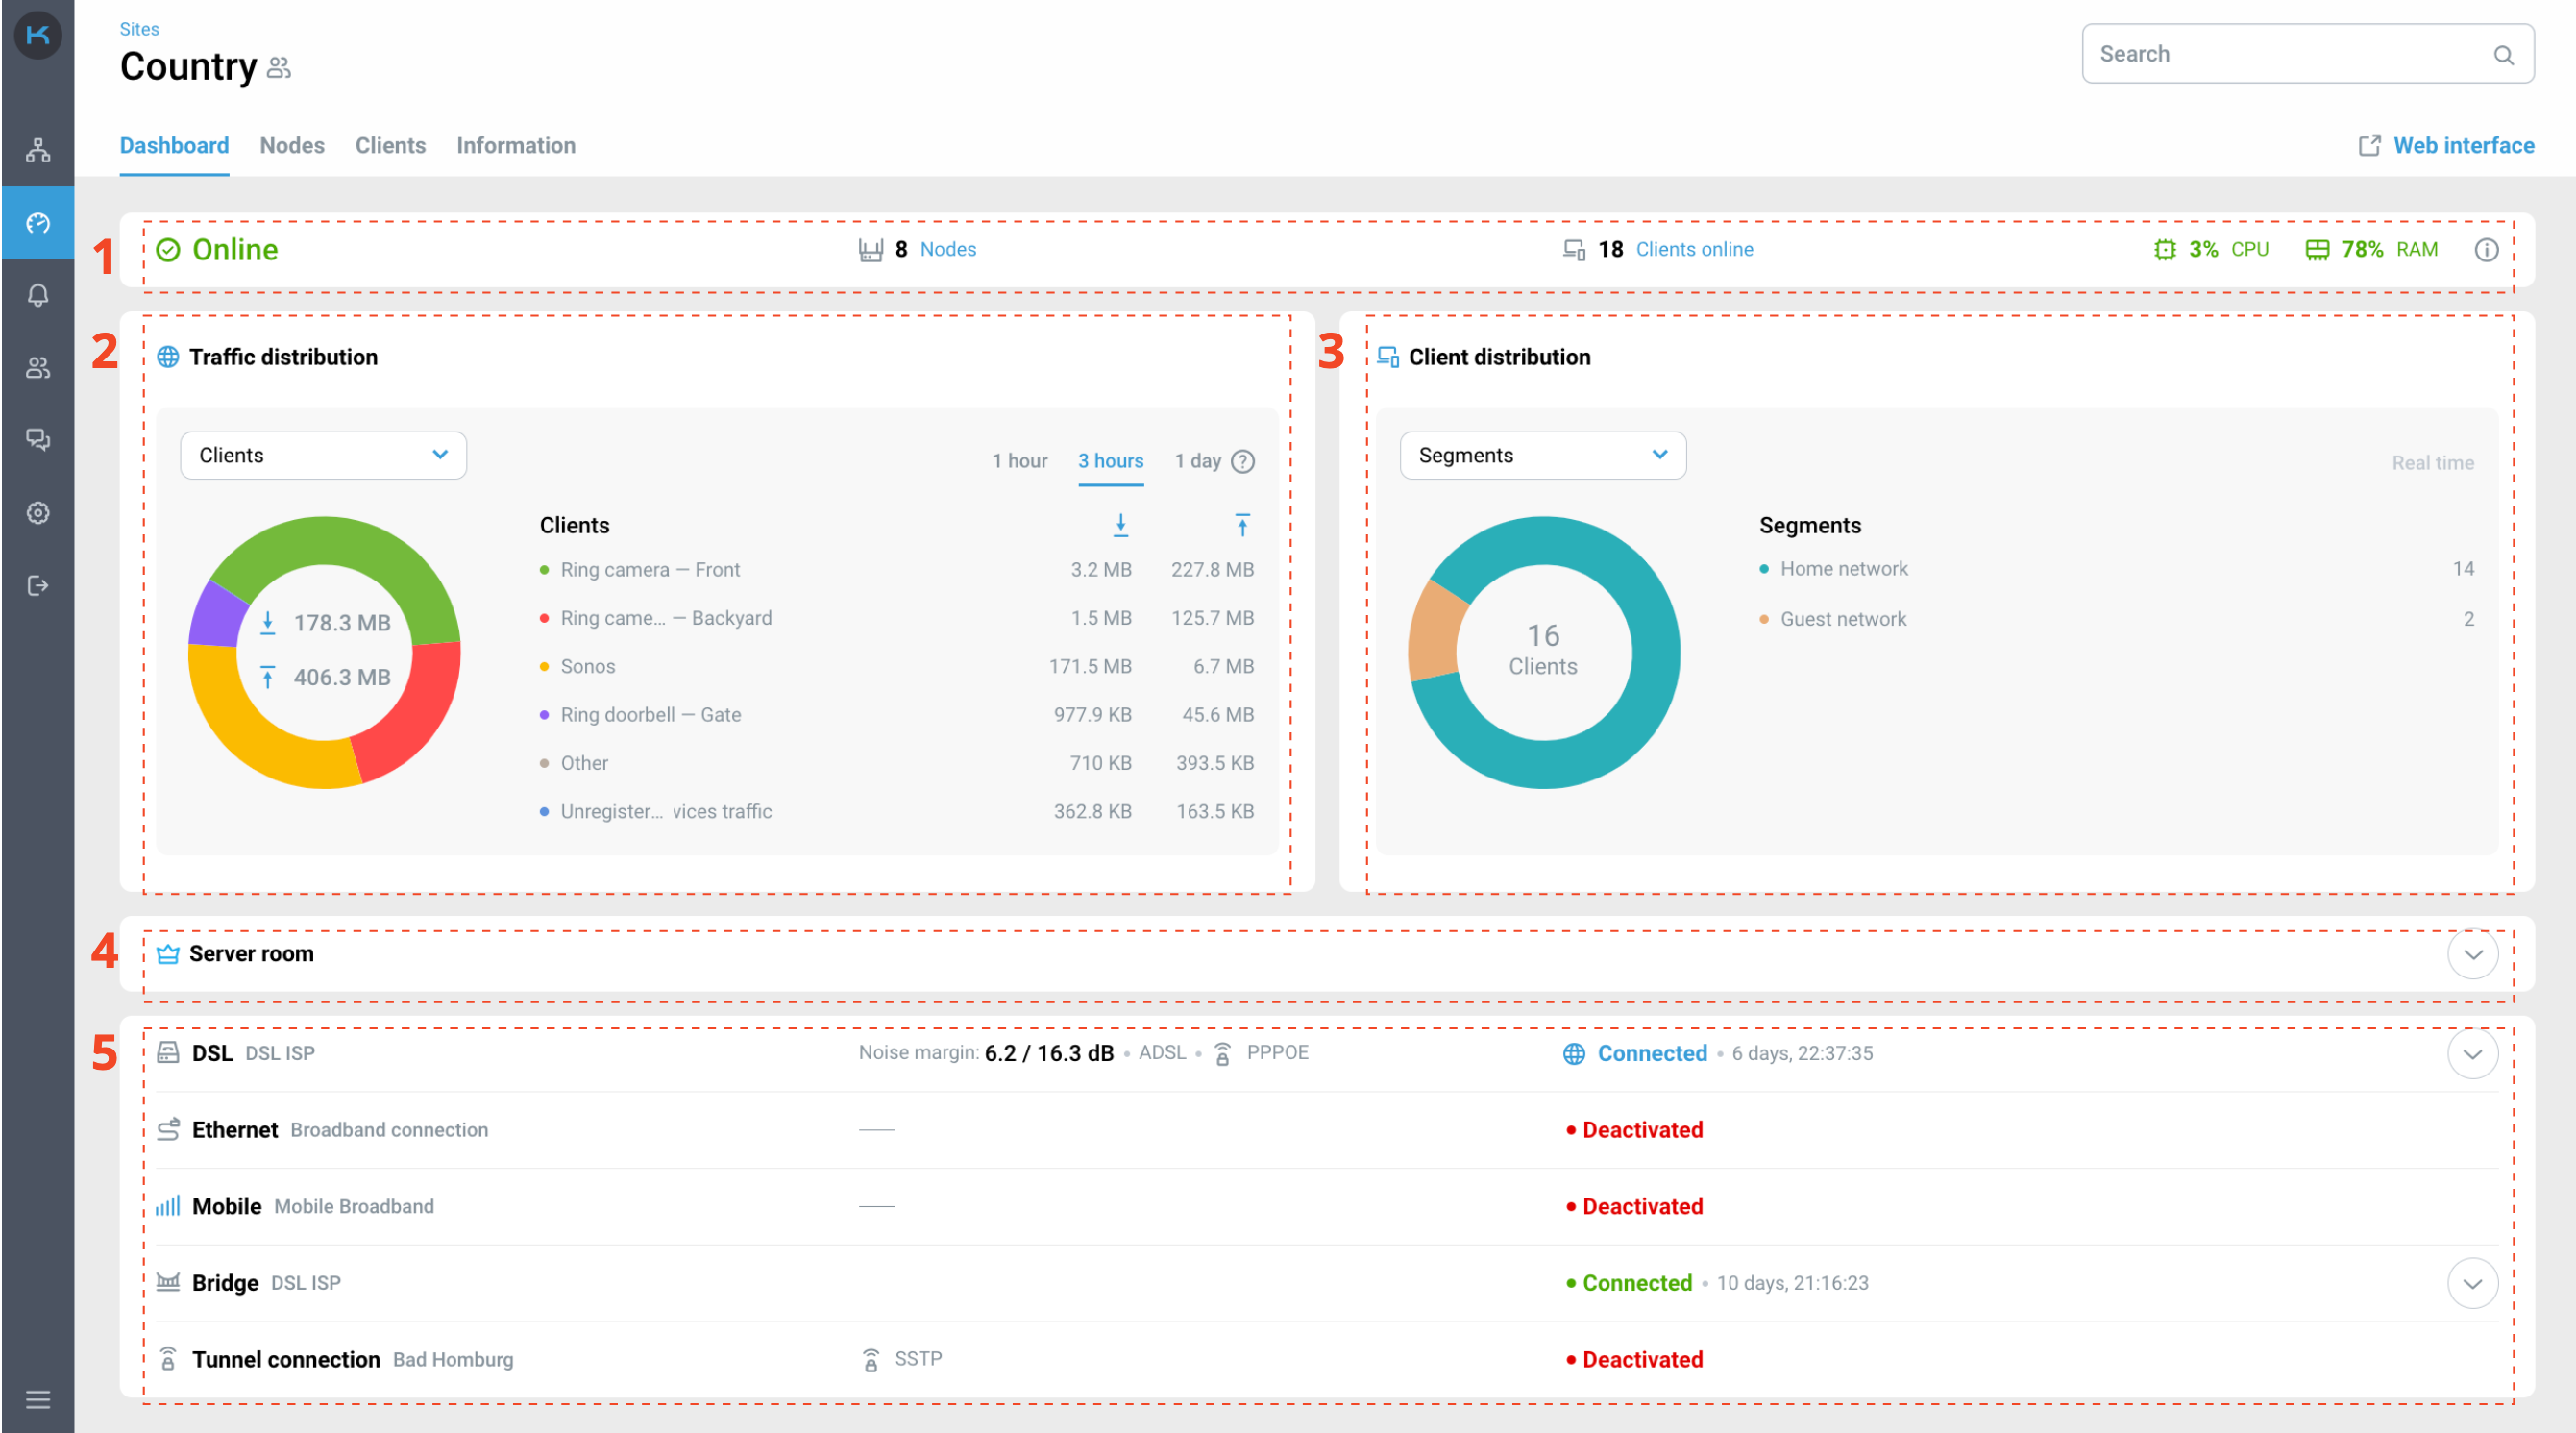
Верхня панель складається зі статусу сайту, кількісті підключених вузлів і клієнтів онлайн, також з параметрів ЦП і ОЗП маршрутизатора, що є миттєвими поточними значеннями. Ви можете прочитати більше про статуси сайту та помилки тут.
Розподіл трафіку за останні
1 hour,3 hours, і1 dayдоступний у 2 видах:Клієнти — розподіл трафіку тільки для зареєстрованих клієнтів. Незареєстровані клієнти відображаються як "Трафік незареєстрованих клієнтів”. Зареєструвати клієнта ви можете через вебінтерфейс Keenetic.
Тип підключення — розподіл трафіку для бездротових і дротових з'єднань.
Важливо
Якщо перезавантаження збігається з недоступністю роутера, дані в інтерфейсі відображаються з моменту, коли роутер стає доступним.
Розподіл по клієнтах в режимі реального часу доступний в 2 режимах перегляду:
Сегменти — розподіл онлайн-клієнтів за сегментами мережі. За замовчуванням, Домашній сегмент активується на всіх пристроях Keenetic. Якщо потрібно створити більше сегментів, ви можете зробити це у вебінтерфейсі Keenetic.
Тип підключення — розповсюдження зареєстрованих онлайн-клієнтів по бездротовому та дротовому з’єднанню.
Значення CPU/RAM будуються на основі даних за останні
1 hour,3 hours, і1 dayдля основного маршрутизатора сайту. На графіку показано максимальні значення за певний період часу.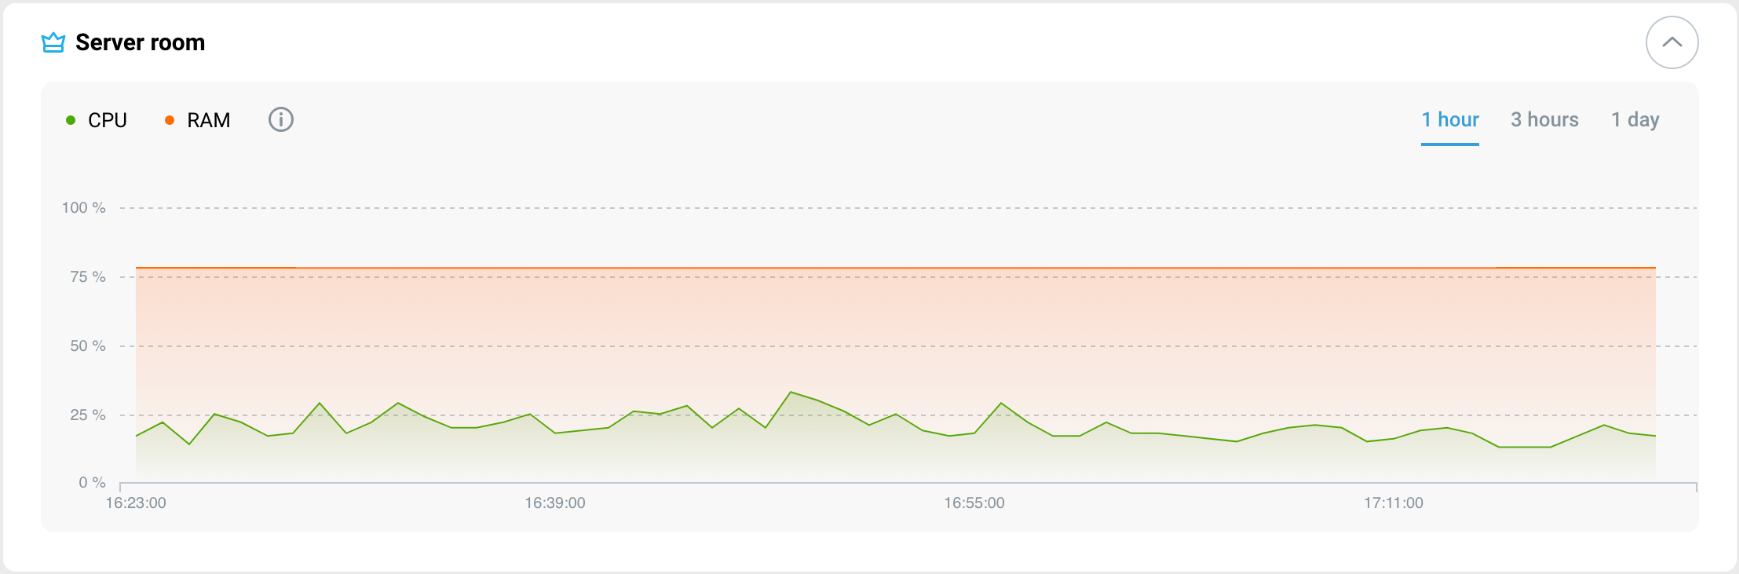
Підключення — цей блок показує всі доступні підключення вашого маршрутизатора та параметри підключення. Якщо ваш роутер має більше 1 підключення (наприклад, резервний канал через 4G модем), це підключення також відображається в цьому блоці. Графік швидкості для активного підключення до Інтернету базується на останніх
1 hour,3 hours, і1 day. Ви можете прочитати докладніше про те, як підключитися до Інтернету тут.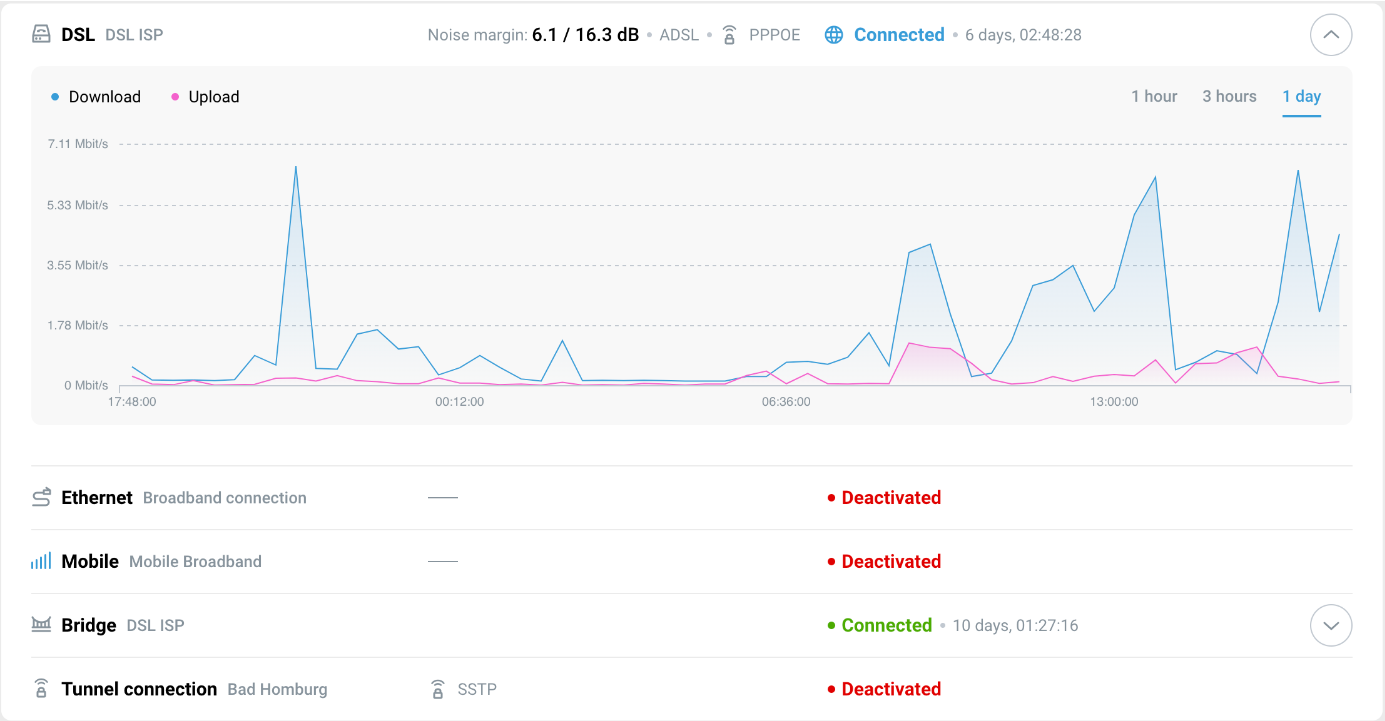
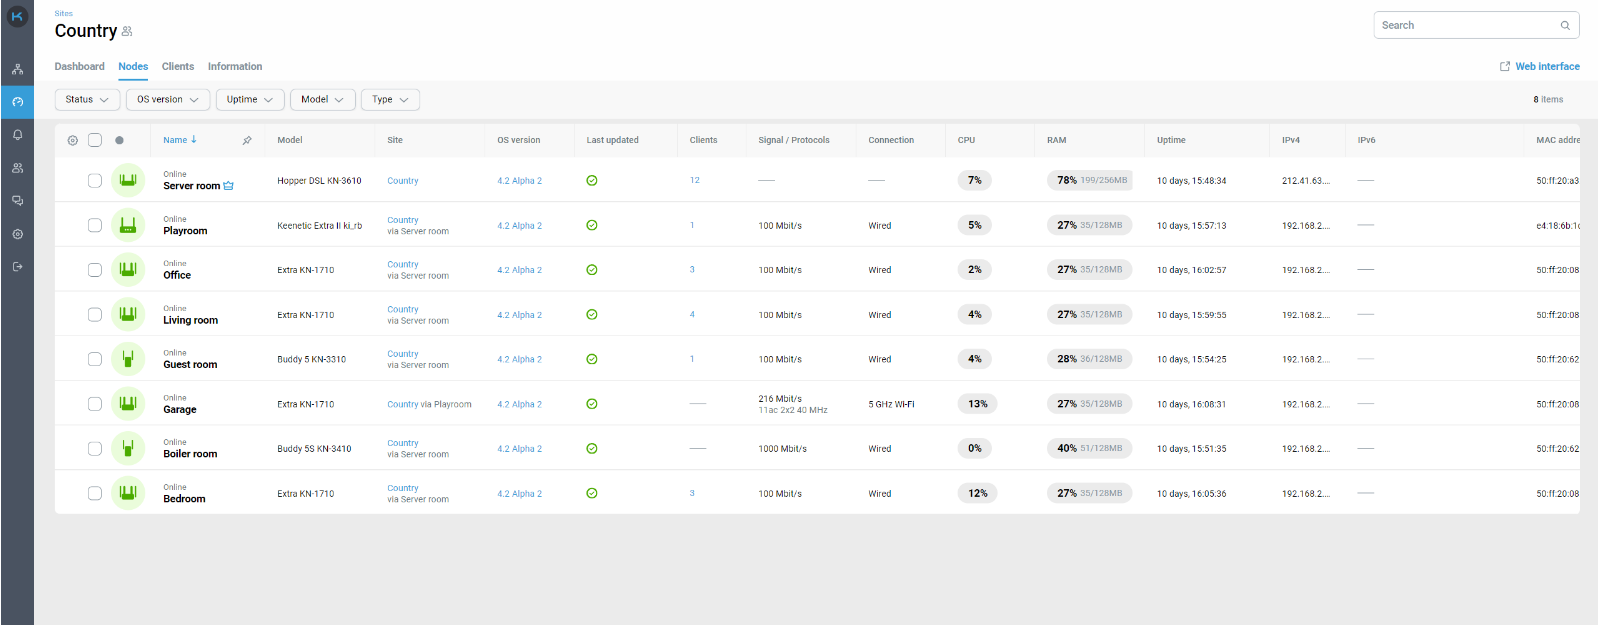
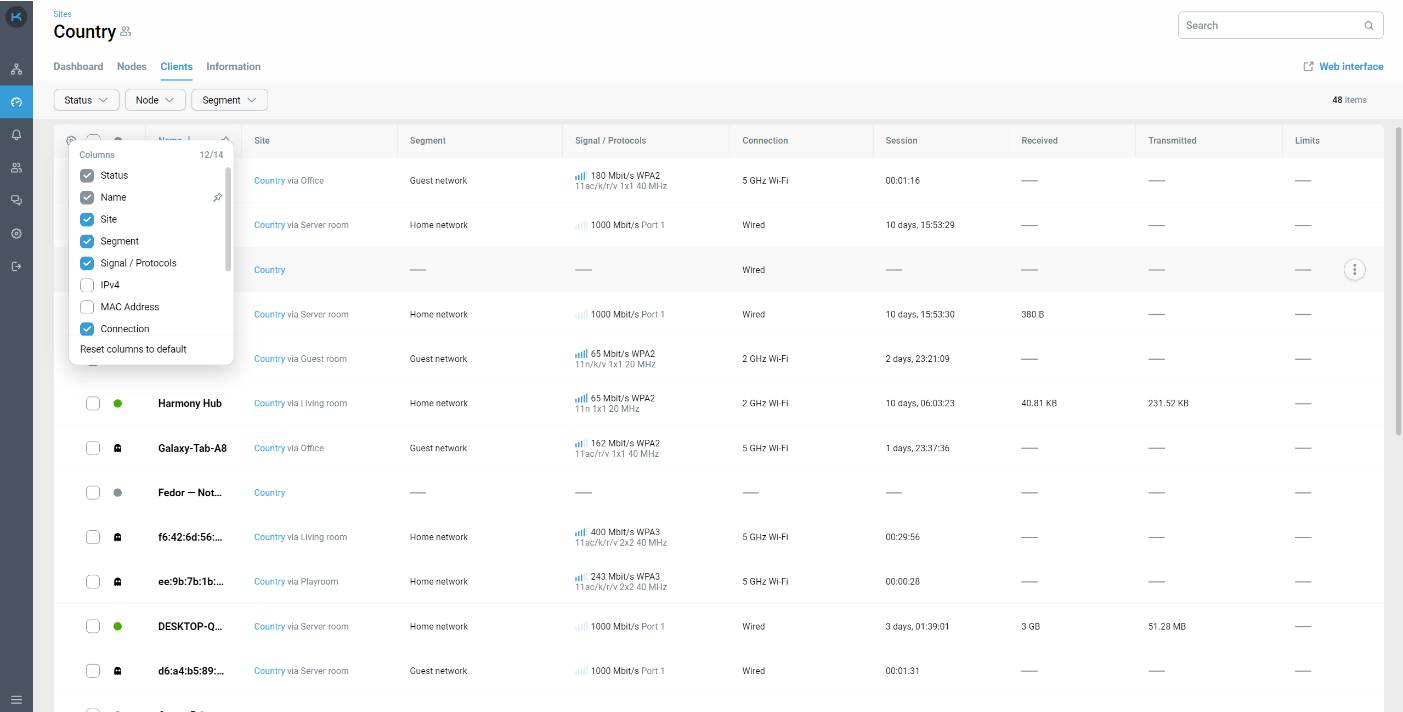
Nodes
У вкладці Nodes dи можете побачити всі пристрої Keenetic, включені на ваш сайт, — їхні статуси, моделі, клієнтів, підключених до кожного вузла, і технічні параметри. Ви також можете налаштувати відображення стовпців, а також сортувати та фільтрувати дані в таблиці «Nodes».
Clients
У вкладці Clients ви можете побачити всі зареєстровані та незареєстровані клієнтські пристрої, підключені до вашого сайту, та їх технічні параметри. Ви також можете налаштувати відображення стовпців, а також сортувати та фільтрувати дані в таблиці Clients.
Information
Вкладка Information зберігає деталі для швидкого зв’язку з відповідальним за сайт контактом.
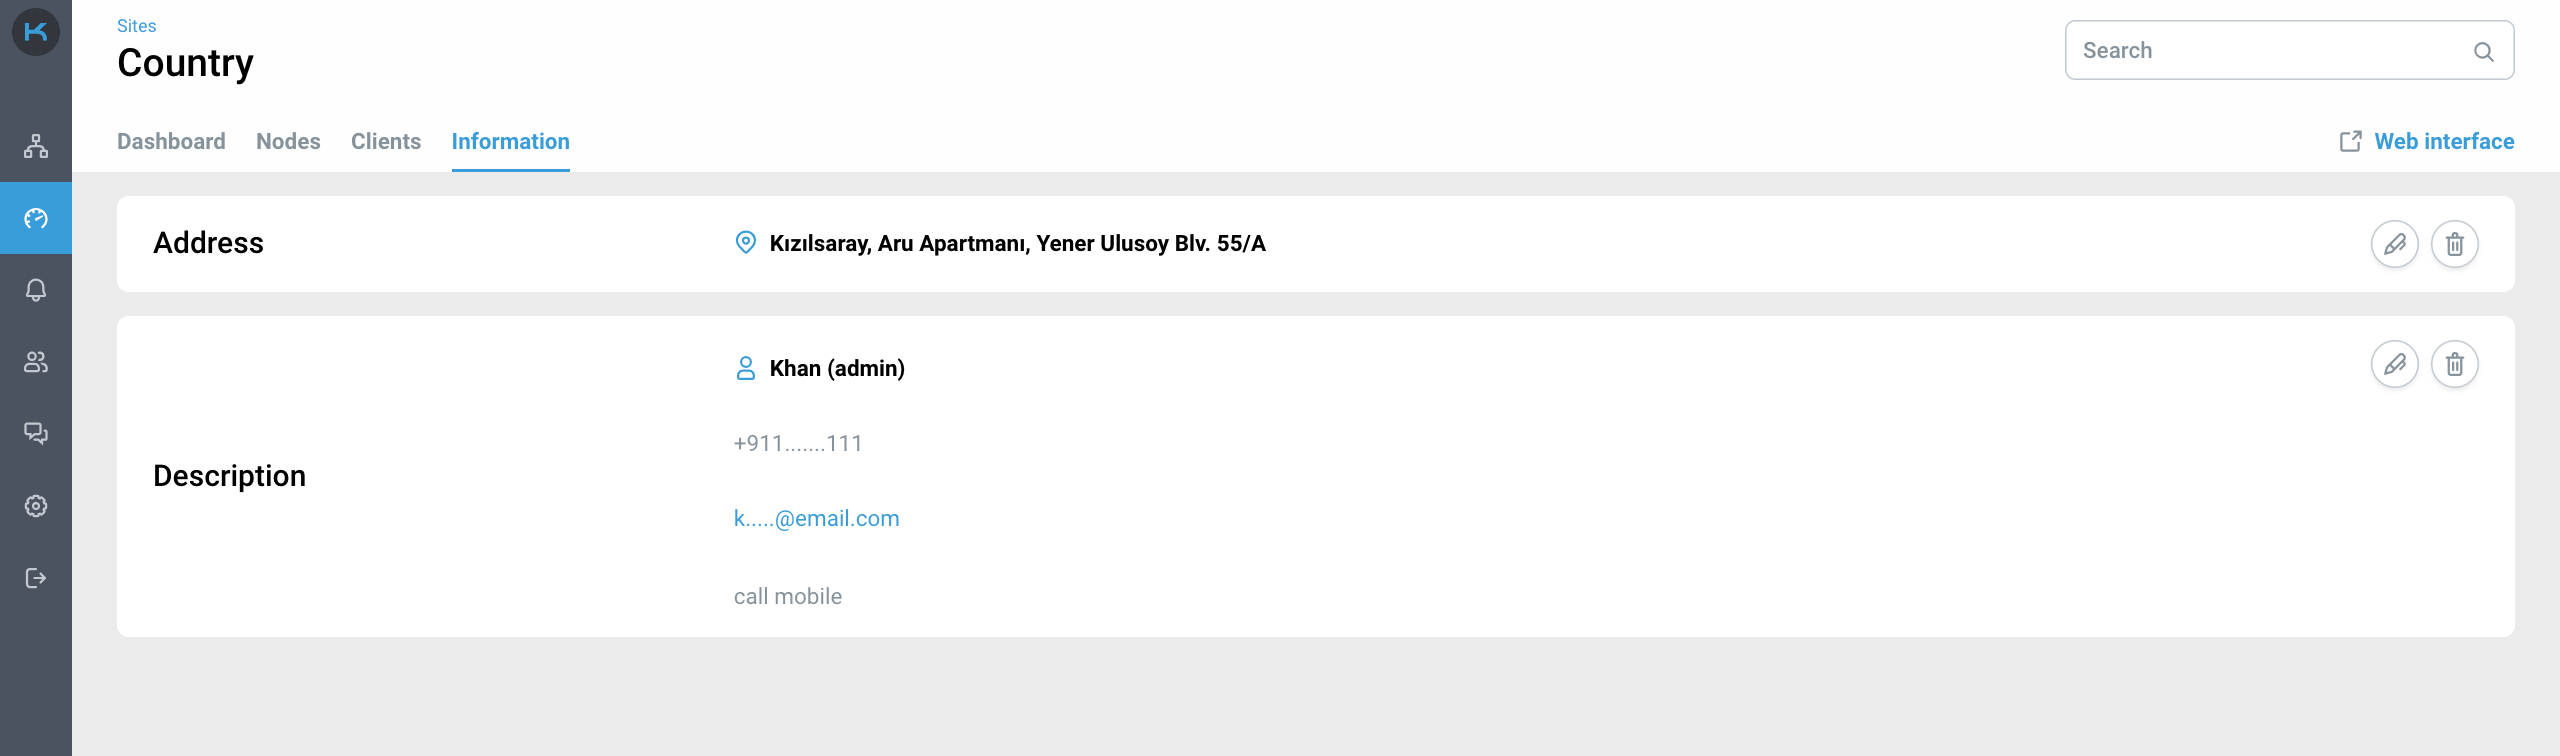
The Teams information block displays the teams that have been granted access to the site. Next are blocks that can be filled in with additional information:
Address — наприклад адреса розташування роутера.
Description — тут ви можете додати будь яку корисну інформацію для зв'язку, таку як: ім'я, номер контактного телефону, e-mail, та необхідні коментарі для цього контакту.
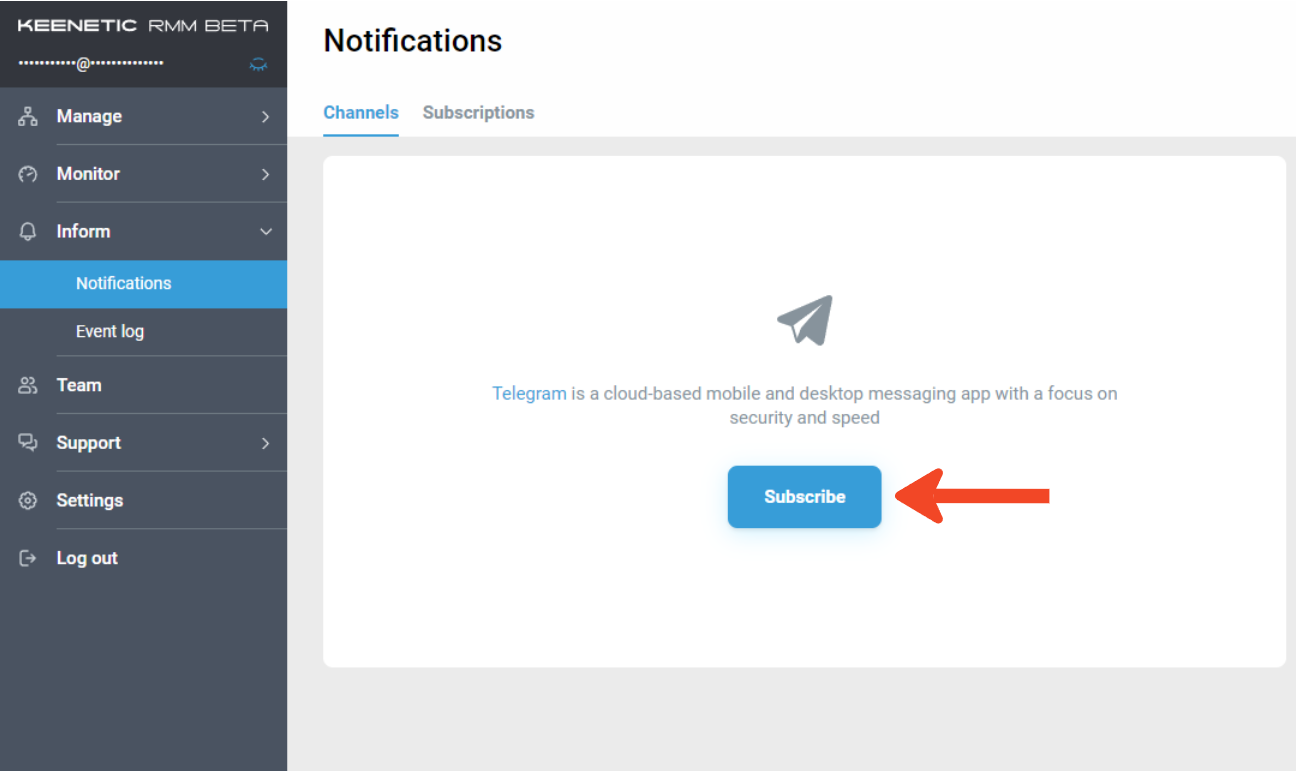
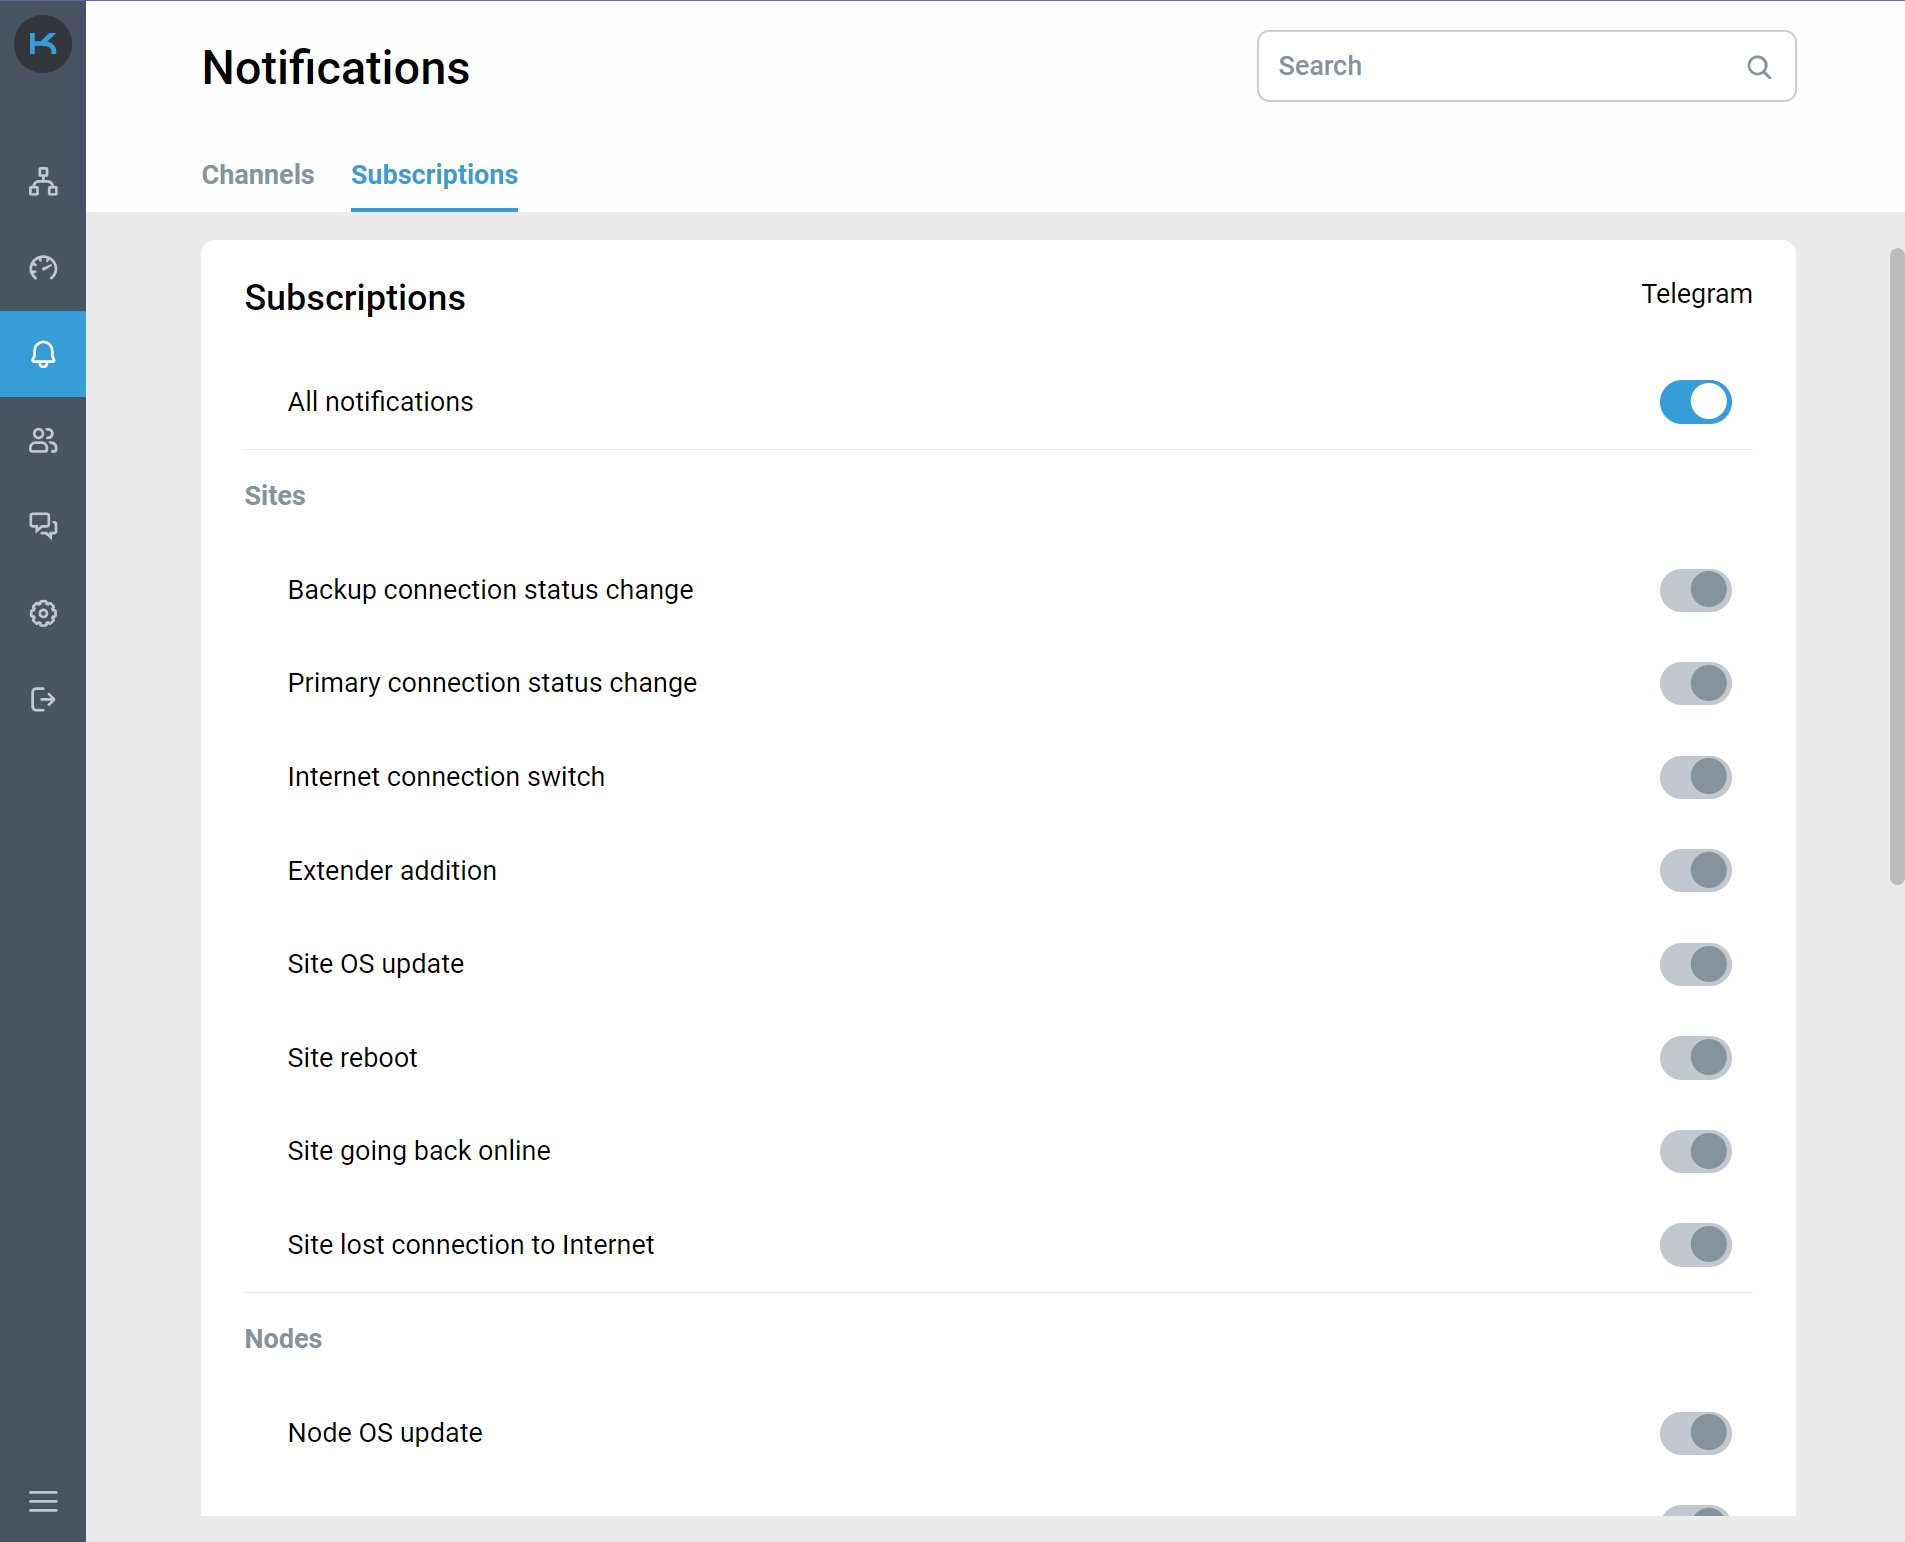
Сповіщення в Telegram
Keenetic RMM дозволяє абонентам підписуватися на сповіщення в режимі реального часу про важливі події на сайті. Повідомлення надсилаються через безпечний і надійний месенджер Telegram. Для використання цієї функції вам потрібен зареєстрований обліковий запис а Телеграм.
Щоб підписатися на сповіщення, перейдіть в «Notifications» в меню бічної панелі та натисніть «Subscribe”.
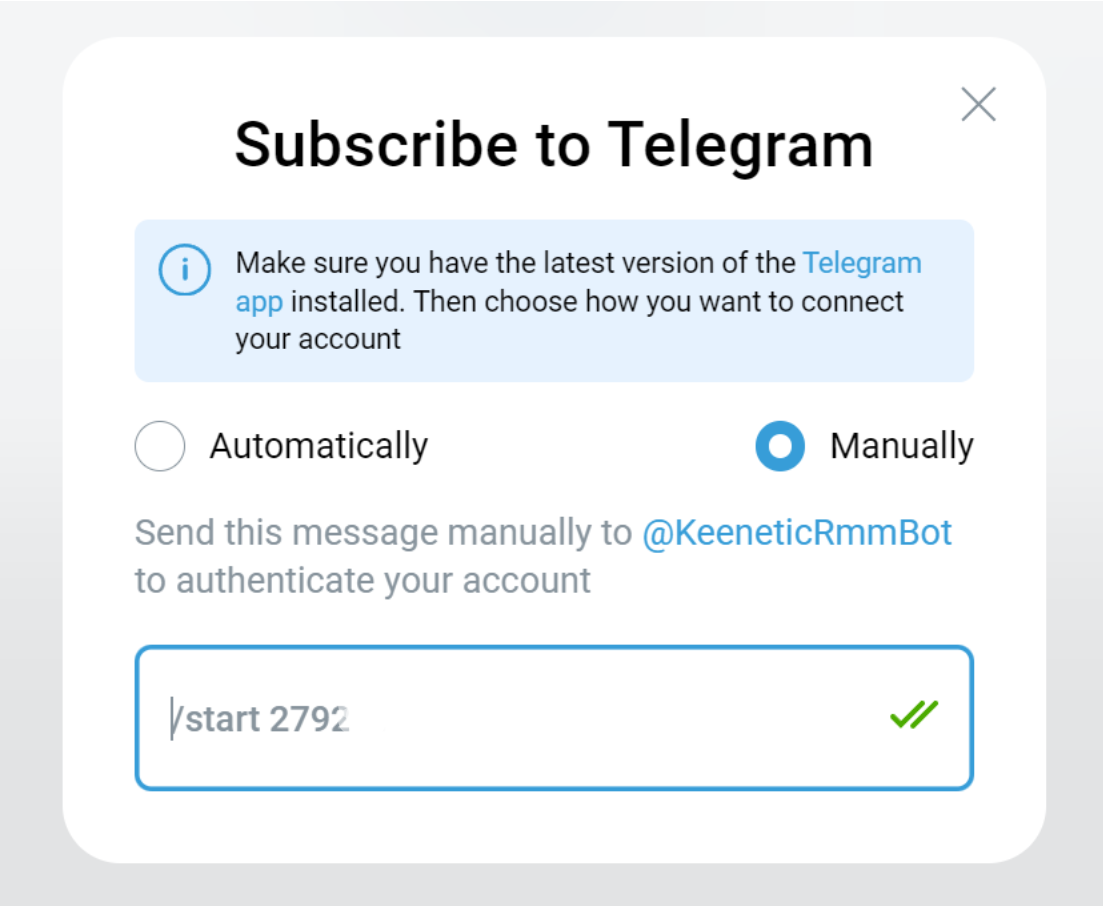
Якщо у вас встановлена вебверсія Telegram, виберіть "Автоматично".
Якщо у вас встановлена мобільна версія Telegram, виберіть «Вручну".
Щоб налаштувати сповіщення, перейдіть до «Підписки» та увімкніть важливі для вас події.
Підказка
Усі сповіщення — увімкніть цей перемикач, щоб отримувати всі доступні сповіщення
Зміна статусу резервного підключення — статус резервного підключення на сайті змінюється на Online/Offline
Зміна статусу основного підключення — статус основного підключення на сайті змінюється на Online/Offline
Підключення до Інтернету перемикнулось — основне підключення на сайті перемикається на резервне підключення або навпаки
Додано ретранслятор — ретранслятор доданий до сайту
Оновлення ОС сайту — KeeneticOS сайту оновлюється успішно або з помилкою
Перезавантаження сайту — сайт перезавантажується успішно або з помилкою
Сайт знову в мережі — статус сайту змінюється на Online
Сайт втратив з'єднання з Інтернетом — статус сайту змінюється на Offline або УВАГА
Оновлення ОС вузла — KeeneticOS вузла оновлюється успішно або з помилкою
Перезавантаження вузла — вузол перезавантажується успішно або з помилкою
Вузол повернувся в режим онлайн — статус вузла змінюється на «Онлайн».
Вузол втратив з'єднання з Інтернетом — статус вузла змінюється на Offline або УВАГА
Отримано SMS — роутер отримав SMS
Зміна реєстрації клієнта — клієнт стає зареєстрованим або незареєстрованим
Підключення незареєстрованого клієнта — незареєстрований клієнт підключився до сайту
Підключення зареєстрованого клієнта — зареєстрований клієнт підключився до сайту
Відключення незареєстрованого клієнта — незареєстрований клієнт відключився від сайту
Відключення зареєстрованого клієнта — зареєстрований клієнт відключився від сайту
Перейменування клієнта — змінено назву клієнта
Поповнення команди — учасник команди приймає запрошення до команди
Статуси сайтів і вузлів
Keenetic RMM надає кілька статусів для сайтів і вузлів, щоб відстежувати їх стан і швидко реагувати на зміни.
Статуси відображаються на сторінках Sites і Nodes і, з розширеним описом, на Site detail page.
| Опис | Колір |
|---|---|---|
Online | Сайт/вузол доступний. Зауважте, що дані періодично оновлюються. | Зелений |
Offline | Сайт/вузол недоступний. | Червоний |
Loading | Дані сайту завантажуються. Зачекайте, це може зайняти деякий час. Зауважте, що це початковий стан маршрутизатора до встановлення з’єднання. | Блакитний |
Confirmation of rights required | Потрібне підтвердження прав доступу. Натисніть "Confirm rights“ і введіть логін і пароль вузла. Доки права не підтверджені, дані вузла не оновлюються в Keenetic RMM. | Сірий |
Extender mode not supported | Ретранслятор, доданий як сайт, не підтримується в Keenetic RMM. Будь ласка, використовуйте вузол в режимі маршрутизатора при додаванні до сайту. | Сірий |
Pending activation | Очікування активації заблокованого маршрутизатора. | Синій |
Unknown network error | Будь ласка, зв'яжіться з нашою Підтримка. | Жовтий |
Unknown response error | Будь ласка, зв'яжіться з нашою Підтримка. | Жовтий |
Access denied | Скиньте вузол до заводських налаштувань або видаліть вузол і додайте його знову. | Жовтий |
SSL connection failed | Не вдалося встановити безпечне з’єднання з вузлом. Будь ласка, зв'яжіться з нашою Підтримка. | Жовтий |
Timeout error | Не вдалося підключитися до вузла протягом встановленого інтервалу часу. Перевірте якість підключення до Інтернету та повторіть спробу. | Жовтий |
KeeneticOS version not supported | Будь ласка, оновіть KeeneticOS до останньої версії. | Жовтий |
Cloud component not installed | Компоненти Хмарне дистанційне керування та KeenDNS не встановлені на вузлі. встановіть компонент і оновіть KeeneticOS до останньої версії. | Жовтий |
Temporarily unavailable | Зачекайте деякий час або перезавантажте вузол. Якщо після цього статус не зміниться, зверніться до нас Підтримка. | Жовтий |
Connection failure | Нестабільне з'єднання між ретранслятором і роутером. Перевірте якість з'єднання та повторіть спробу. | Жовтий |
Tunnel connection failed | Failed to establish a tunnel connection to the node. Please contact your Internet service provider | Yellow |
Reboot | Перезавантаження сайту/вузла виконано з інтерфейсу Keenetic RMM. Будь ласка, зачекайте трохи. | Фіолетовий |
OS update | Оновлення KeeneticOS розпочато з інтерфейсу Keenetic RMM. Будь ласка, зачекайте трохи. | Фіолетовий |
Важливо
Якщо у вас проблеми з маршрутизатором або підключенням до Інтернету, ви можете надіслати self-test файл до нашої Підтримки для діагностики.
Оновлення KeeneticOS і перезавантаження сайтів і вузлів
Keenetic RMM дозволяє оновити KeeneticOS до останньої доступної версії з попередньо вибраного каналу. Ви можете дізнатися, як налаштувати канал оновлення тут.
Оновлення KeeneticOS для вузлів
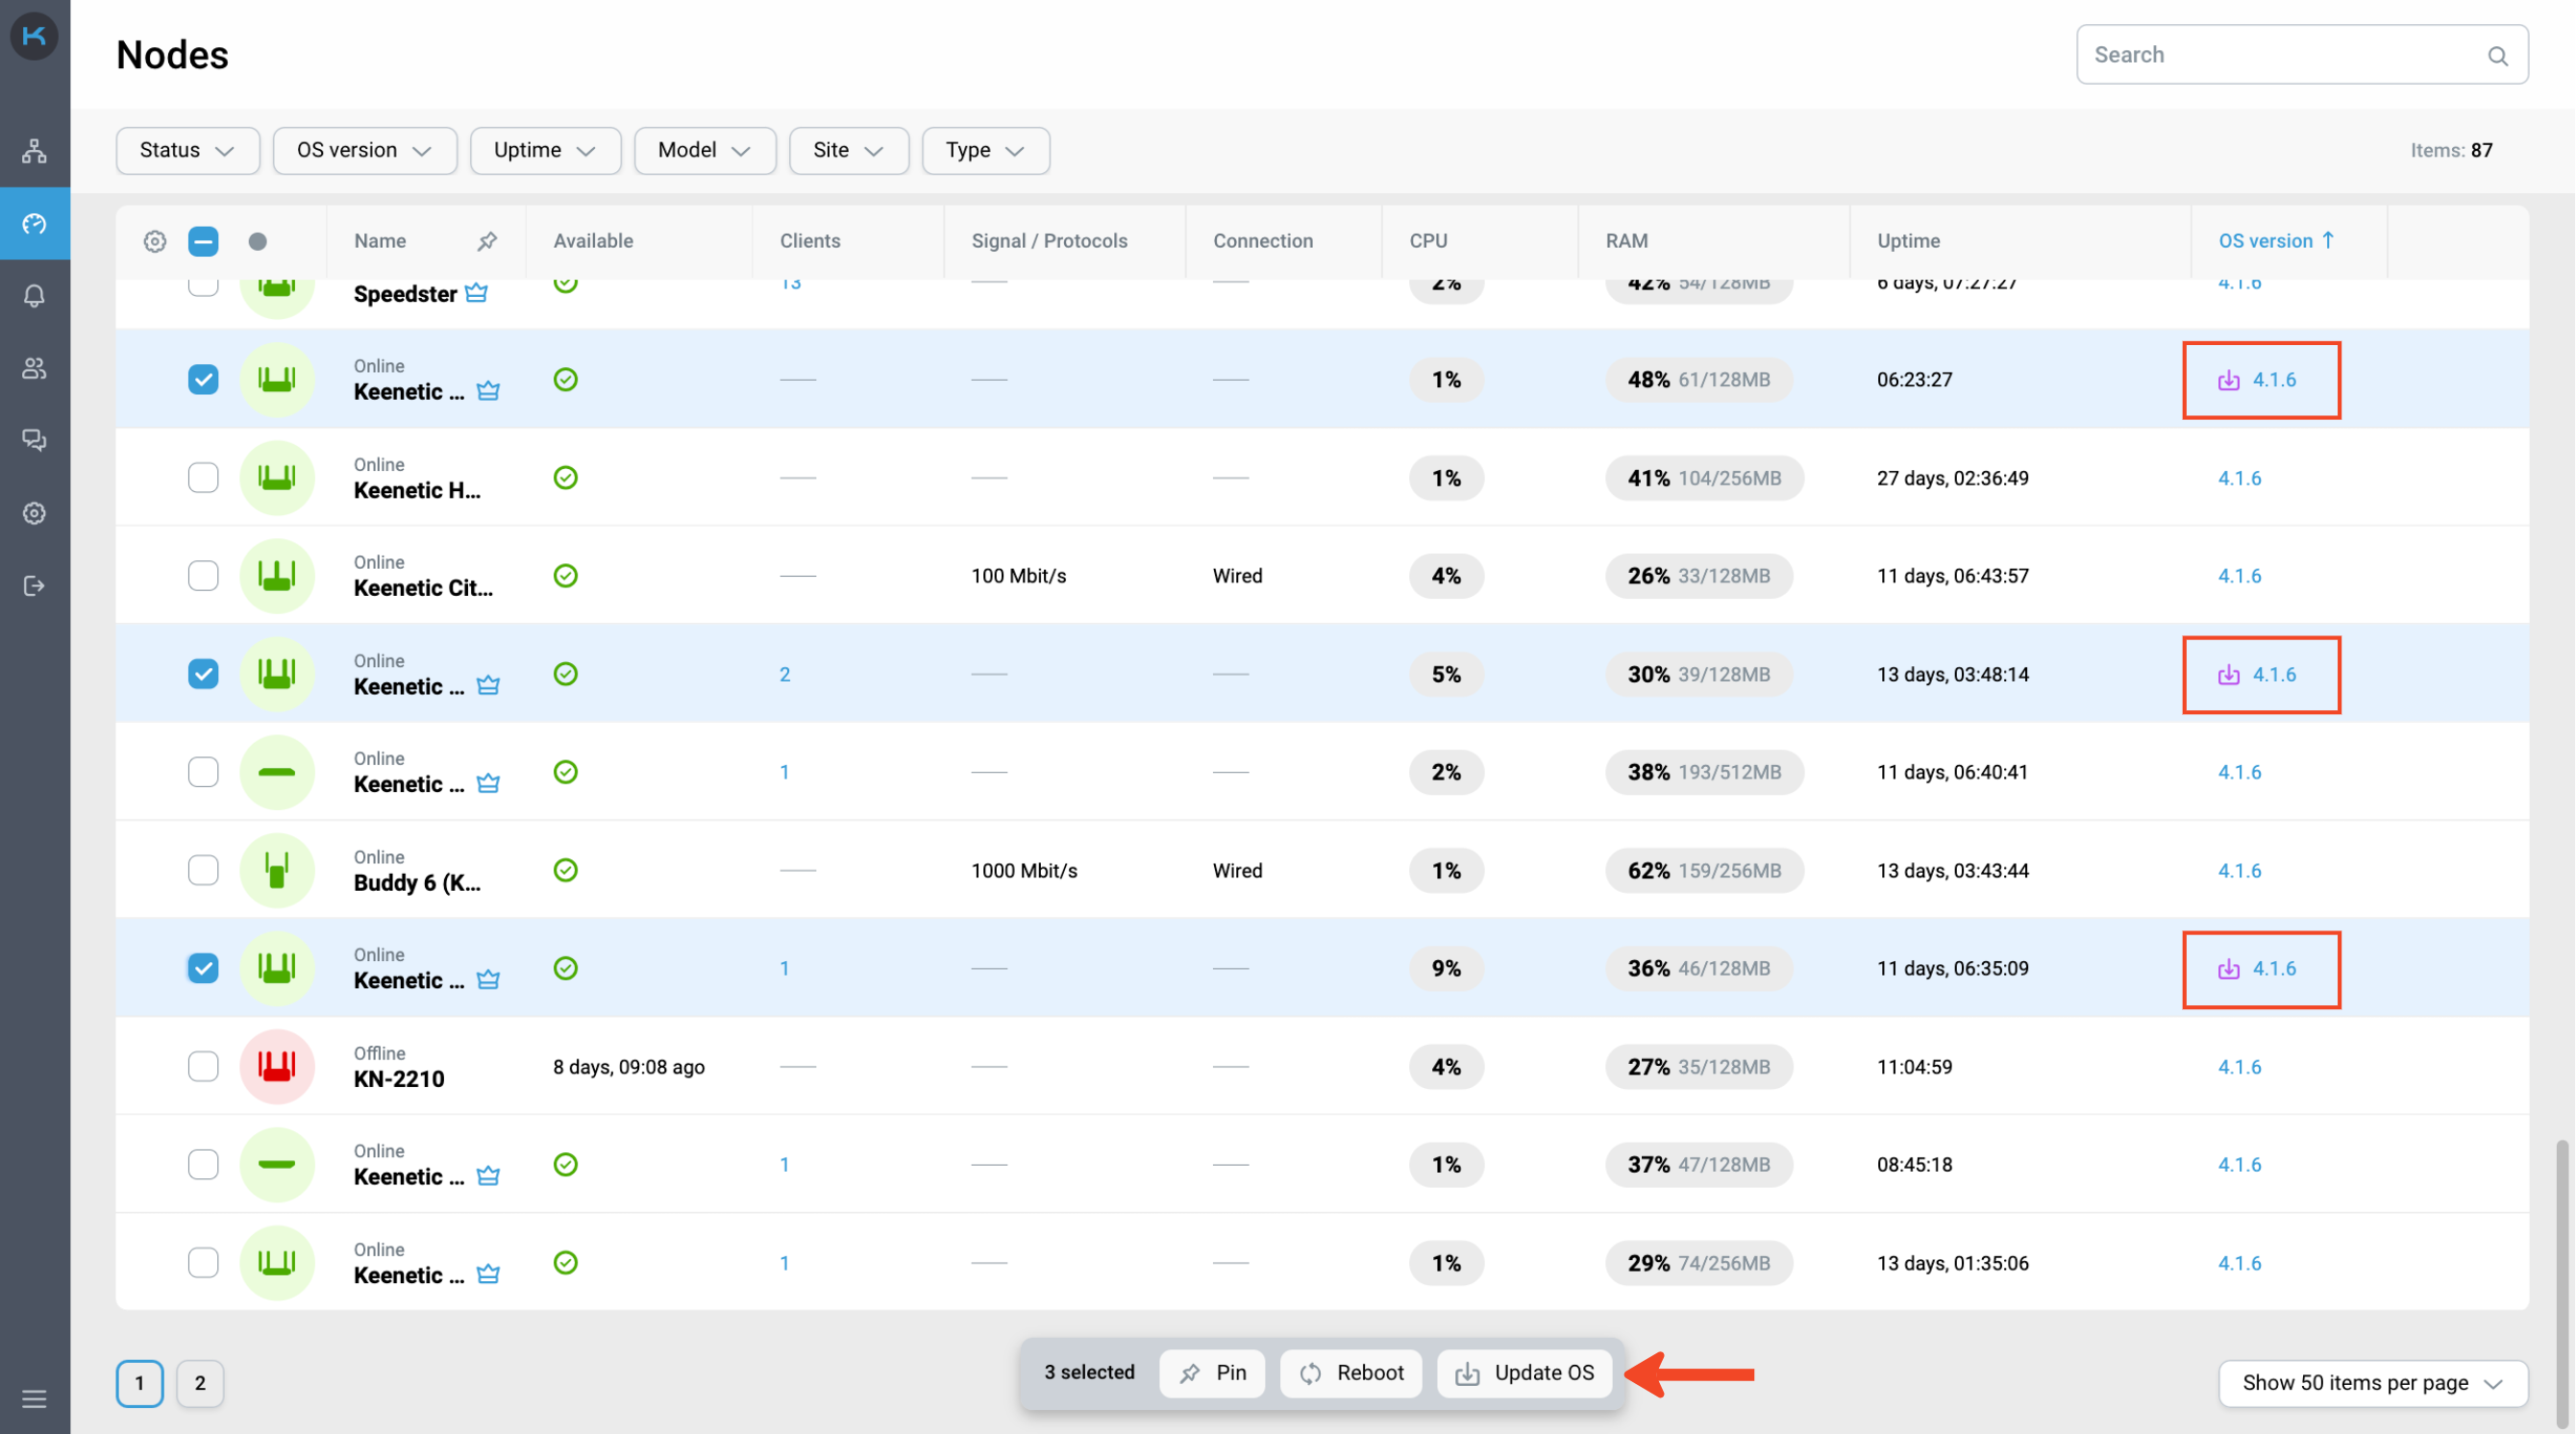
KeeneticOS — доступність оновлення відображається в Nodes за допомогою піктограми та кольорової індикації.
Щоб оновити вузол, клацніть значок і підтвердьте дію.
Підказка
Для кращої продуктивності Меш Wi-Fi-системи, рекомендується, щоб усі вузли використовували одну версію KeeneticOS.
Для зручності доступна функція групового оновлення. Щоб оновити групу пристроїв Keenetic, виберіть вузли, для яких доступне оновлення, і натисніть кнопку "Оновити ОС" в меню групових операцій.
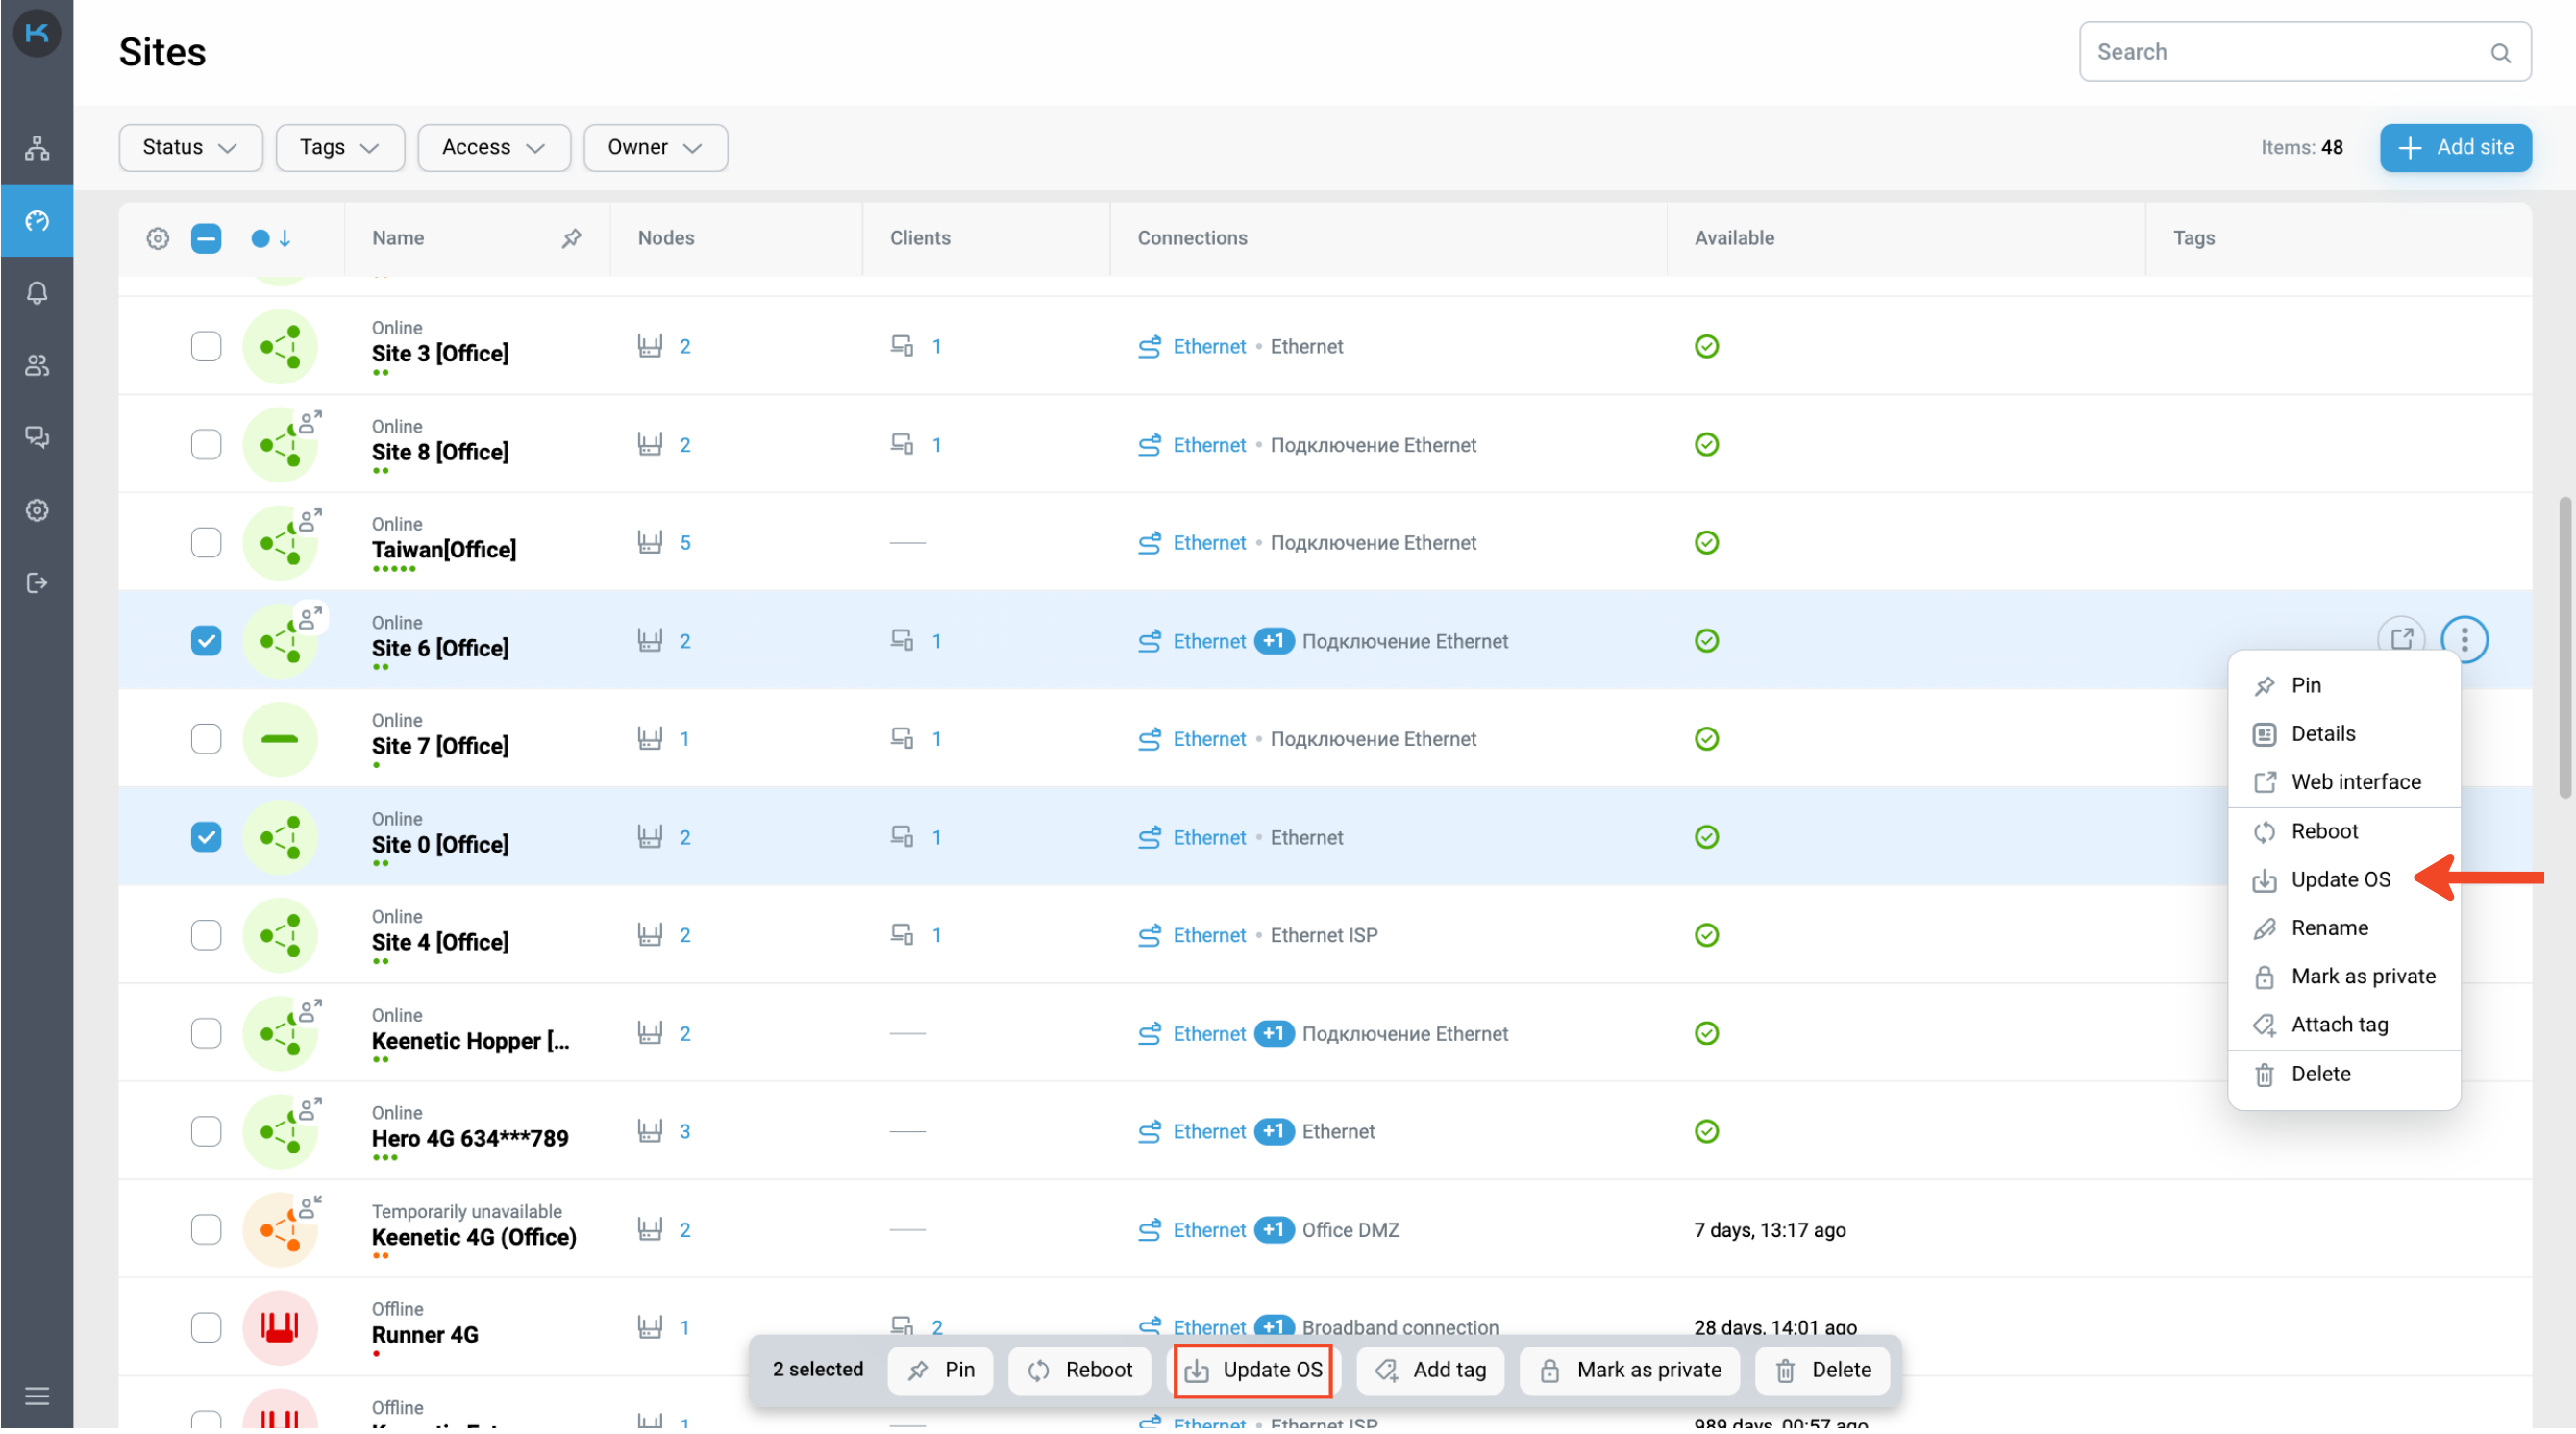
Оновлення KeeneticOS для сайтів
Щоб оновити сайт, натисніть кнопку "Оновити ОС" в контекстному меню і підтвердити дію.
Щоб оновити групу сайтів, виберіть сайти та натисніть кнопку "Оновити ОС" в меню групових операцій.
Важливо
Оновлення KeeneticOS доступне для Сайту, якщо версія KeeneticOS роутера 4.0 або вище.
Примітка
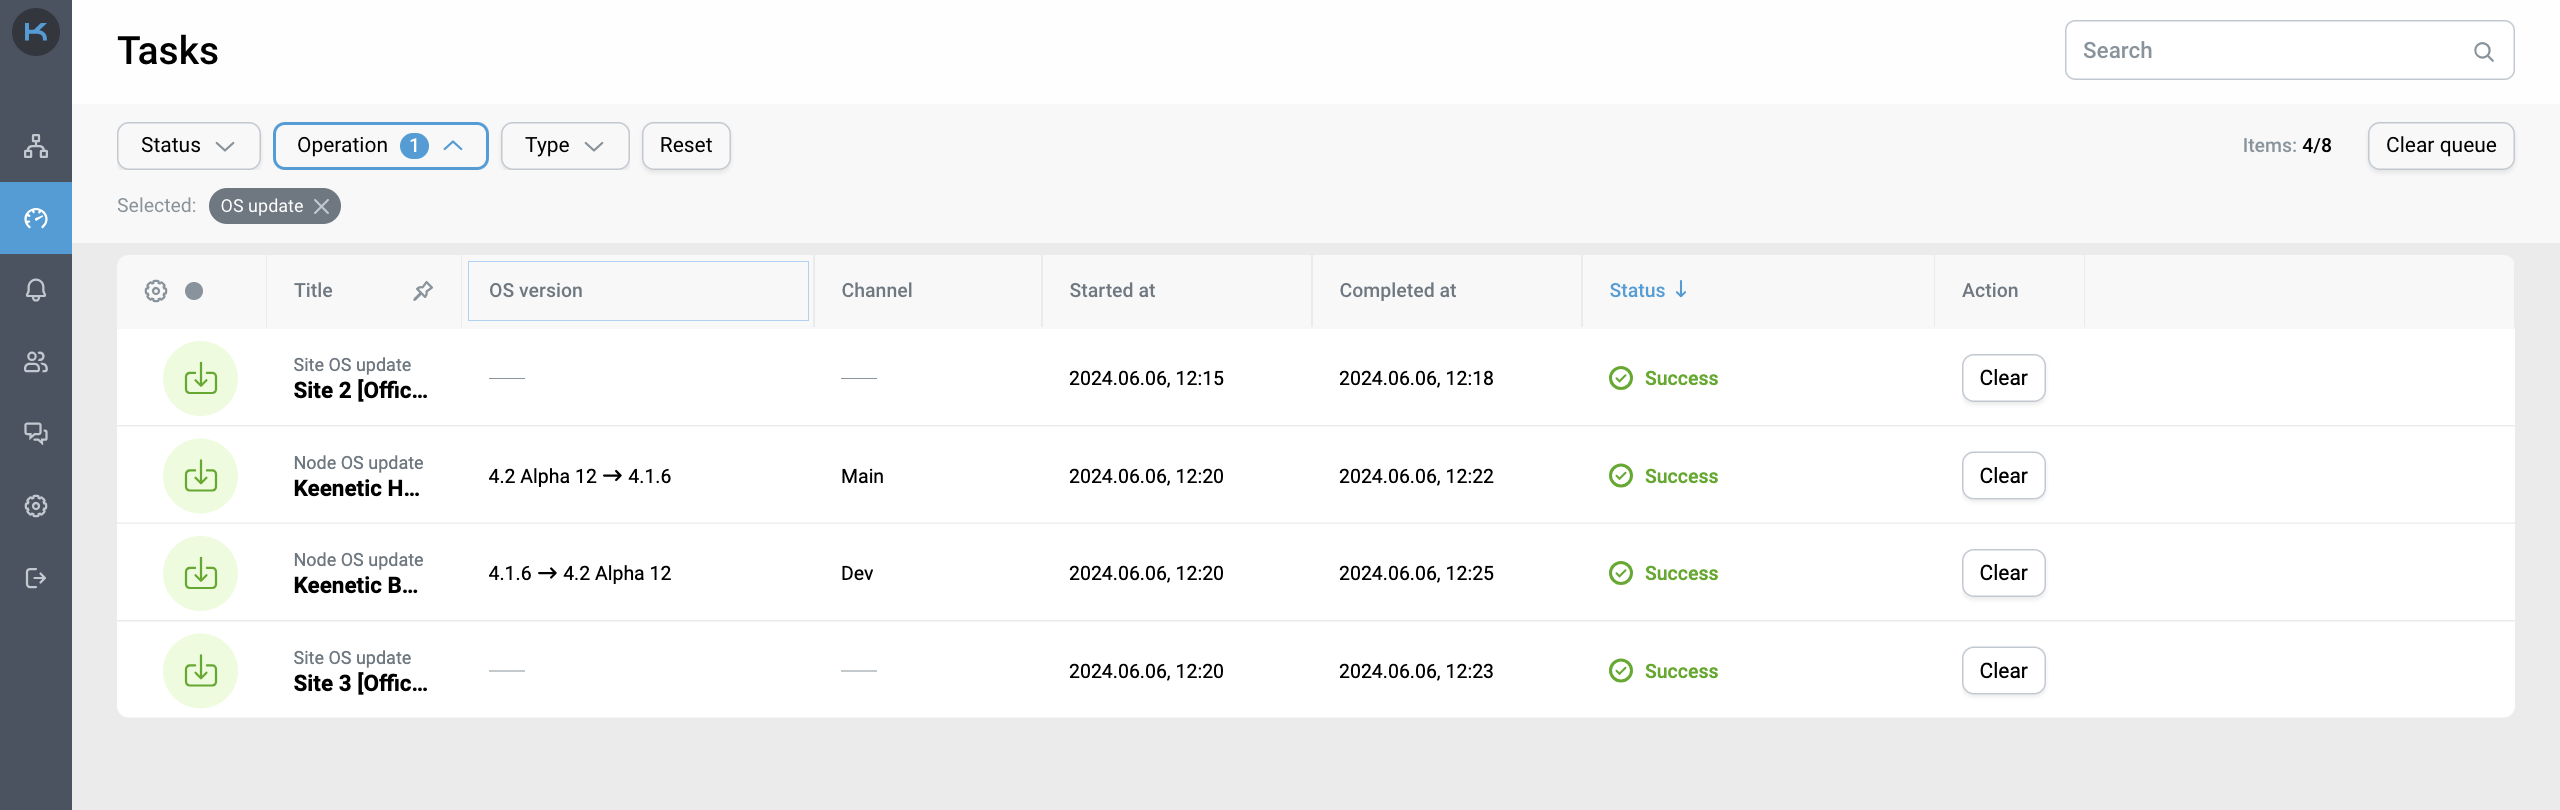
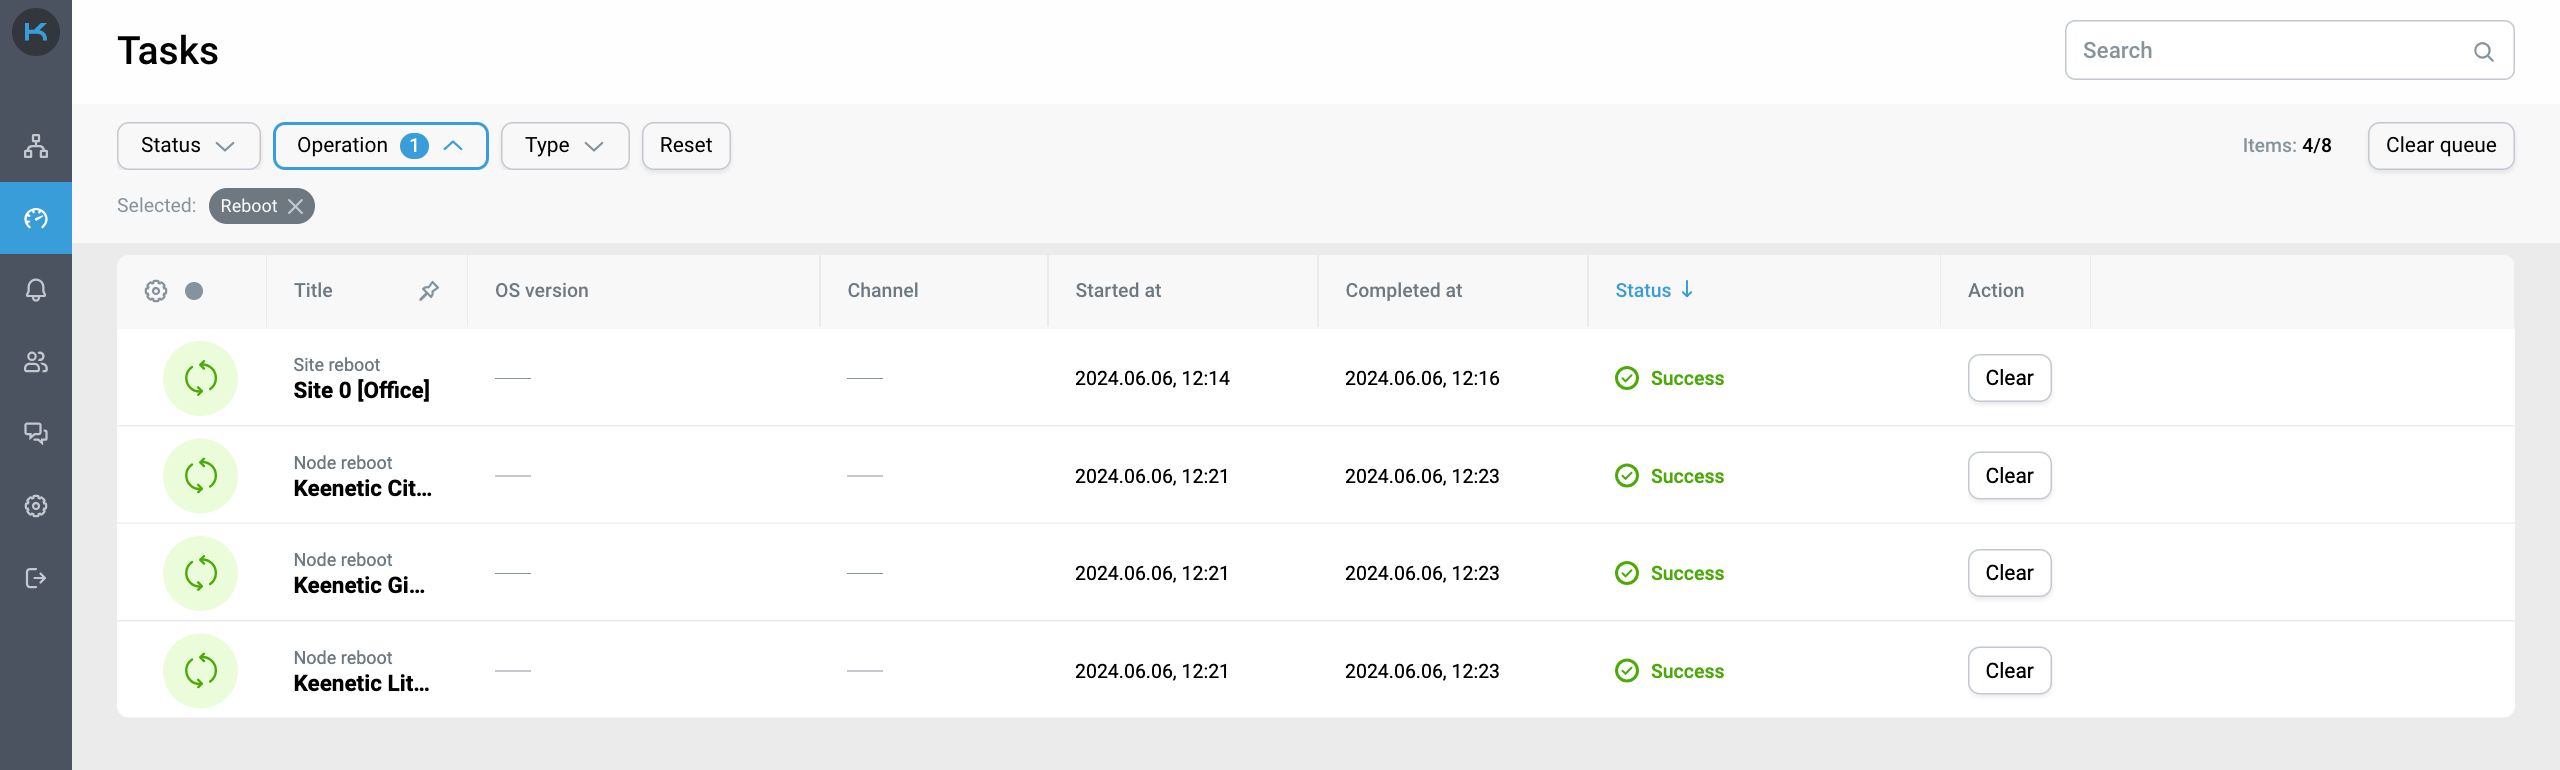
Після початку оновлення вас буде перенаправлено на сторінку Tasks для відстеження статусу оновлення ОС.
Перезавантаження вузла
Щоб перезавантажити вузол, натисніть кнопку "Reboot" у контекстному меню та підтвердьте дію. Перезавантаження доступне для Маршрутизаторів Wi-Fi системи і Ретрансляторів.
Для зручності доступна функція групового перезавантаження. Виберіть вузли, які ви хочете перезавантажити, і натисніть "Reboot” у меню групових операцій.
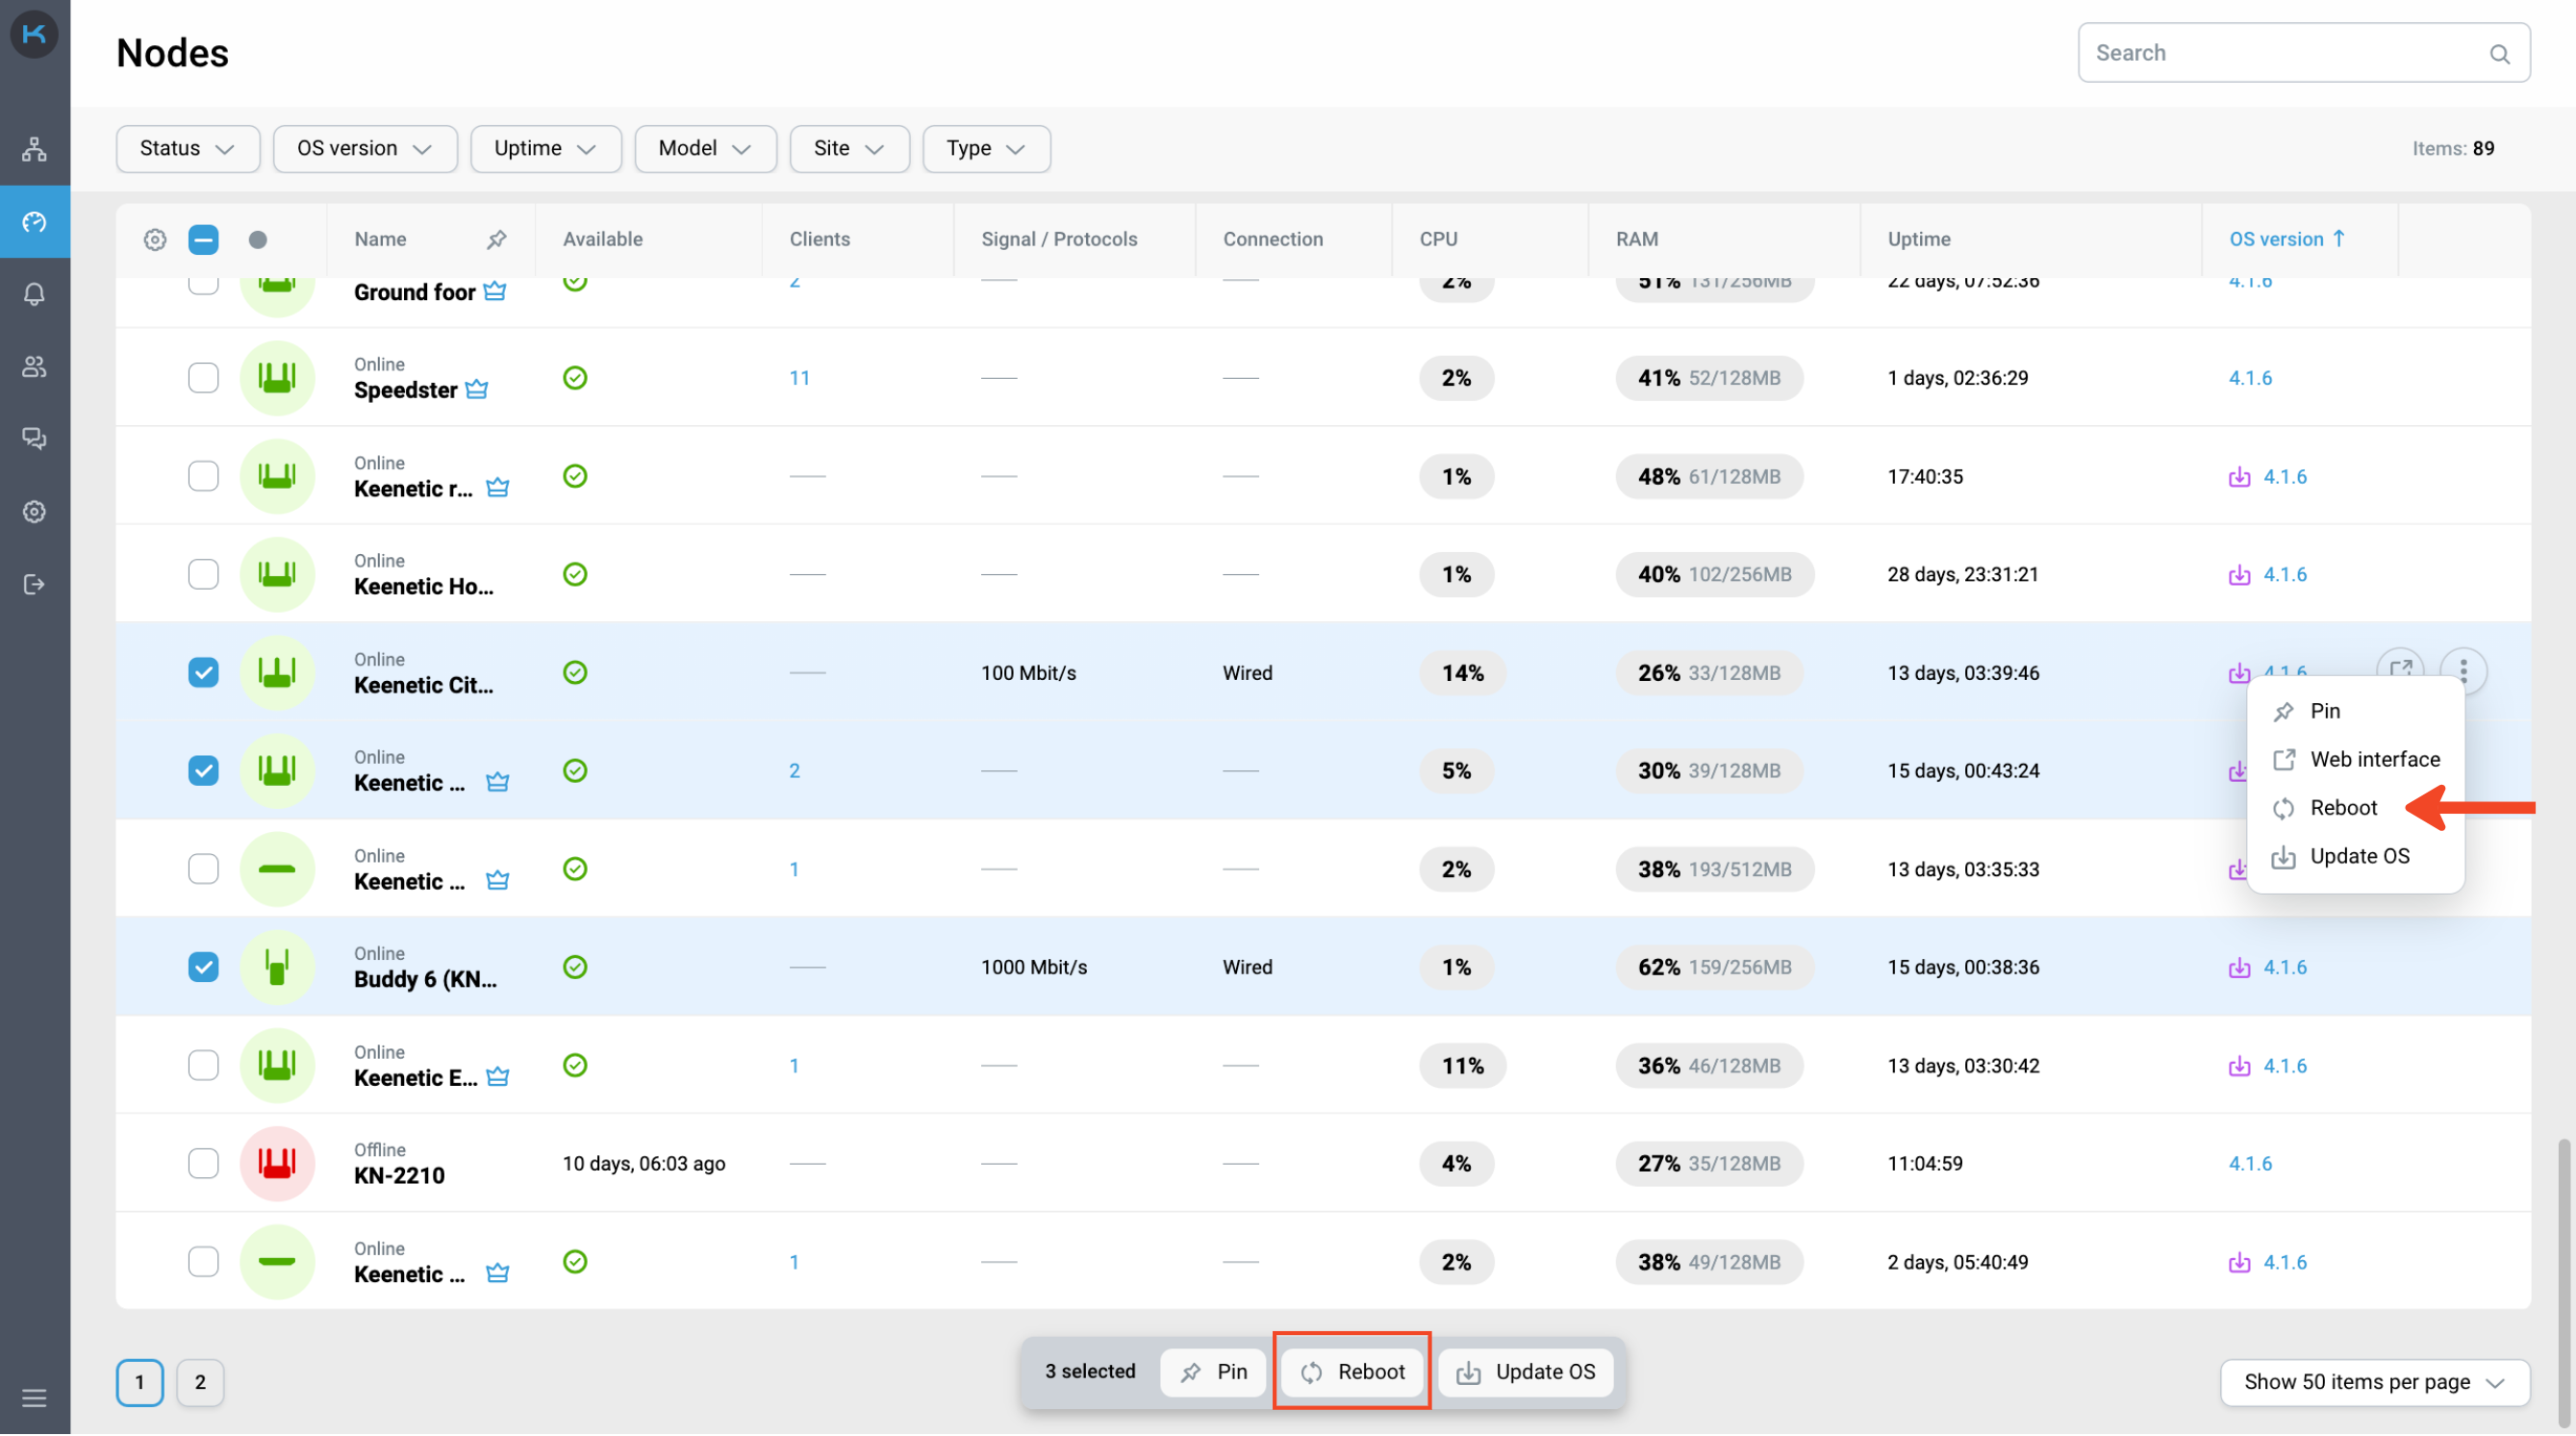
Важливо
Якщо версія KeeneticOS Маршрутизатора є 3.8 Alpha 1 або вищою, Ретранслятори Wi-Fi системи можна перезавантажити.
Перезавантаження сайту
Щоб перезавантажити сайт, натисніть контекстне меню, виберіть «Reboot» і підтвердьте дію.
Для зручності доступна функція групового перезавантаження. Виберіть сайти, які потрібно перезавантажити, і натисніть "Reboot” у меню групових операцій.
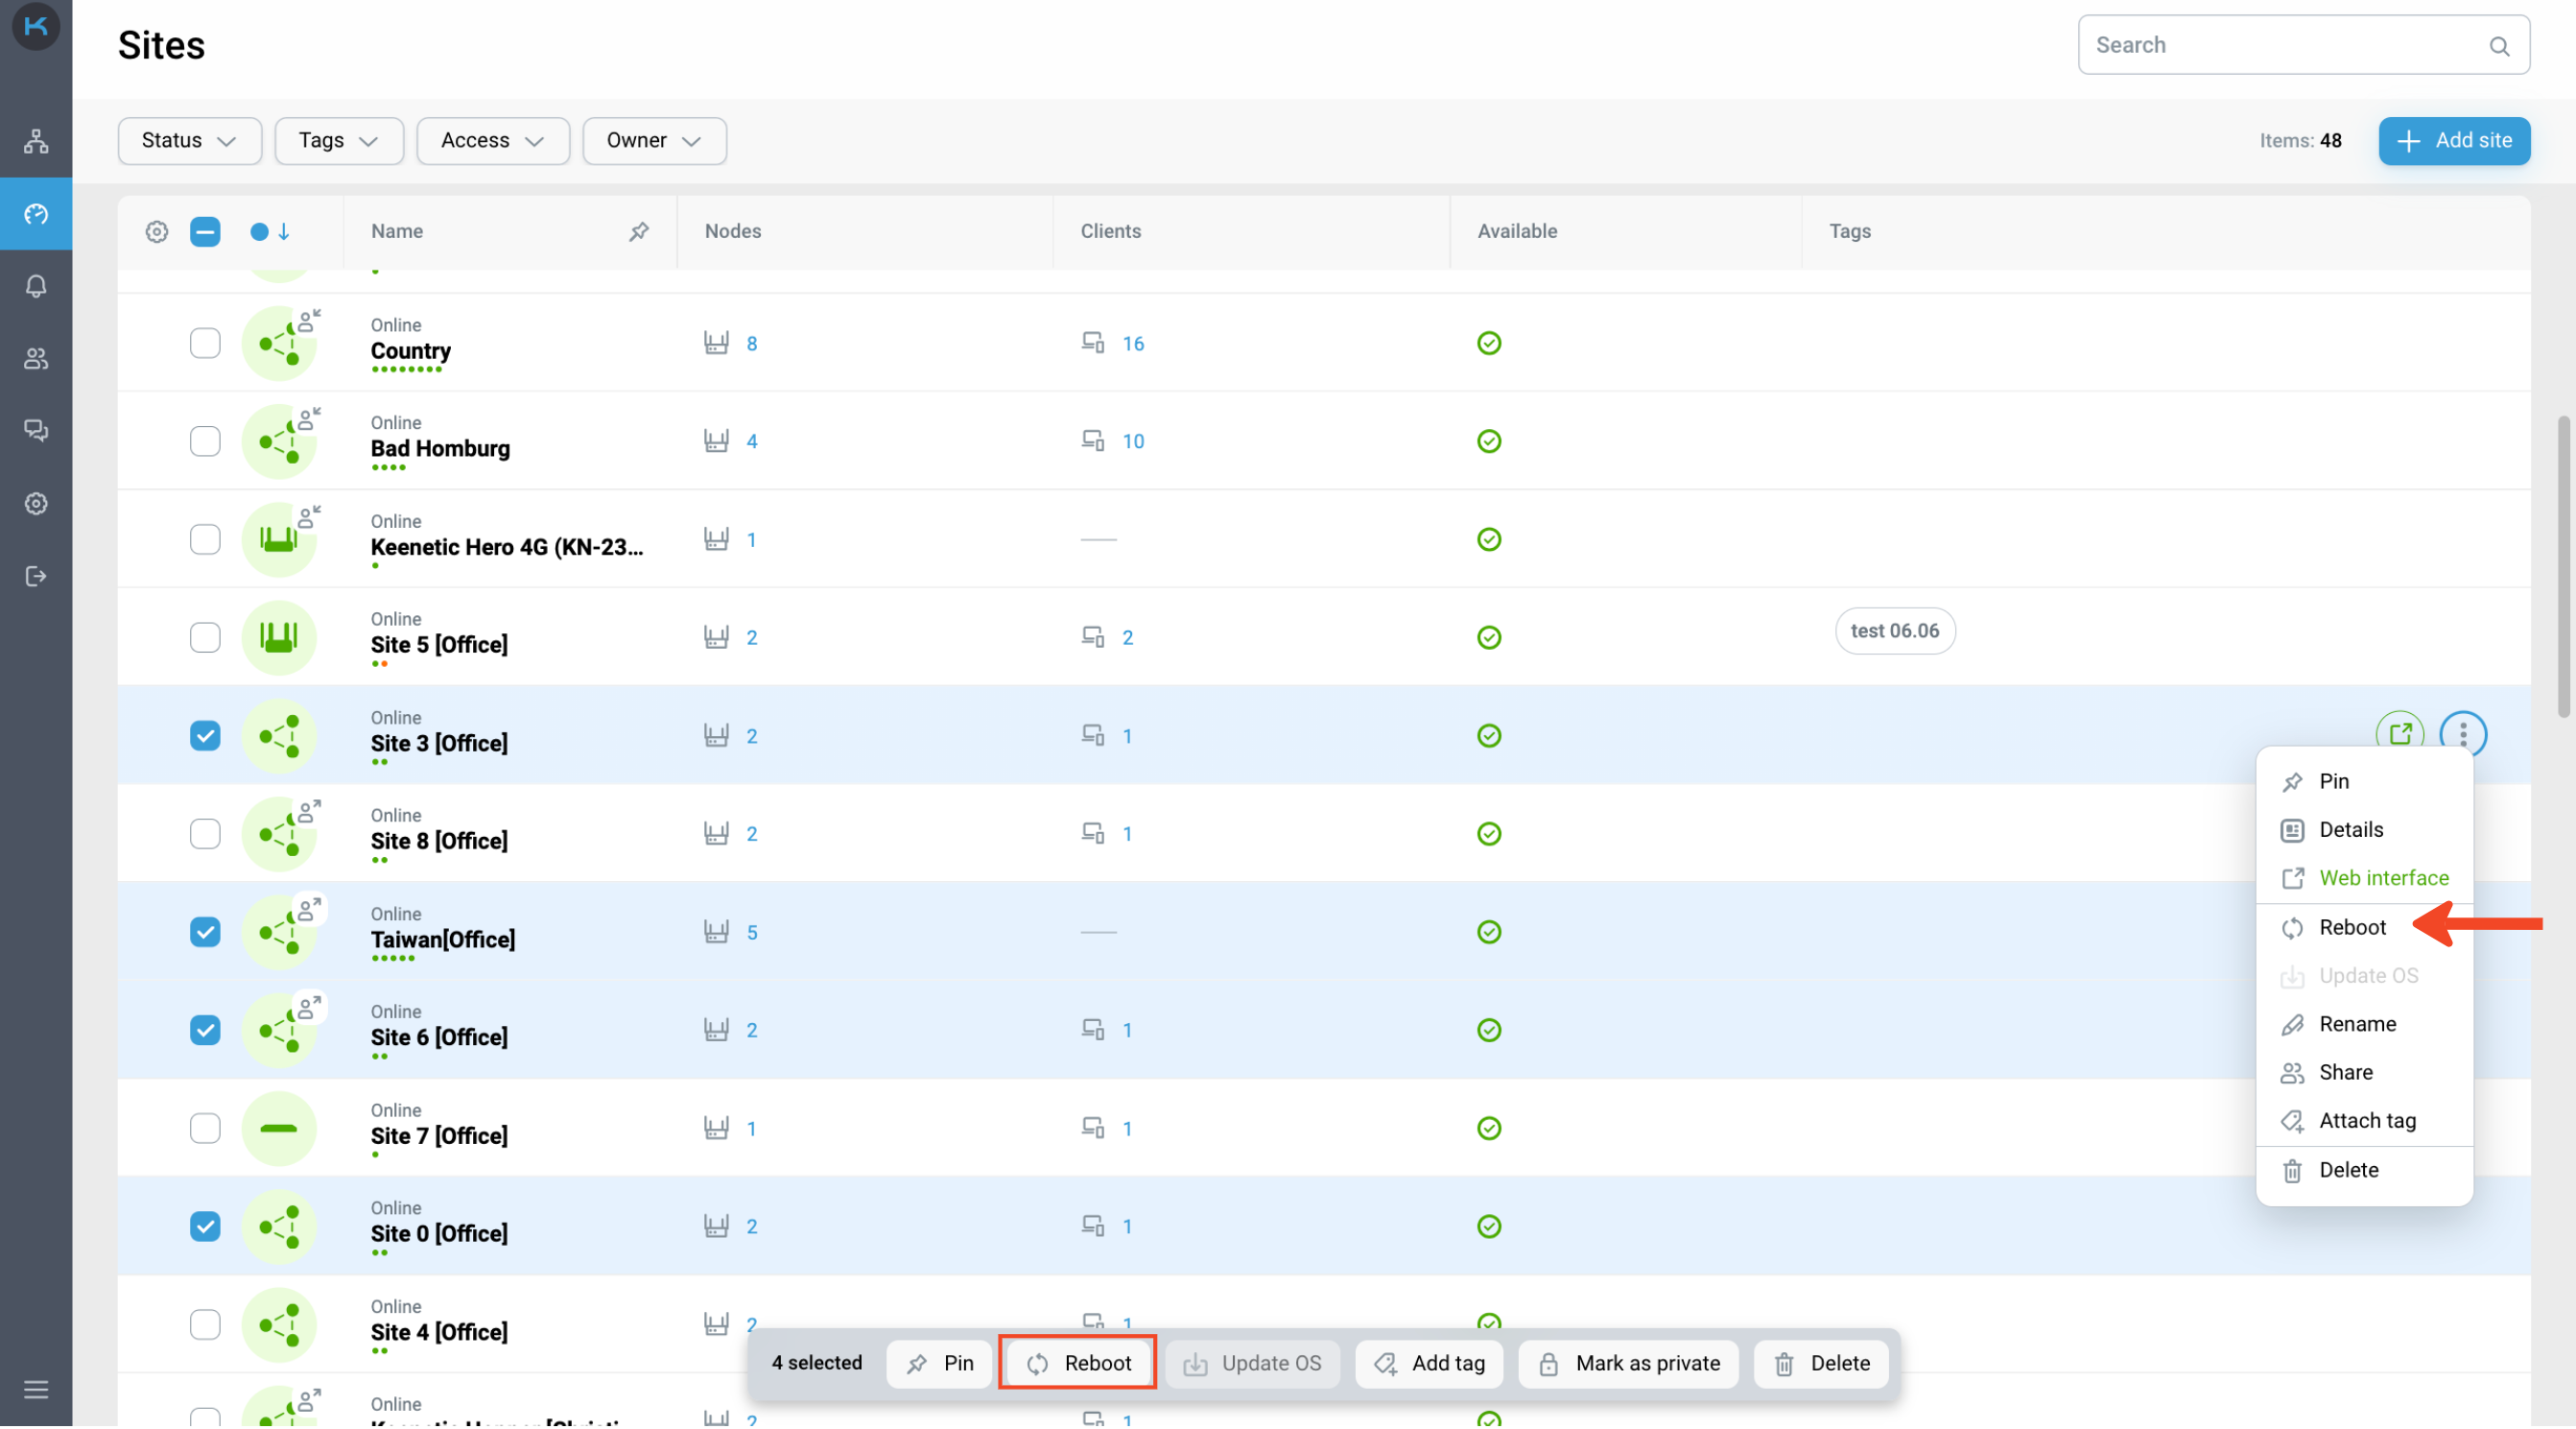
Важливо
Якщо версія KeeneticOS Маршрутизаторf є 3.8 Alpha 1 або вищою, Сайт можна перезавантажити.
Примітка
Після початку перезавантаження ви будете перенаправлені на сторінку Tasks для відстеження стану перезавантаження.
Teams
The Keenetic Remote Monitoring and Management (RMM) system provides the ability to grant shared access to sites, allowing team members to simultaneously perform remote monitoring and management of sites. Each Keenetic RMM user can create multiple teams, invite members, assign roles, and provide shared access to their sites. The table below presents the differences in privileges and limitations for each role.
Functionality | Owner | Admin | Manager | Viewer | Notes | |
|---|---|---|---|---|---|---|
1 | Access management to sites |
|
|
|
| Ability to grant and revoke shared access to sites for the team. |
2 | Team member management |
|
|
|
| Ability to view the list of members, invite and remove members from the team, and change their roles. |
3 | Team settings management |
|
|
|
| Ability to delete or rename the team. |
4 | Leaving the team |
|
|
|
| Ability to leave the team. |
5 | Seamless access to Web interface without restrictions |
|
|
|
| Ability to change all settings in the web interface of the shared node. |
6 | Seamless access to Web interface with limited administrative rights |
|
|
|
| Ability to change settings in the web interface of the shared node, except for the following settings:
|
7 | Seamless access to Web interface in read-only mode |
|
|
|
| Ability to view settings in the web interface of the shared node. |
8 | Update and OS reboot operations |
|
|
|
| Ability to perform OS updates and reboots on nodes and sites with shared access. |
9 | Viewing tasks |
|
|
|
| Ability to view tasks related to nodes and sites with shared access, created by team members. |
10 | Clearing tasks |
|
|
|
| Ability to clear the list of completed tasks created by other team members. |
11 | Client management |
|
|
|
| Ability to rename, register, and deregister clients connected to shared sites. |
12 | Rights confirmation |
|
|
|
| Display of the "Confirm Rights" button in the interface and the ability to enter credentials for shared sites to confirm rights. |
13 | Site renaming |
|
|
|
| Ability to change the name of a shared site. |
14 | Editing site information |
|
|
|
| Ability to edit the "Description" and "Address" fields on the detailed page of a shared site. |
15 | Site deletion |
|
|
|
| Ability to delete a shared site from Keenetic RMM. |
16 | Tag management |
|
|
|
| Ability to create, delete, rename tags, and attach/detach tags to shared sites. |


Instructions for the "Owner" Role
In each team, there can only be one Owner — the user who created the team. The Owner role cannot be changed, and the user with this role cannot be removed from the team.
1. Creating a team
To create a new team, follow these steps:
Go to the Teams section in the side menu.
Click the Create team button.
Enter the team name and click Confirm.
After creating the team, you can add team members and grant them access to sites.
2. Renaming a team
If you need to change the team name:
Go to the Teams section in the side menu.
Hover over the team you want to rename.
Click the edit icon (pencil).
Enter the new team name and click Confirm.
Alternatively:
Go to the Teams section in the side menu.
Click on the desired team name.
In the top-right corner, click the Additional options button (three dots).
Click Rename Team.
Enter the new team name and click Confirm.
3. Adding members to a team
To invite new members to the team:
Go to the Teams section in the side menu.
Click on the desired team name.
Click the Invite member button.
In the form that opens:
Select the role for the new member from the dropdown list.
Click Confirm.
Copy the invitation link using the Copy link button.
Send the invitation link to the person you want to add to the team.
Примітка
The invitation link is valid for 72 hours. If the link expires, create a new invitation. Only one user can join per link.
4. Changing a member's role
To change a member's role:
Go to the Teams section in the side menu.
Click on the desired team name.
In the members table, find the Role column.
Click the dropdown list in the member's row whose role you want to change.
Select the new role from the list.
5. Removing a member
To remove a member:
Go to the Teams section in the side menu.
Click on the desired team name.
In the member's row, click the remove icon (cross).
In the pop-up window, click Remove and confirm the action.
6. Group operations with team members
Group operations allow you to perform actions with multiple team members simultaneously, such as changing roles or removing them.
6.1. Assigning roles to multiple members
To assign a new role to multiple members at once:
Go to the Teams section in the side menu.
Select the desired team by clicking on its name.
In the members table:
Use checkboxes to select the members whose roles you want to change.
In the group operations menu, click Role.
In the form that opens:
Select the new role from the dropdown list.
Click Confirm.
6.2. Removing multiple members
To remove multiple members from the team:
Go to the Teams section in the side menu.
Select the desired team by clicking on its name.
In the members table:
Use checkboxes to select the members you want to remove.
In the group operations menu, click Remove.
Confirm the action in the pop-up window.
Примітка
Ensure you have selected the correct team members before confirming changes or removals.
Removed members lose access to the team and its sites.
7. Managing access to sites
7.1. Granting access to sites
To grant access to sites for team members:
Go to the Teams section in the side menu.
Select the desired team by clicking on its name.
On the team page, go to the Sites tab.
Click the Grant access button.
In the form that opens:
You will see a list of sites you own.
Use the search bar or pagination to find the desired site.
Search can be performed by:
Site name,
Controller name,
Service tag,
IP or address.
Use checkboxes to select the sites you want to grant access to.
Click Continue.
In the new window, review the list of selected sites and click Confirm.
Примітка
To grant access to some sites, you not only need to add the sites to a team, but also add the relevant members. Only the team owner can manage access to sites through their own team. If users need cross-team access, each user must create a team, invite each other to both teams, and add the necessary sites to them.
7.2. Revoking access to a site
To revoke access to a site:
Go to the Teams section in the side menu.
Select the desired team by clicking on its name.
On the team page, go to the Sites tab.
In the sites table:
Find the site for which you want to revoke access.
Click the Revoke access icon (cross) in the site's row.
Confirm the action in the pop-up window.
7.3. Revoking access to multiple sites
To revoke access to multiple sites at once:
Go to the Teams section in the side menu.
Select the desired team by clicking on its name.
On the team page, go to the Sites tab.
In the sites table:
Use checkboxes to select the sites for which you want to revoke access.
In the group operations menu, click Revoke access.
Confirm the action in the pop-up window.
7.4. Auto-grant access function
The Auto-grant access function allows you to automatically grant team members access to all your sites.
Turning on Auto-grant access:
Go to the Teams section in the side menu.
Select the desired team by clicking on its name.
On the team page, go to the Sites tab.
Click the Turn on Auto-Access button or toggle the switch in the top-right corner.
Confirm the action in the pop-up window.
Turning off Auto-grant access:
Go to the Teams section in the side menu.
Select the desired team by clicking on its name.
On the team page, go to the Sites tab.
Click the Turn off Auto-Grant Access button or toggle the switch in the top-right corner of the screen labeled Grant this team access to all sites.
Confirm the action in the pop-up window.
Примітка
When Auto-grant access is enabled, all current and future sites you own will automatically be accessible to team members.
When Auto-grant access is disabled, access to all sites is revoked for all members.
8. Deleting a team and leaving a team
8.1. Deleting your own team
If you are the owner of a team, you can delete it. This will revoke access to sites for all members.
To delete your team:
Go to the Teams section in the side menu.
Select your team from the list.
Click the Delete icon (trash bin).
Confirm the action in the pop-up window.
Alternatively:
Go to the Teams section in the side menu.
Click on the desired team name.
In the top-right corner, click the Additional options button (three dots).
Click Delete Team.
Confirm the action in the pop-up window.
Примітка
After deleting the team, access to sites will be revoked for all members.
A deleted team cannot be restored.
8.2. Leaving someone else's Team
If you were invited to someone else's team as a member, you can leave it. This will revoke your access to all sites in that team.
To leave someone else's team:
Go to the Teams section in the side menu.
Select the team you want to leave.
Click the Leave team icon (exit).
Confirm the action in the pop-up window.
Примітка
After leaving the team, you will no longer be able to view or manage its sites.
If you need access again, the team owner must re-invite you.
8.3. Group Operations with Teams
You can delete multiple teams you own or leave multiple teams you are a member of simultaneously using group operations.
To perform group operations:
Go to the Teams section in the side menu.
Use checkboxes to select the teams you want to delete or leave.
In the group operations menu, click the Leave or delete teams button.
Confirm the action in the pop-up window.
Примітка
Ensure you have selected the correct teams before confirming the action.
Additional Recommendations
Ensure all team members understand their roles and responsibilities.
Regularly review the team composition and adjust member roles as needed.
If you have any questions or encounter difficulties, contact our Support — help@keenetic.ua.
CLI
CLI is a tool for centrally executing JSON-formatted commands on specified sites.
The tool allows you to:
execute requests on multiple sites;
track their status;
analyse responses for each site;
re-run failed requests;
save requests as templates;
work with templates and reuse them.
Getting started with CLI
select CLI in the side menu of the interface
or, on the Sites page, select one or more sites and click CLI in the context menu or in the group operations menu
1. Request editor
1.1 Creating a new request
To create a CLI request, click New request.
CLI supports three types of requests:
GET
POST
DELETE
The request type is selected using the tabs at the top of the form.
A request can be specified in one of two ways:
JSON format
The user enters the request body in JSON format in the editor. Formatting and editing functions are available.
URL command
The user enters a command in the URL field after the prefix. For example:
show/mws/member
Next, click Select sites. A modal window for site selection will open. Check the boxes for the sites where the request should be executed, then click Continue.
At the next step, verify that the list of sites is correct, then click Confirm.
To send the command, click Execute in the request editor form.
The submitted request is displayed in History and is no longer editable.
1.2 Request statuses
Each request can have one or more statuses (depending on the number of selected sites):
Draft — the request has not been sent or saved to history.
In progress — the request is being executed.
Success — the request was successfully executed on the site.
Error — the request execution failed.
1.3 Viewing responses
To view the response for each site, select the required site from the dropdown list next to the response field. For each site, the following is displayed:
the response body;
or an error message if the response body is absent.
1.4 Saving a request as a template
The current request can be saved as a template:
Click Save as template.
The request will be saved in the Templates section and will be available for reuse.
1.5 Retry for failed
The Retry for failed button lets you re-run the request only for the sites that received an Error status.
2. History
The History section allows you to view and manage previously executed CLI requests. It enables tracking request execution status, analysing results and errors, and rerunning failed requests. Records from history cannot be deleted.
For auditing and team collaboration purposes, the following events are automatically recorded in the Event Log:
sending a CLI request;
completion of a CLI request (successful or failed).
3. Templates
Templates are used to save frequently executed requests so they can be reused without re-entering parameters. They help speed up operations and reduce the likelihood of errors when working with the CLI.
3.1 Creating a new template
A template can be created:
manually in the Templates section using the Create template button;
or from an open request in the History section using the Save as template button.
The following actions are available:
Execute a request from a template
Duplicate a template
Rename a template
Edit and save a template
Delete a template
3.2 Executing a request from a template
Please verify that the list of selected sites is correct before executing the request. When you click Execute, a Request is created from the open template and displayed in the History section.
4. Team collaboration and user roles
Users with the Owner, Administrator, Manager, and Viewer roles can execute CLI commands on the Owner’s sites. Within the controller, restrictions are applied depending on the team member’s role.