Мобільний застосунок Keenetic
Keenetic app
for iOS and Android, which is designed for mobile management of a single router, Wi-Fi System, or geographically distributed installations. Cloud technologies provide remote access to Keenetic devices from anywhere in the world. The app will remember all your devices and allow you to connect to them quickly, without passwords or logins.
Family profiles allow you to assign Internet access rules to groups of devices at once, and cloud statistics will help you analyse traffic over long periods of time. Push notifications will keep you informed about events and statuses.
From the app, you can update the router's operating system, reconfigure Wi-Fi settings, check the status of Internet connections, enable/disable the guest network, control all home devices connected to the router, check traffic volume, set up a work schedule, and more. For each client, you can limit the speed or completely block Internet access, assign a content filtering profile for safe Internet browsing, and remotely “wake up” the computer using WoL.
The Keenetic app is available on
 |
 |
 |
Key features:
Cloud technologies. The list of routers is not tied to a specific mobile phone. All information about your devices is stored in the cloud, and when you replace your smartphone, you will not need to add devices again. Simply enter your account credentials in the app.
Management works even if the IP address on a Keenetic's WAN interface is private. Supports access to your router when switching to a backup channel. No additional settings are required.
Single account. Use a single account to access our cloud services — your Keenetic Account, Keenetic RMM, Keenetic mobile application and Keenetic Cloud web portal.
Collaborative management. The Keenetic app allows you to manage routers together from different accounts and different mobile devices.
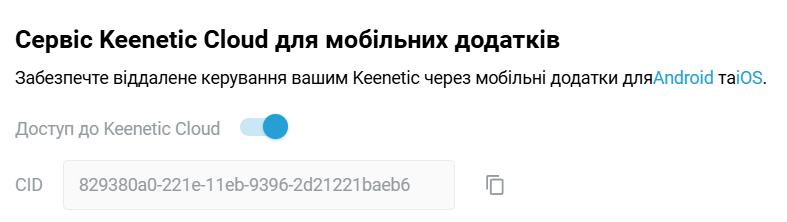
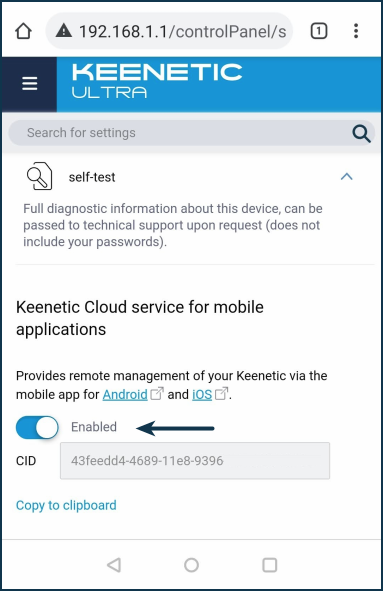
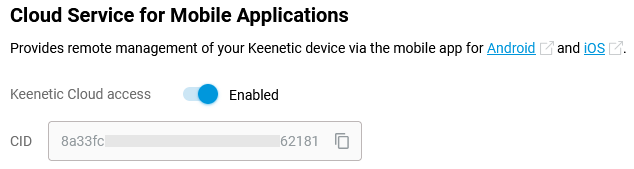
CID identifier. Devices can be added remotely using a unique cloud CID identifier. You can find it in the device's web interface on the General System Settings page in the Cloud Service for Mobile Applications section.
Notifications. You can configure notifications to receive information about events on the router in a way that suits you. For example, these can be push notifications to a mobile device or e-mail messages about changes in device status (online/offline) or when switching to a backup connection, or notifications about the activation/deactivation of a specific home network client.
Family profiles. These allow you to manage groups of connected devices that have a common owner. This is especially useful for implementing parental controls. By creating a separate 'child' profile, you can add devices that you want to control (these can be mobile smartphones, tablets, or stationary computers), set a work schedule for them (specify permitted time intervals during the day or certain days), and enable an Internet filter that blocks access to adult content, malicious and fraudulent sites. If necessary, a family profile will allow you to disconnect all of your child's gadgets from the Internet at once, even when you are not at home.
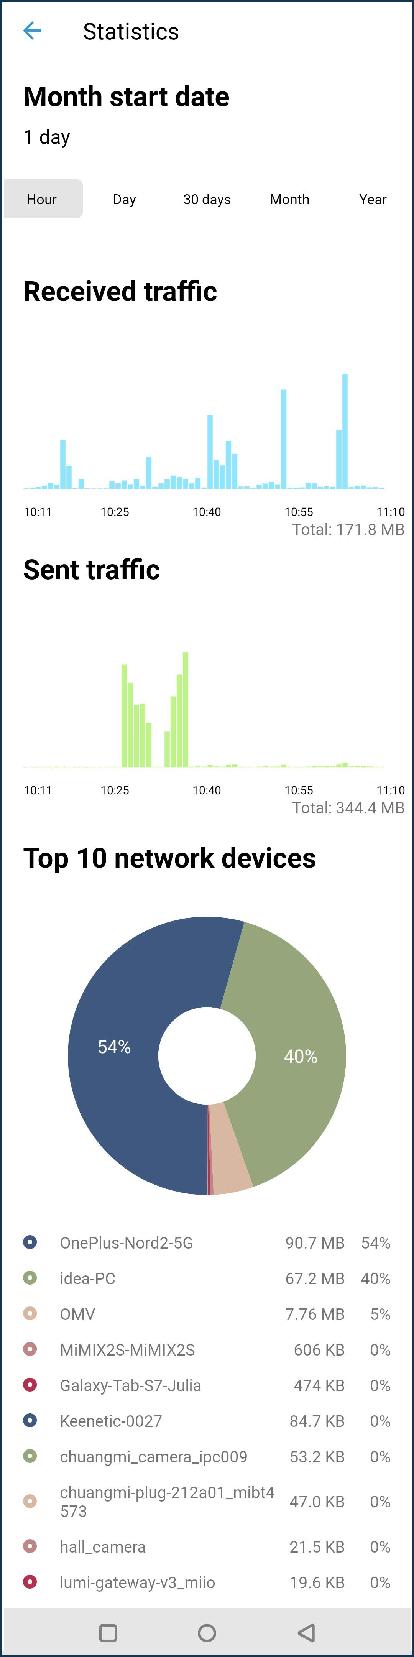
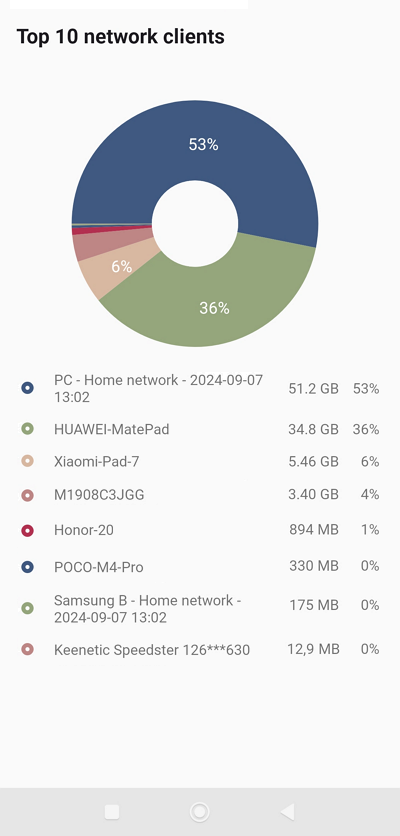
Global traffic statistics. The cloud allows you to aggregate and receive data from any group of devices or users for a period of time ranging from one hour to one year. Now it will be easier for you to identify the main consumer of Internet traffic.
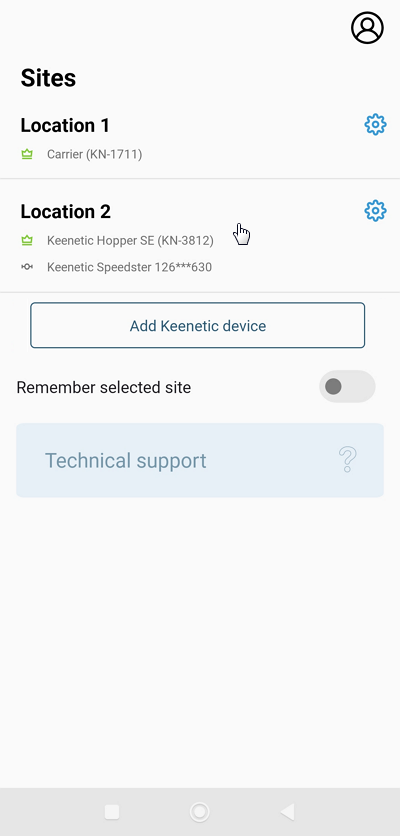
Separation by objects. Devices located in the same local network are displayed as a group (location, object). A group can consist of a main router and extenders.
Compatible with Wi-Fi System. The app enables you to add additional extenders to an existing network and configure and remotely manage all nodes of the Wi-Fi System.
Security. E2EE Curve25519 and AES channels, along with P2P sessions, are used to transfer data between the router, cloud, and app.
The Keenetic app is constantly evolving and improving. We plan to expand the app's capabilities. Feedback from technical support engineers or directly from developers allows us to identify errors and fix them as soon as possible.
Adding a router locally
The Keenetic mobile app is designed to easily manage Keenetic routers and home network from mobile devices on Android and iOS. Thanks to cloud technology, your Keenetic devices will be accessible not only from your home network but also in any place where your smartphone or tablet has Internet access. A public IP address is not required. The mobile application is designed for remotely managing your router and home network from mobile devices running Android and iOS operating systems.
The app automatically searches for a router on your local network and prompts you to add it. It is also possible to add a remote Keenetic using a special CID in the app. You can find more information on how to do this in the article Adding a router remotely by its CID.
Важливо
Check your router's KeeneticOS version (must be 3.1 or higher) and make sure Service for mobile application is enabled in your device settings. You can find more information on how to do this in the Note to the article Keenetic mobile application troubleshooting.
Connect the router to a power source via the power adapter supplied. Once the router has booted up, its Status LED (far left) should illuminate and not blink (this means that the router is switched on and ready to use).
Install the Keenetic mobile app on your mobile device.
Create a user account for the Keenetic application.
Connect your mobile device to the router's Wi-Fi network.
The Wi-Fi network name and password for the connection can be found on the device's bottom label. For example:
Switch on the Wi-Fi network on your mobile device, and in the list of available networks, find your network whose name is on the label and click on it. In our example, this is the
Keenetic-5050network.Enter the Wi-Fi password to connect to the network; this is also shown on the label, and tap 'Connect'.
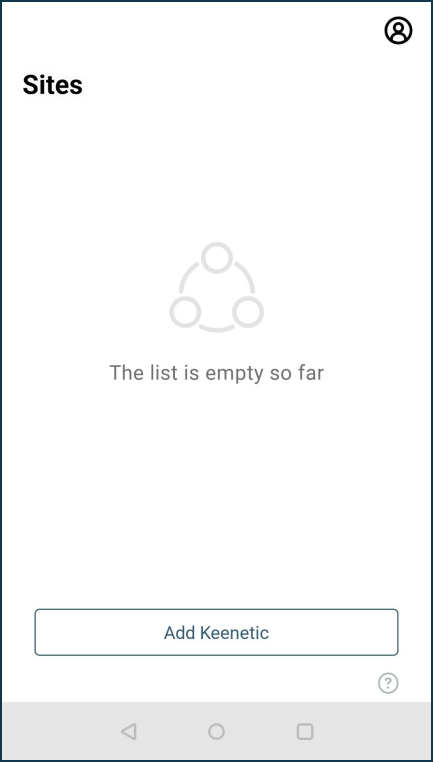
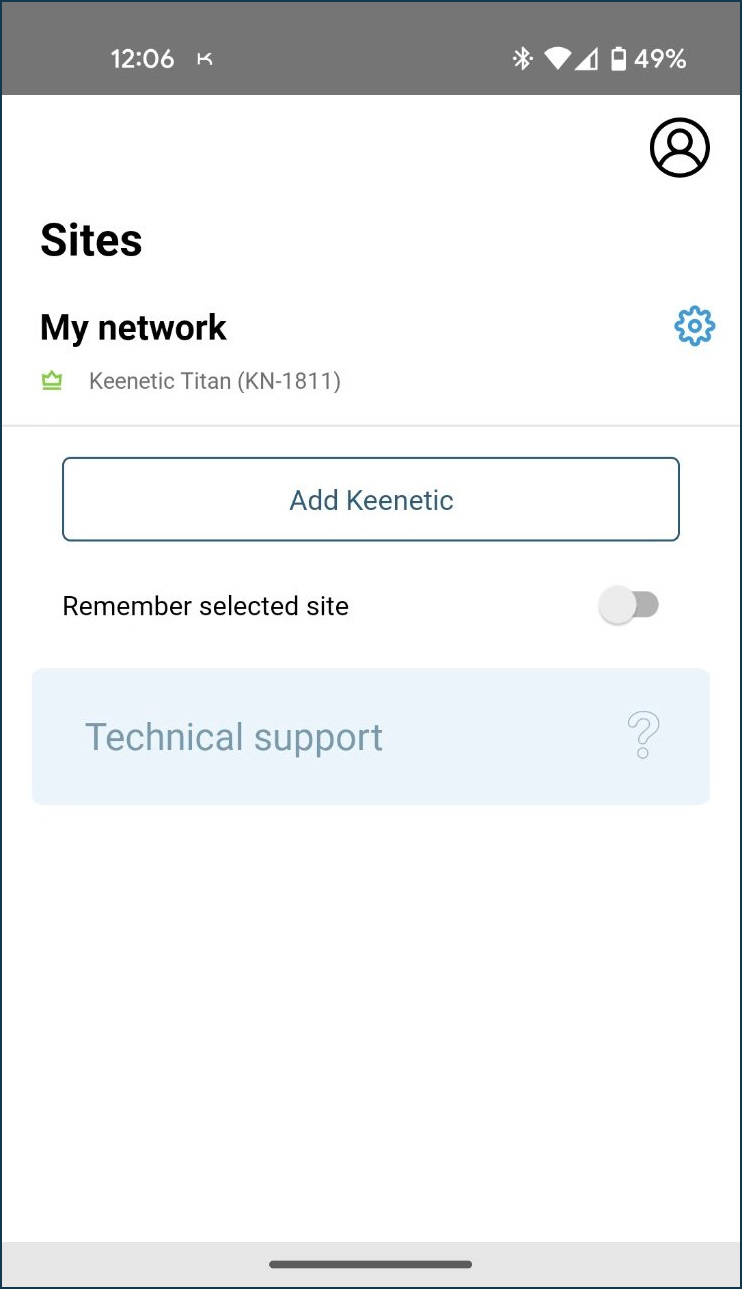
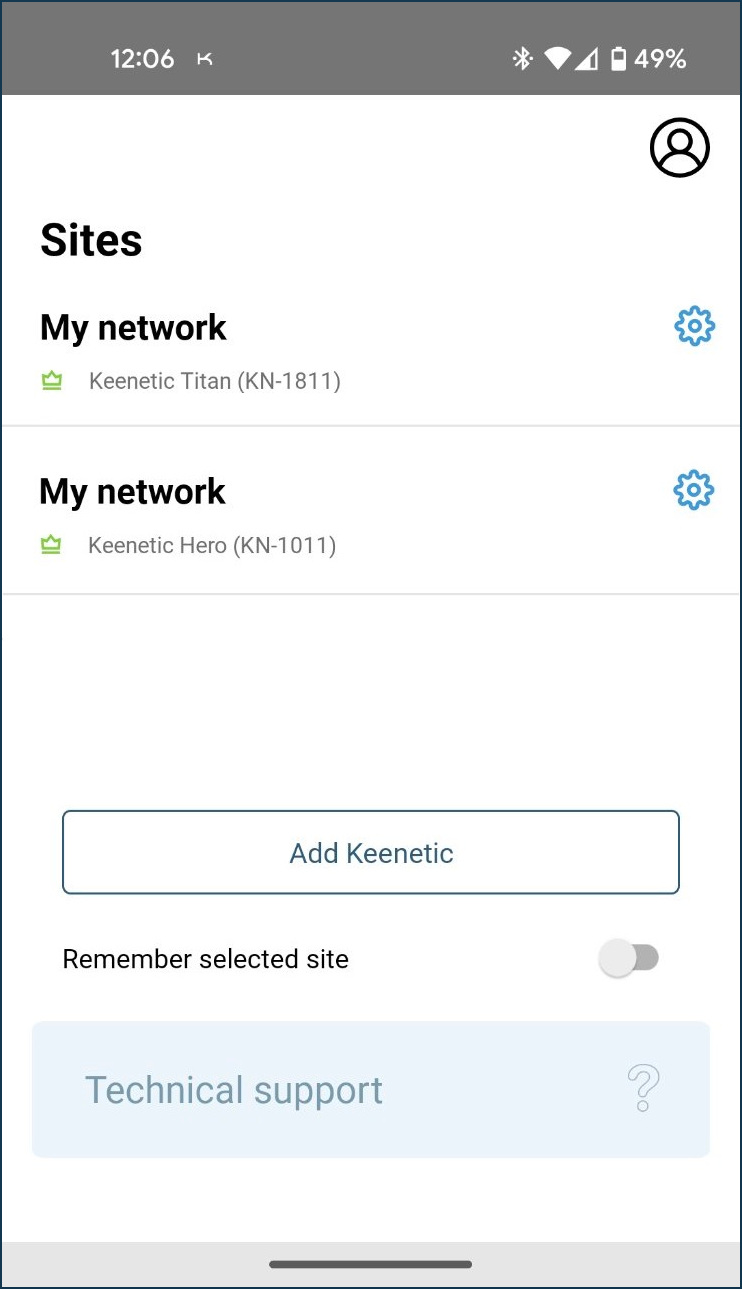
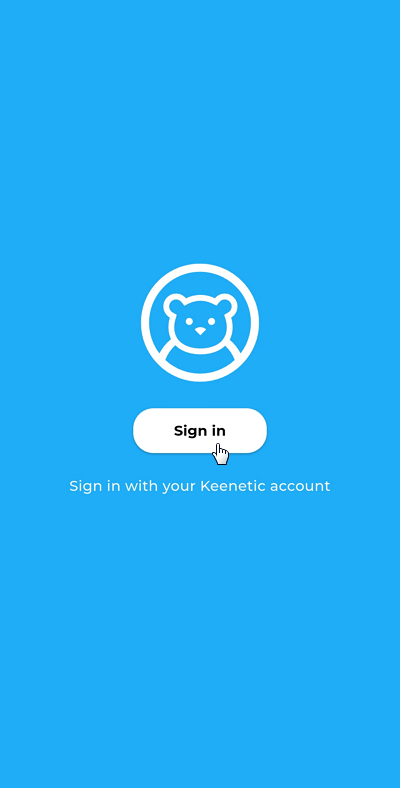
Launch the app, log in to your Keenetic Account or create one if you don't have it. Then, on the Sites screen, tap Add Keenetic device.
If you are connected to your router's network, the app automatically searches it for Keenetic devices.
Tap on the detected device.
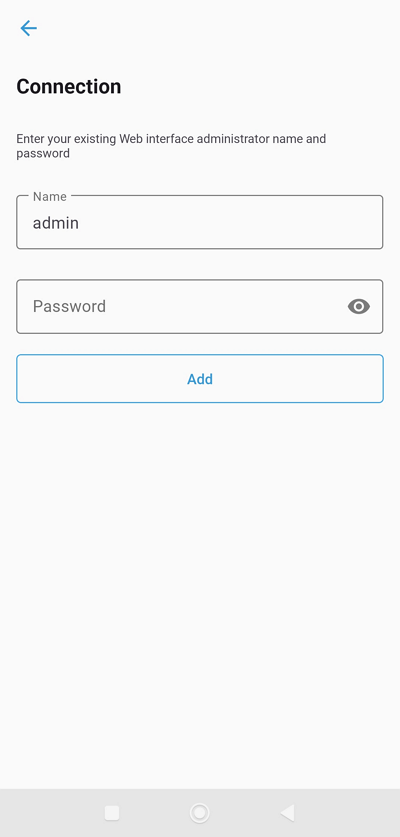
Use the router administrator name (
admin) and password, as in the web interface. Then tap Add.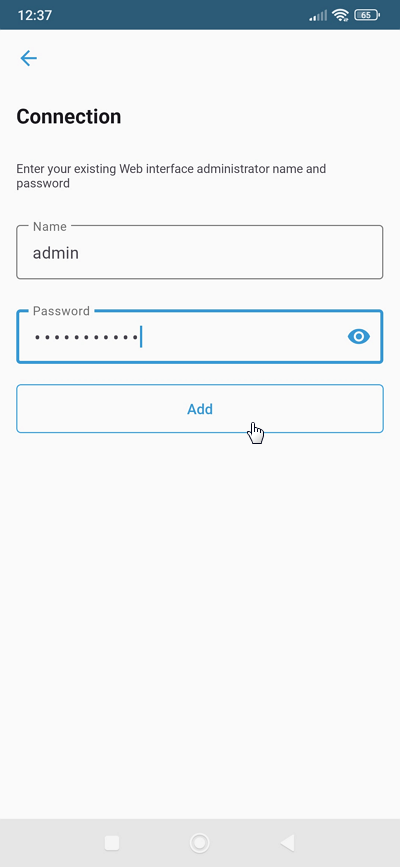
Важливо
By default,
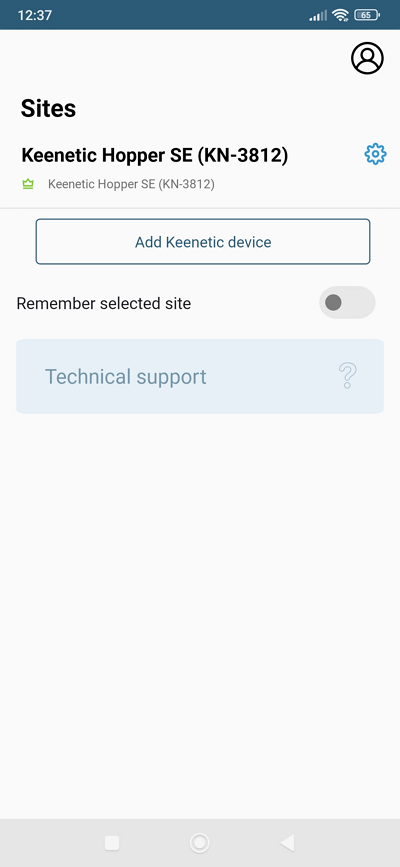
no administrator passwordis set in Keenetic routers. A user must set it during the initial setup. If you do not know or have forgotten the administrator password, use the Reset button on the router to reset it to factory settings.If the connection were successful, the router would be added to the app.
Підказка
If you are unable to add a router in the Keenetic app for some reason, we recommend that you reset your router to factory settings and then repeat the procedure to add a router.
For information on adding a remote router, see the article Adding a router remotely by its CID.
There is also an option of adding a router via the Keenetic Cloud web portal.
Adding a router remotely by its CID
|
|
|
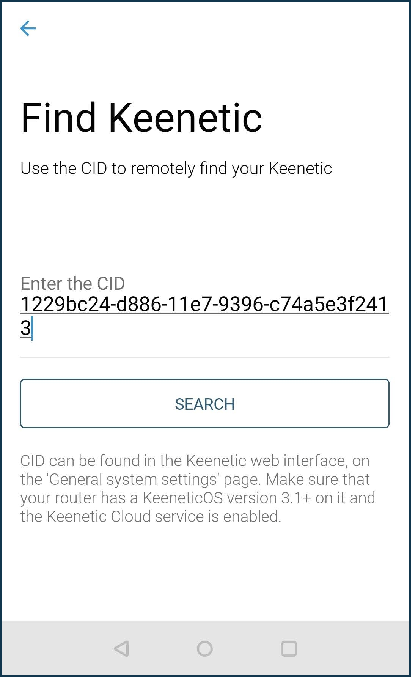
The Keenetic mobile application allows you to add a new Keenetic by CID. You can find the CID of your Keenetic in the web interface, on the General System Settings page, in the Cloud Service for Mobile Applications section.
Підказка
To avoid mistakes when entering a CID, copy it to the clipboard.

Важливо
If you add a Keenetic to the application remotely via CID, the administrator password must be set on the router; otherwise, the connection will not be established.
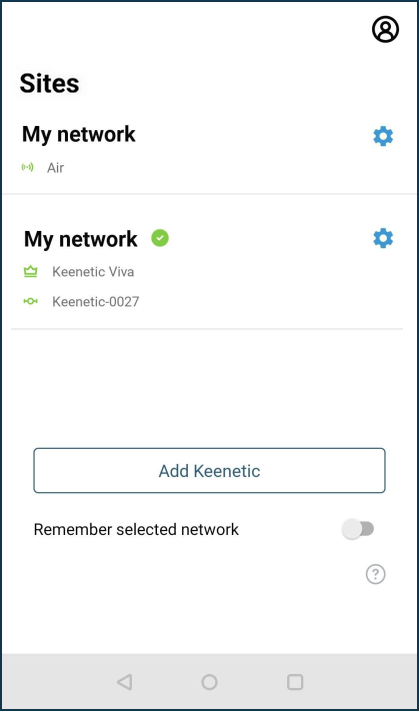
Start the Keenetic application and click Add Keenetic device on the Sites screen.
Важливо
Before you start adding your Keenetic devices, make sure it is turned on and ready to use.
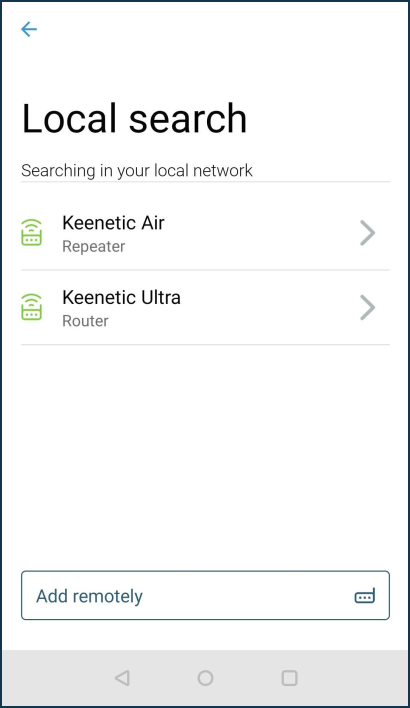
On the Local search screen, click Add remotely.
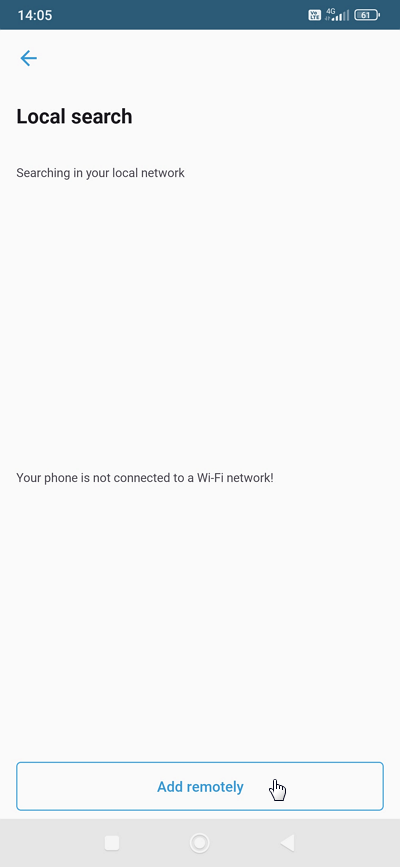
Enter the CID of your Keenetic or paste it from the clipboard and click Search.
To connect to the Keenetic, use the same router administrator name and password as the web interface. Then click Add.
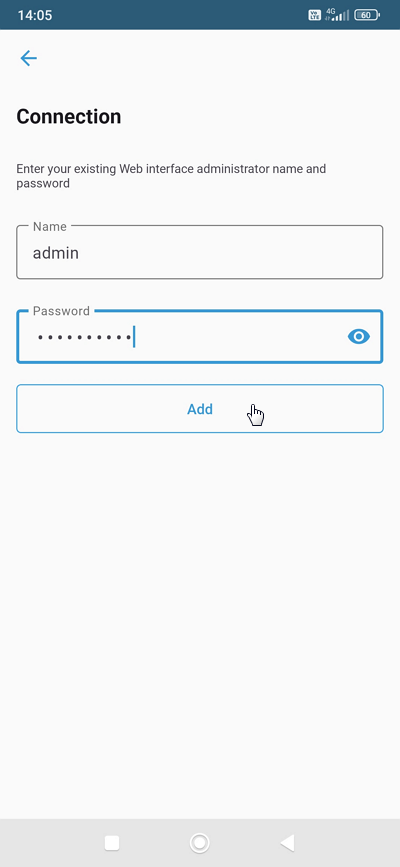
On successful connection to the router, it will be added to the application.
You will find another way to add a router in the article Adding a router locally.
There is also an option of adding a Keenetic router via the Keenetic Cloud web portal.
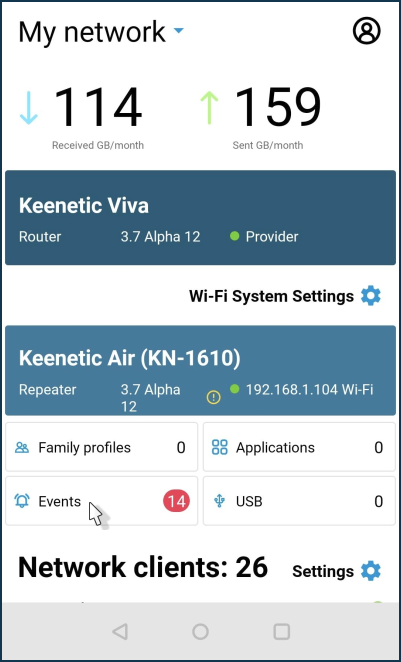
Managing home network with Keenetic app
The Keenetic mobile application allows you to configure your Internet connection, update the router firmware, and reconfigure Wi-Fi (change the preset Wi-Fi network name and password). All this can be done without a computer — a smartphone or tablet is enough. After the initial setup, the Keenetic app becomes a handy tool for managing your home network. You can find out the status of your Internet connection, switch on or off the guest access point, and control all home devices connected to the router. For each of them, you can limit the speed, ban Internet access completely or on a schedule, forward necessary ports, enable Internet filters to protect home devices from dangerous sites and other threats, set up notifications that allow you to receive information about events on the router in a convenient way for you.
Thanks to cloud technology, management with the Keenetic app is available from your home network and anywhere your mobile device has the Internet. The app will remember all your routers and allow you to connect to them without passwords and logins from anywhere worldwide (even if there is no public IP address on the router's WAN interface).
To configure and connect to your router, you need to follow the steps below:
Install the Keenetic mobile app from Google Play (Android), App Store (iOS) or AppGallery (Huawei) on your mobile device.
Важливо
Keenetic mobile app is designed for devices with KeeneticOS version
3.1and higher (all actual Keenetic models).Connect from your mobile device to your Keenetic's Wi-Fi network.
The Wi-Fi network name and password for connection are on a sticker on the back of the router case.
Switch on the Wi-Fi network on your mobile device, and in the list of available networks, find your network, the name of which is indicated on the sticker, and click on it.
Enter the Wi-Fi password, which is also indicated on the sticker, to connect to the network and press Connect.
Launch the Keenetic app.
For the mobile application to work, you need to create a user account. How to do this is shown in the instructions for Обліковий запис Keenetic.
After successfully logging into the account, you need to Add Keenetic device to the app.
If the router is not already configured, make the initial connection and configure the router via the web interface.
If the router is already connected to your ISP's network and has Internet access, follow the Adding a router locally instructions to add the router.
Click on the entry of the discovered device.
To connect to the router settings, use the router administrator name (
admin) and password as in the web interface. Then click Add.Важливо
The router's administrator password is not set by default; it is set by the user during initial configuration. If you do not know or have forgotten the administrator password, in this case, perform a factory reset using the Reset button on the router.
If you successfully connect to Keenetic, it will be added to the application.
Підказка
If, for some reason, you are unable to add a router to the Keenetic app, we recommend performing a factory reset and then repeating the procedure to add the router. Also, please read the information provided in the article Keenetic mobile application troubleshooting.
The way to remotely add a router can be found in the article Adding a router remotely by its CID.
After adding your router to the app, you will have access to its settings.
The start screen will show you all the routers you have added for management. Tap on the device whose settings you want to connect to.
Information describing the app features and available settings can be found in the Мобільний застосунок Keenetic section.
Now, to test the remote control of your router via the Keenetic app, switch off Wi-Fi (WLAN) on your mobile device and switch on 4G/3G Internet.
In case for some reason, you are unable to set up a remote connection to your router via the app, please note the following:
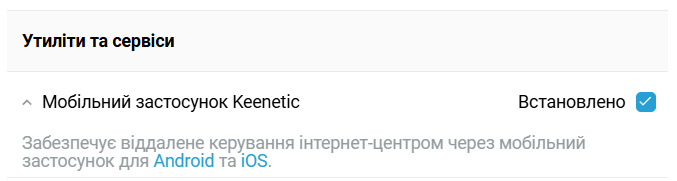
Make sure that the system component Service for mobile application is installed. You can do this in the web interface on the General System Settings page in the Update and Component Options section by clicking on Component options.
Make sure that Keenetic Cloud access is enabled.
This setting can be found in the Cloud Service for Mobile Applications section on the General System Settings page.
Keenetic mobile application troubleshooting
When using the Keenetic mobile application, please note the following:
The application is designed to work with devices running KeeneticOS version
3.1and higher.Важливо
Check which version of the OS is installed in your Keenetic router (it must be higher than
3.1) and ensure that the Keenetic Cloud service is enabled in the router's settings.For details on how to do this, see at the end of this article.
If you add a Keenetic device to the application remotely via CID, the administrator password must be set on the router; otherwise, the connection won't be established.
When you add a router locally, the mobile device on which the application is installed must be connected to the router's main Home Wi-Fi network. If you are connected to a Guest network or any other segment isolated from the Home segment, you will not connect to the router through the application.
The Wi-Fi network name and password for the connection can be found on the back label of your Keenetic.
Turn on the Wi-Fi network on your mobile device, and in the list of available networks, find your network name. Click on it, then enter the Wi-Fi password to connect to the network (it is also shown on the back label) and click Connect.
If a VPN connection is installed on the router or mobile device, application errors may occur. We recommend that you temporarily disconnect the VPN connection.
If your Keenetic device is located behind another router, ensure that there are no rules in its firewall settings that may block traffic to/from our Cloud servers.
On your mobile device, check that you have all the permissions necessary for the application to work.
In some situations, when you cannot connect to your Keenetic via the application or an error occurs when adding a Keenetic, try restarting it.
If you have changed the recommended component set in your router's operating system, make sure to install the special system component Service for mobile application. You can do this in the web interface on the General System Settings page under Update and Component Options by clicking on Component options. By default, this component is installed in the router.
If you cannot add a router in the Keenetic mobile app, you can do it via the Keenetic Cloud web portal.
At the very least, if all previous options have been checked, you can reset the router to its factory settings.
Примітка
Connect from your mobile device to your Keenetic's Wi-Fi network. Then open a web browser and type 192.168.1.1 or my.keenetic.net in the address bar to connect to the router's web interface.
In the Username field, type admin (in English lowercase letters).
In the Password field, enter the administrator password for the router.
Important! The administrator password is not set by default (in the factory settings); the user sets it during the initial setup.
Click Log in to continue.
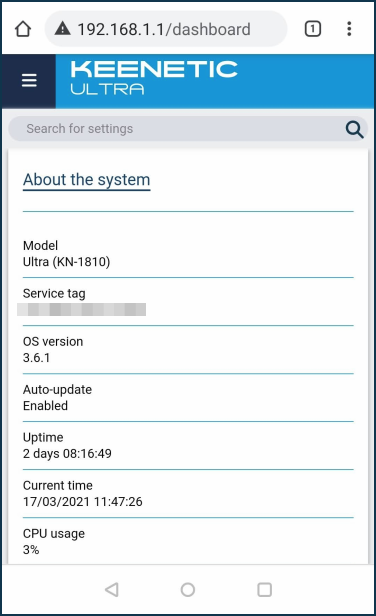
If the connection is successful, you will see the web interface (Control Panel) screen of your Keenetic. Scroll down to the System Update section. The OS version line displays the current version of the KeeneticOS operating system. If an update is available, install it.
Click on  (hamburger icon) in the upper left corner of the screen. The navigation menu will open on the sidebar. Scroll down and go to the System Settings menu.
The switch must be set to Enabled in the Cloud Service for Mobile Applications section.
Setting up your Keenetic via the mobile application
|
|
|
The Keenetic mobile application is designed for quick setup and management of Keenetic routers. The application will allow you to configure your device, update its operating system if necessary, reconfigure Wi-Fi settings, create Family Profiles to manage groups of connected clients quickly, manage built-in services, learn the status and current speed of the Internet connection, enable or disable the Guest Access Point, control all connected home clients, set schedules and much more. For each device, you can limit the speed or completely deny Internet access, configure port forwarding, and set the content filtering profile.
First, install the application and add your Keenetic according to the article Adding a router locally or Adding a router remotely by its CID.
Launch the application and make sure that the router is online and available for management.
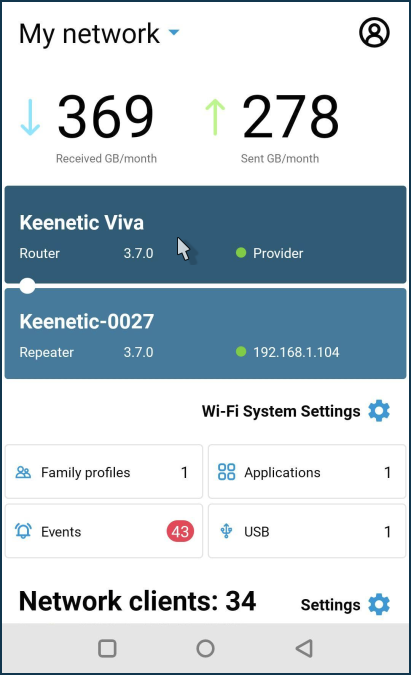
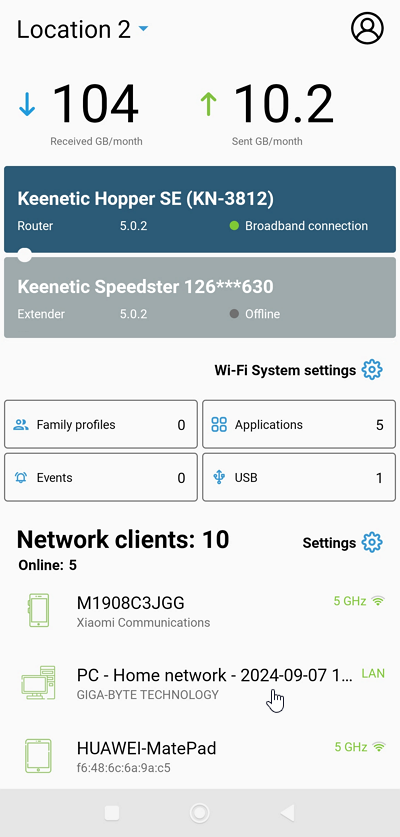
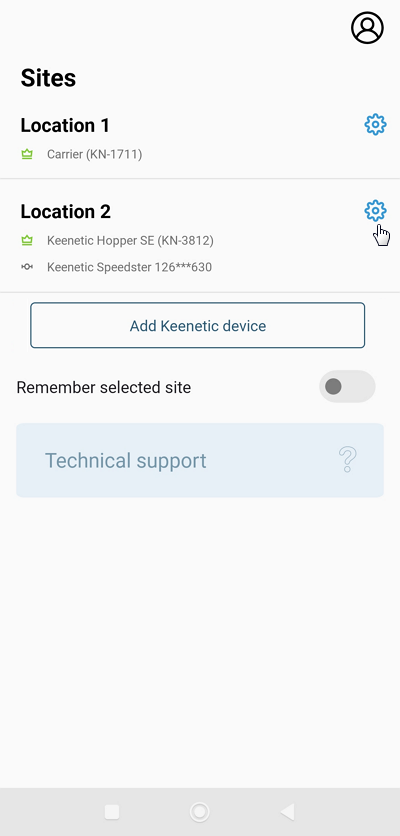
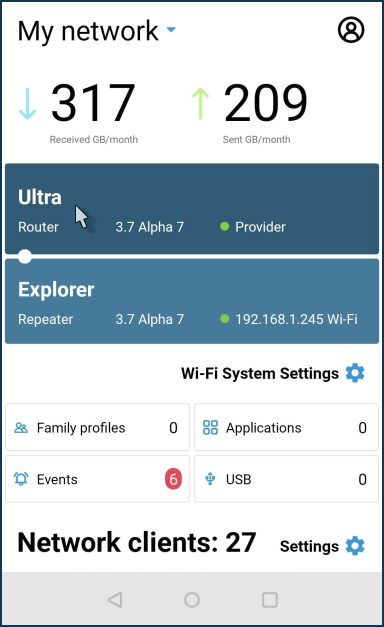
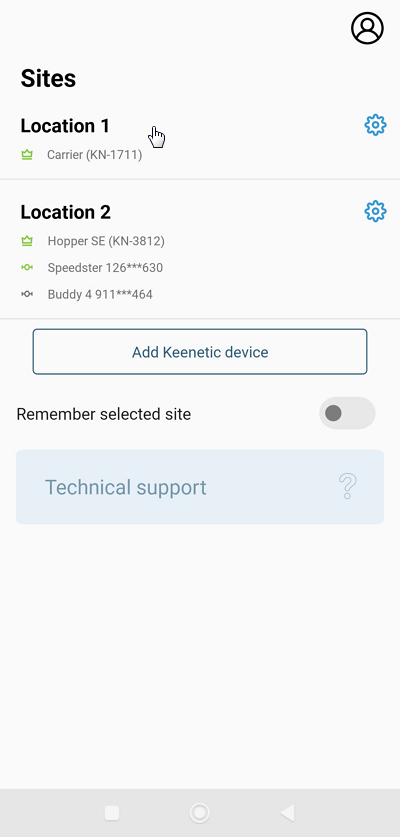
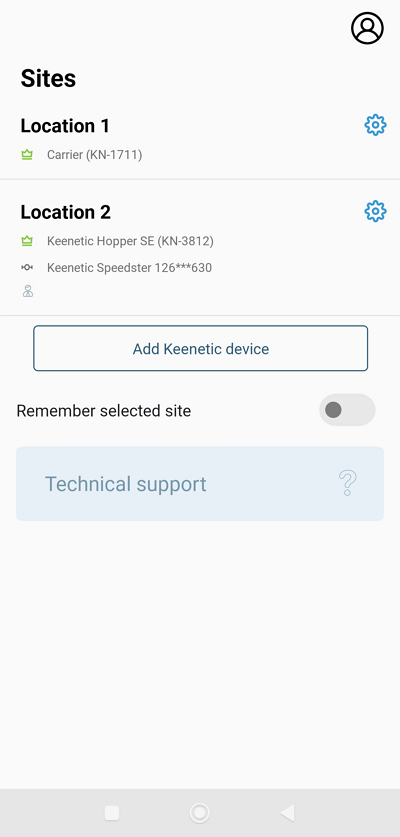
The Sites screen will show all the networks added to the app. Click on the site you want to connect to.
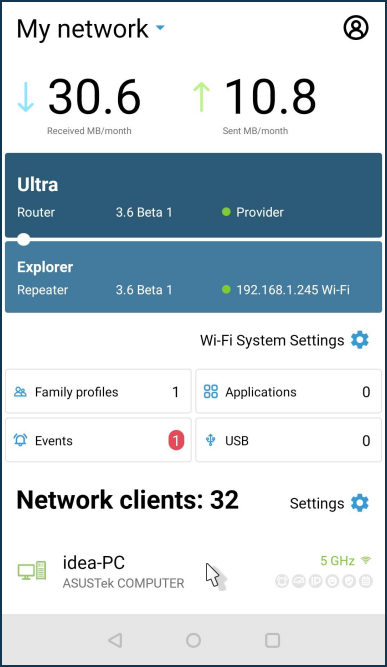
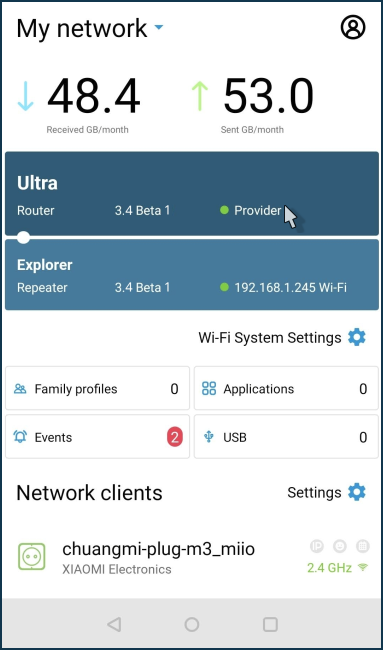
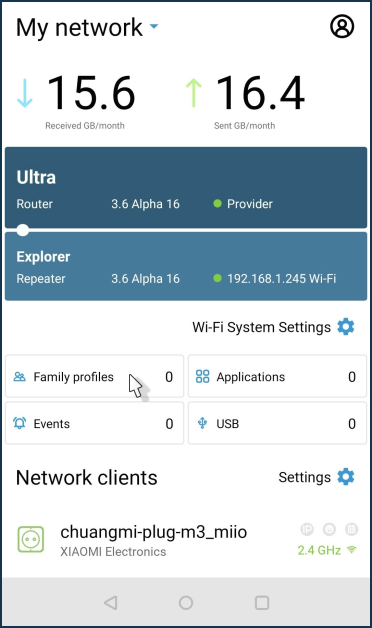
The site dashboard displays the volume of traffic sent and received by this site. You can get information about home network clients, create a family profile, and manage router applications.
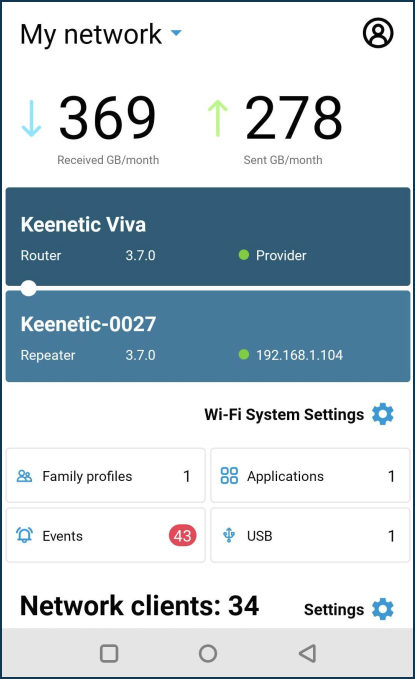
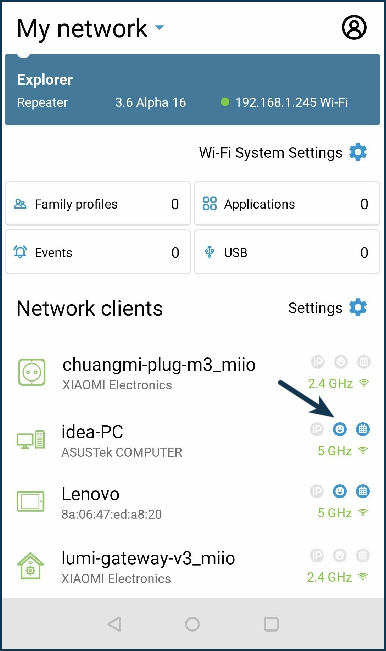
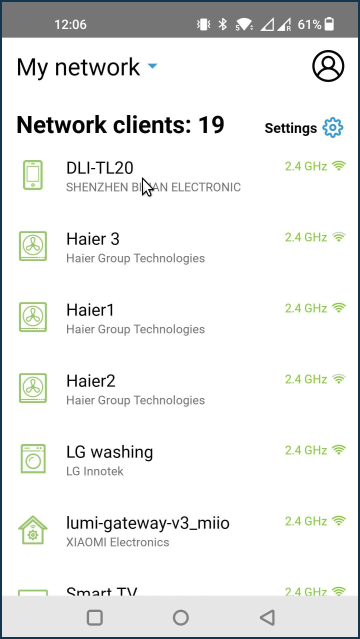
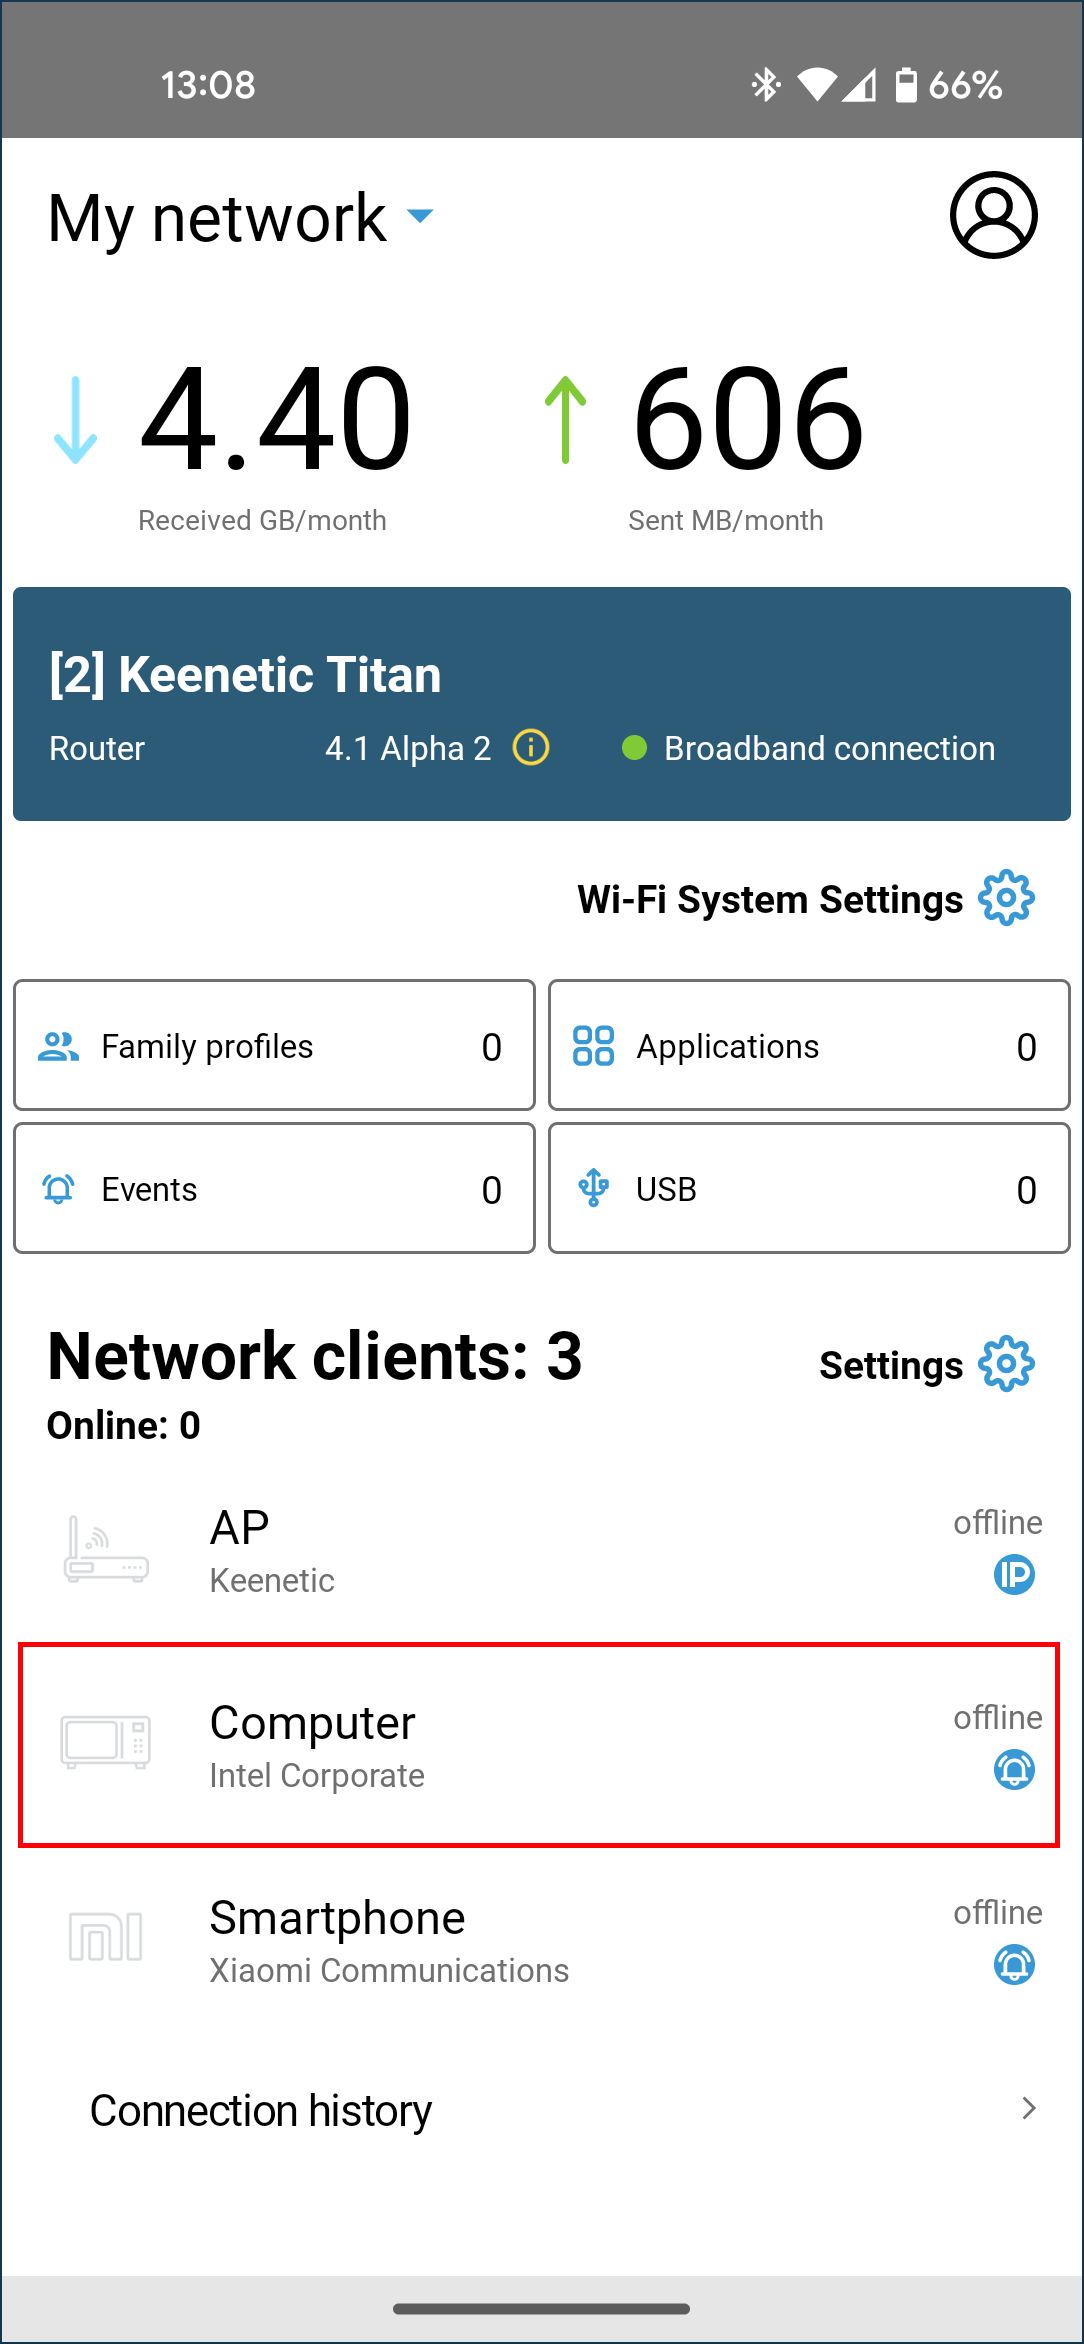
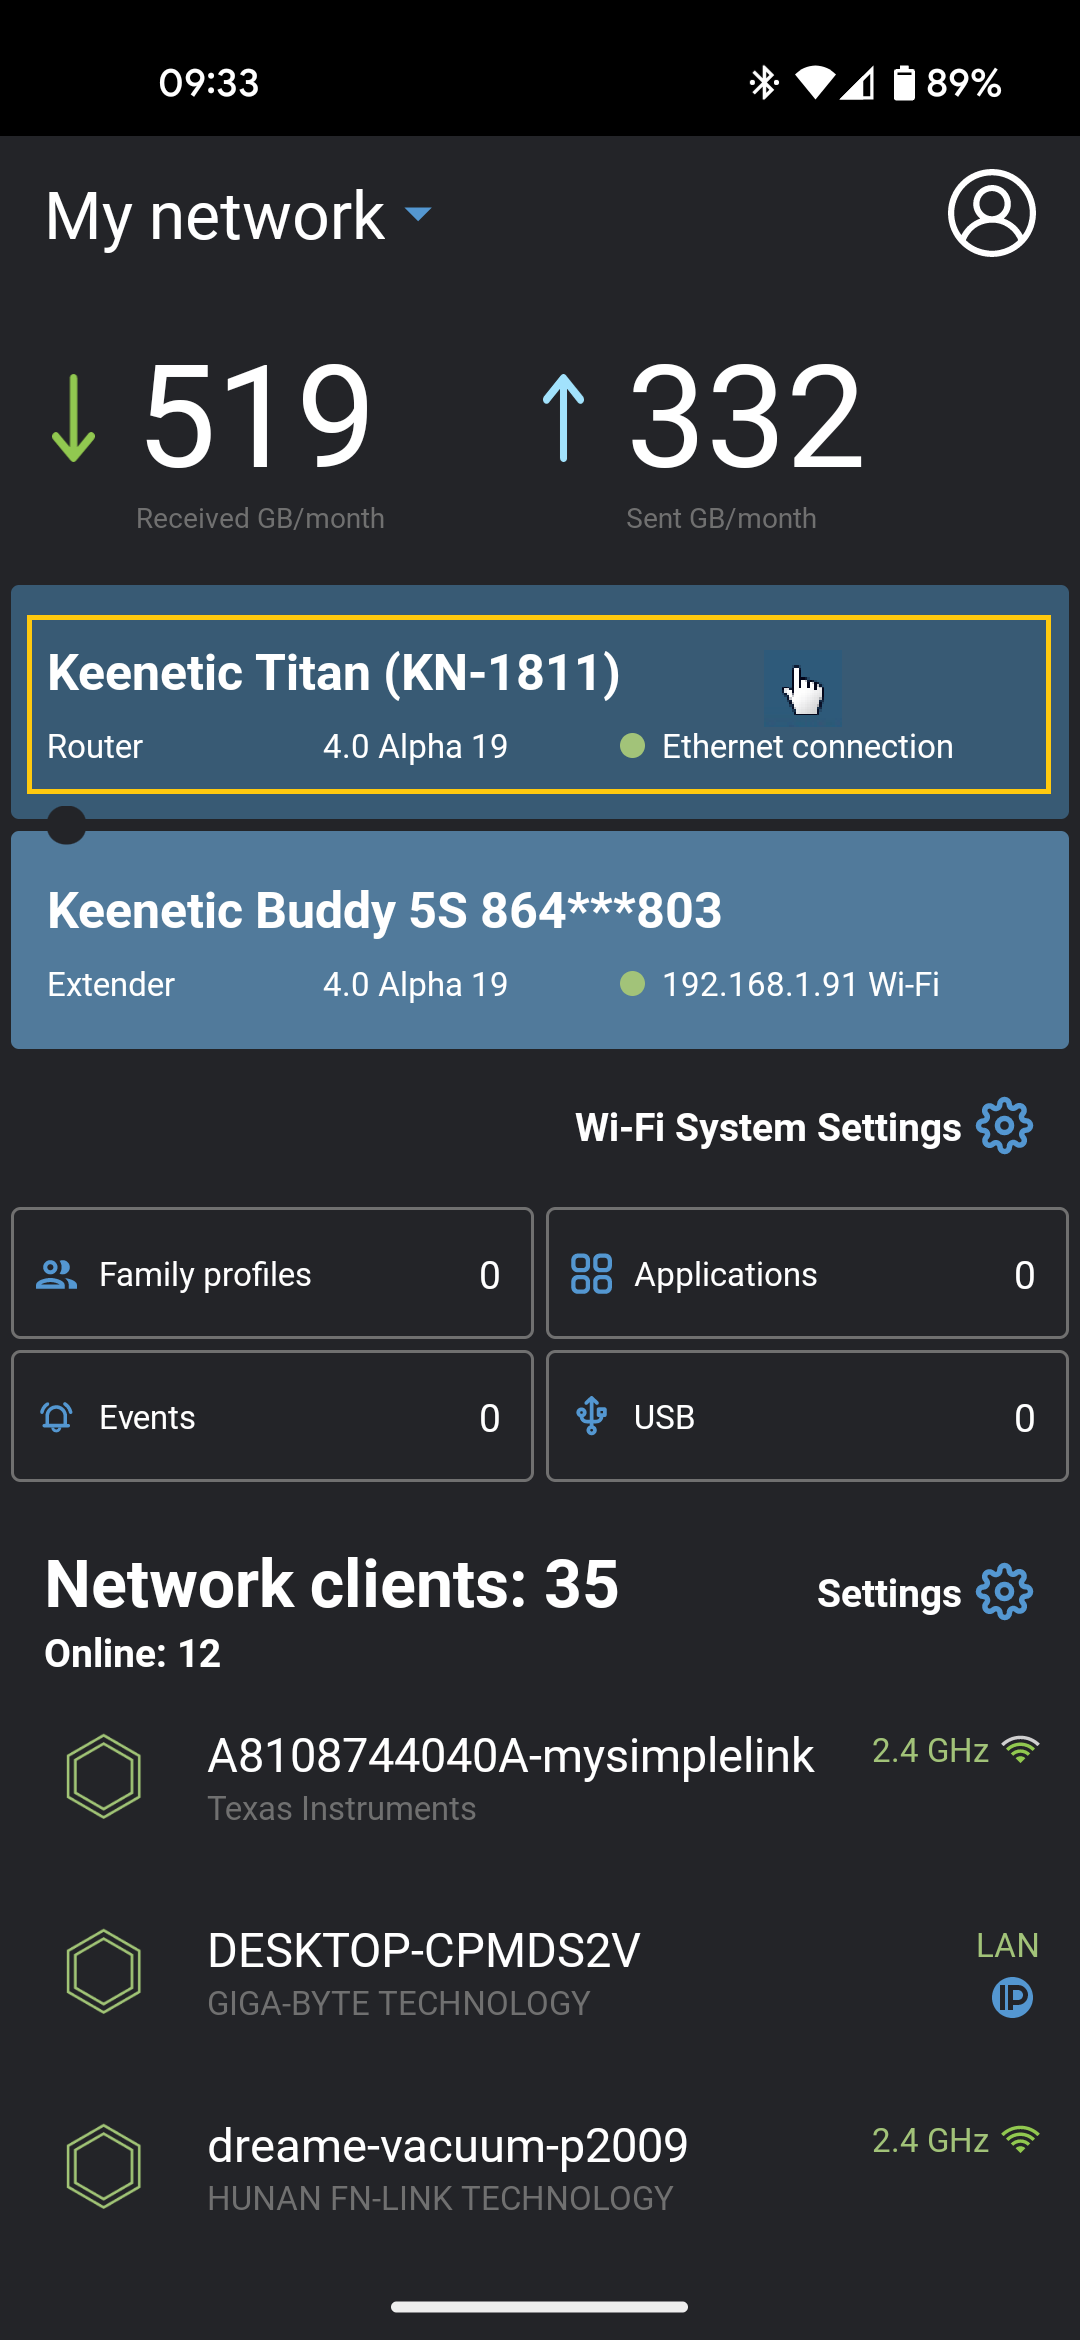
The Network clients section displays information about the connected clients.
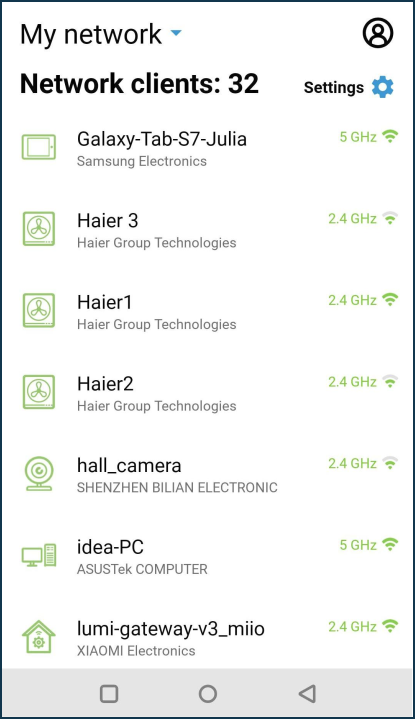
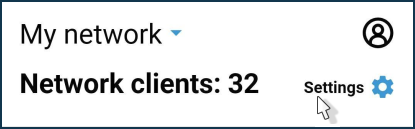
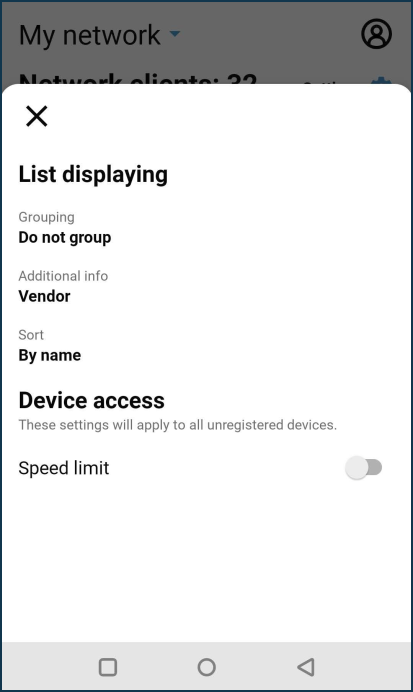
If you click on Settings (the gear icon) to the right of the Network clients section name, you will see options for configuring the list of home network clients displayed.
For example, you can configure grouping or sorting of the list and enable speed limitation for unregistered clients.
On the Family profiles page, you can create and manage groups of connected clients.
In the Family profile, for a specific group, you can specify client devices, schedule, enable the Internet filter, and view this group's traffic statistics.
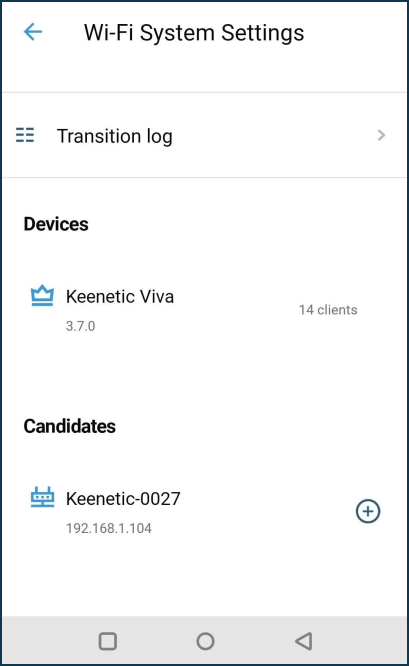
On the Wi-Fi System settings screen, you can add new extenders to organize a single wireless system with centralized management and monitoring.
You can manage the built-in applications on the Applications page — VPN servers and many more.
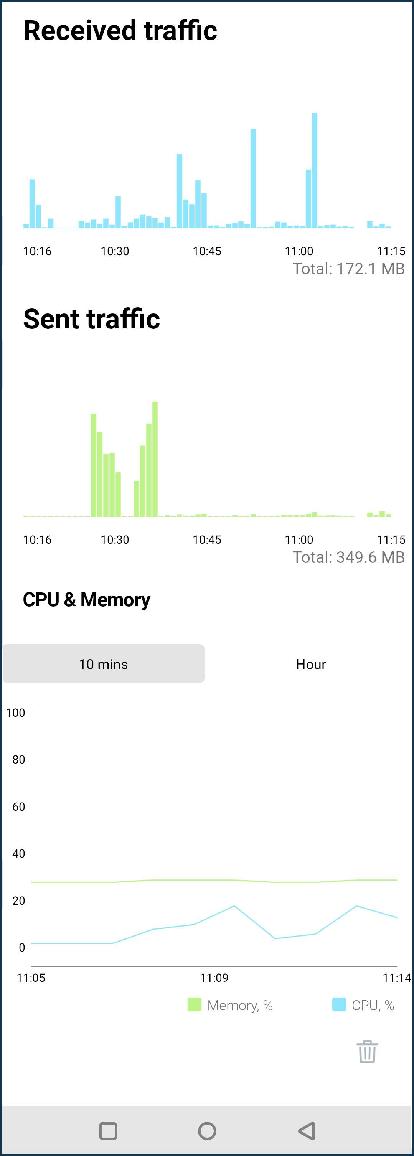
To view detailed traffic consumption statistics, click on the received/sent traffic numbers at the top of the screen.
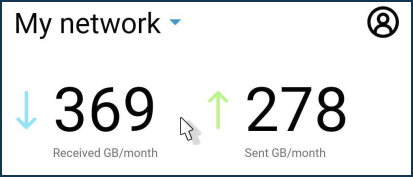
Here is information for different periods: Hour, Days, 30 days, Month, Year.
In addition to the total volume of Received and Sent traffic, the Top 10 network clients statistics are displayed here.
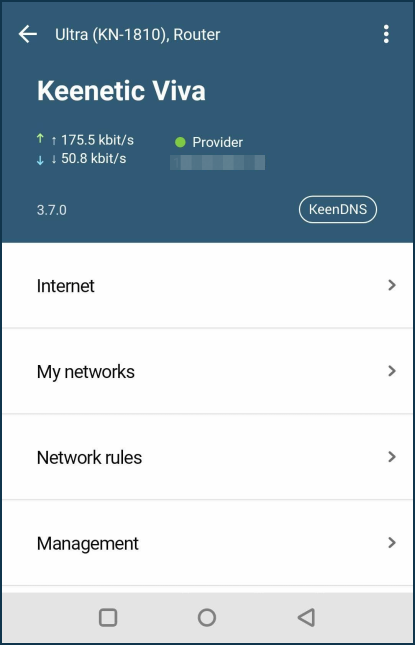
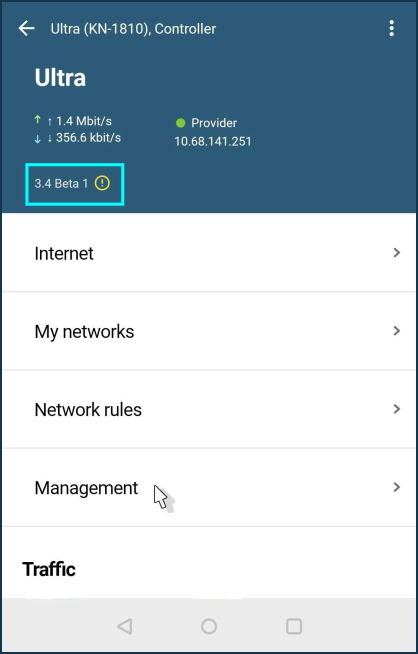
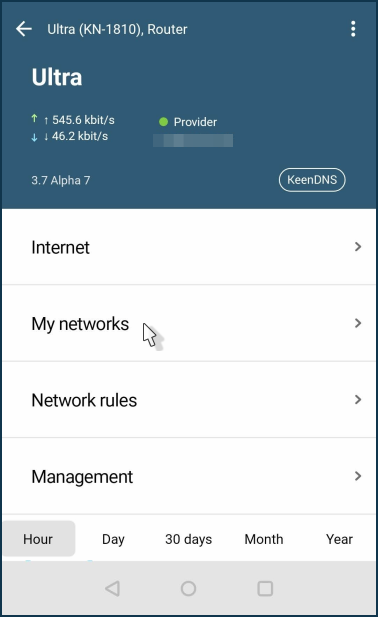
To go directly to the router settings, click on its name.
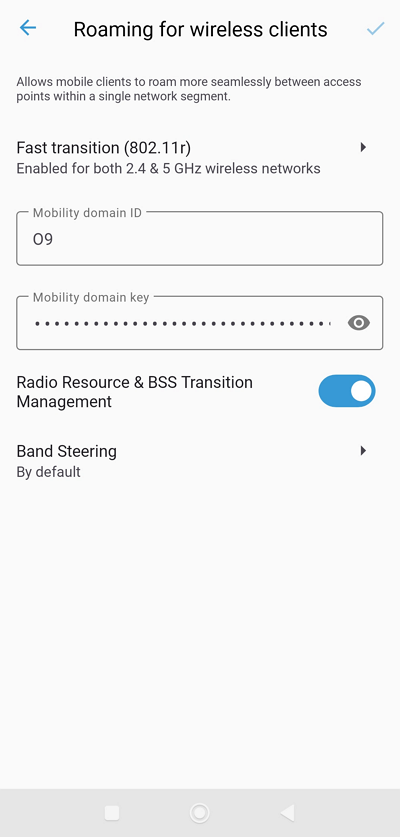
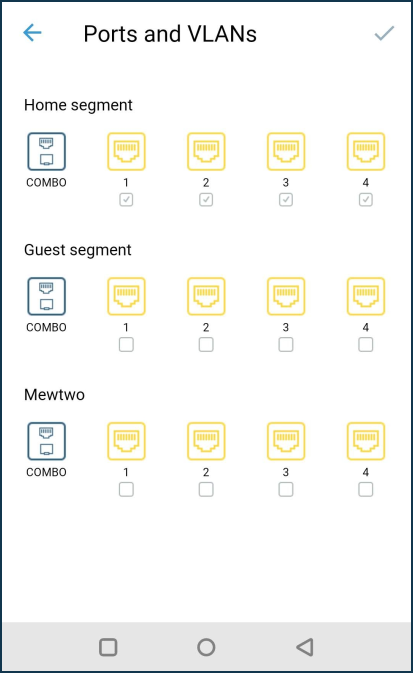
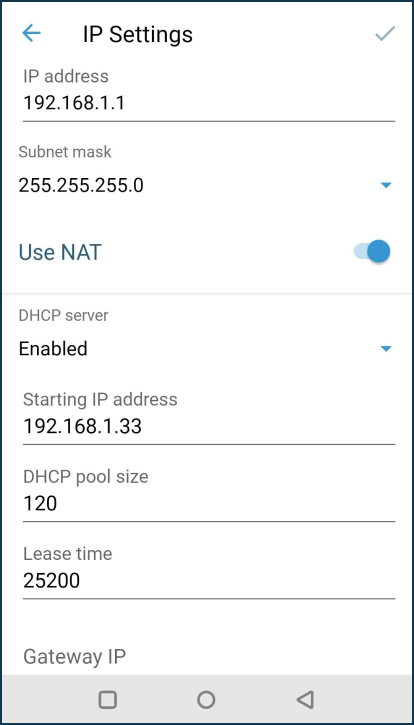
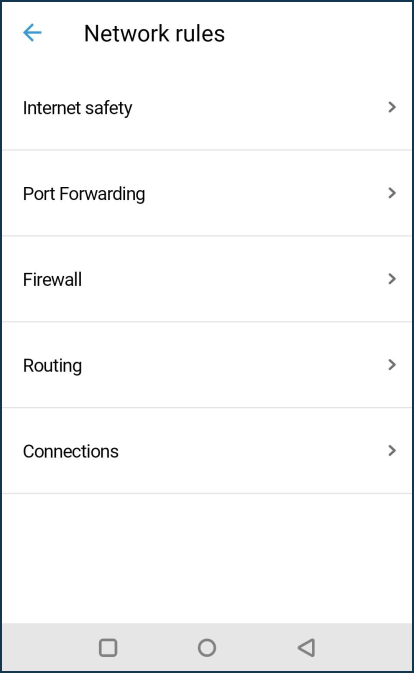
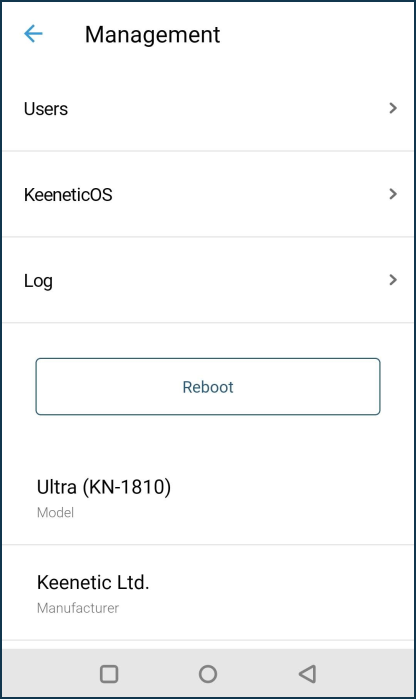
On the router's settings screen, there are menu items Internet (Internet connection settings), My networks (settings of Wi-Fi and network ports of the Home and Guest networks and additional segments), Network rules (settings of Internet filters and rules of Port Forwarding, Firewall, Routing), Management (settings of KeeneticOS update installation, user management and viewing the router's System Log).
At the bottom of the router's settings screen are graphs of traffic consumption and CPU/memory usage of the device. There is information for different periods: Hour, Day, Week, Month, Year.
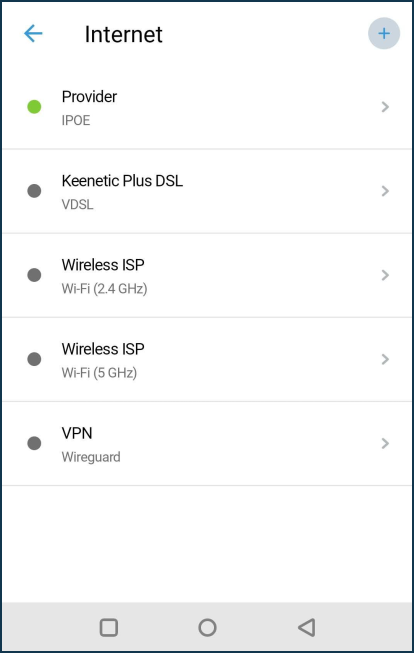
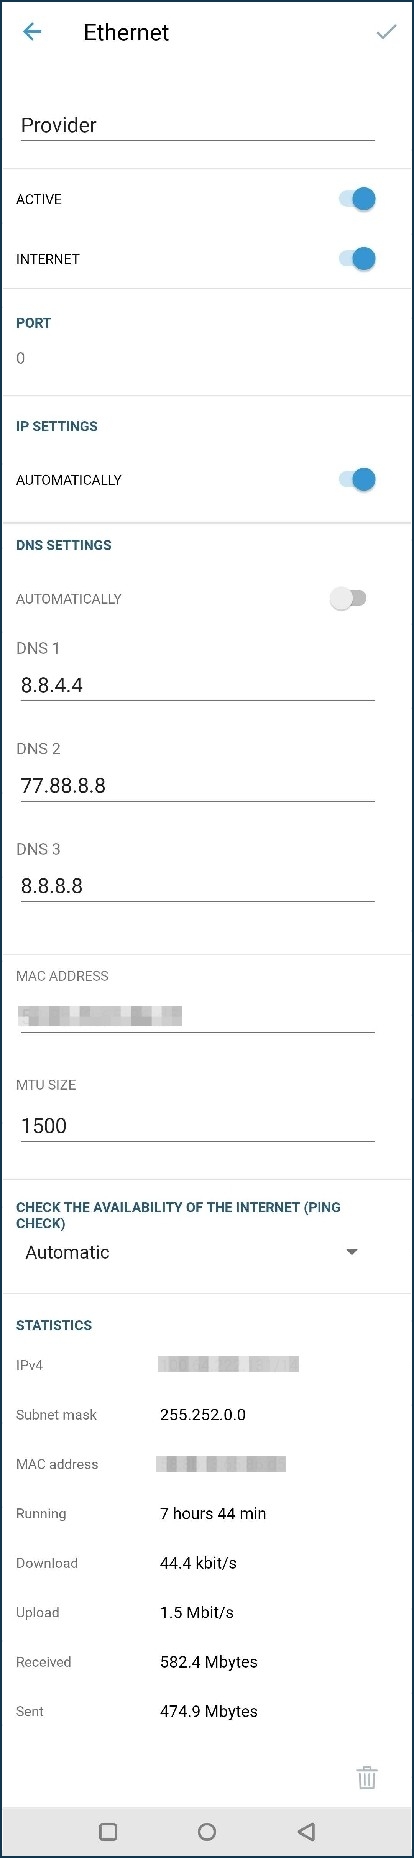
The Internet menu presents the settings for Internet connections: Ethernet cable (IPoE), 3G/4G Modem, Wireless ISP (WISP), Other connections (PPTP/L2TP/PPPoE), VPN connections.
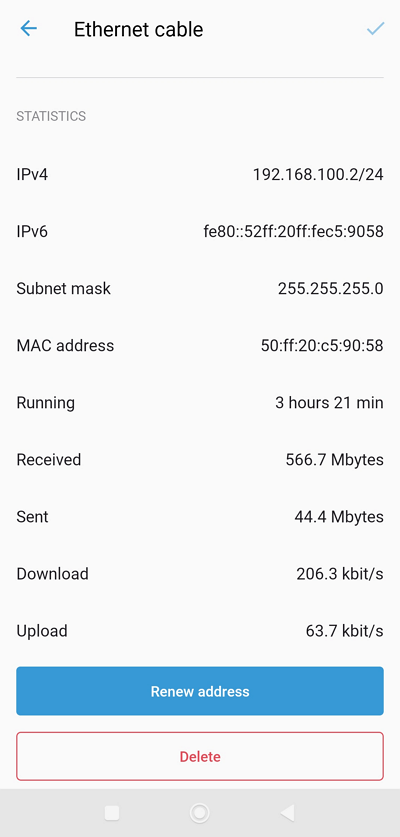
The bottom of the connection settings screen shows detailed information with statistics.
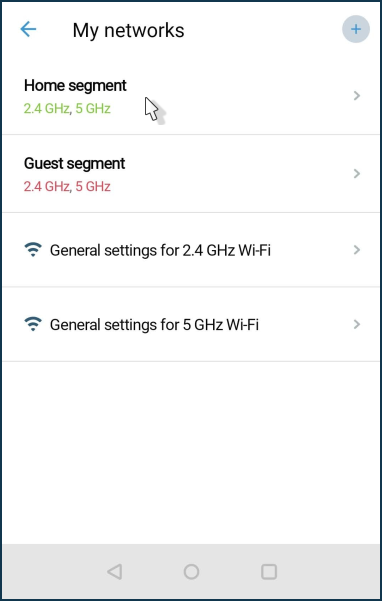
In the My networks menu, you will find the settings for Home and Guest network segments, as well as additional segments created.
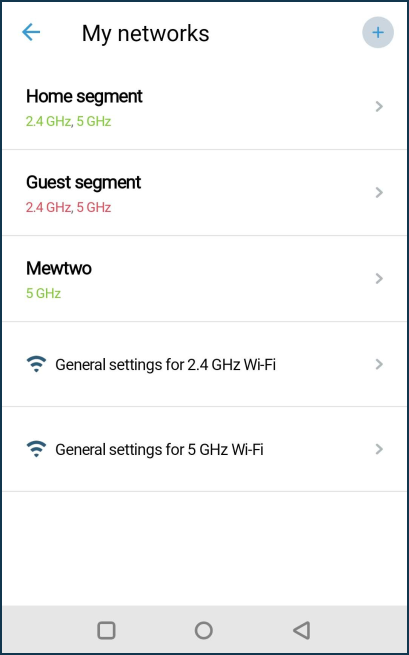
Here, you can change the Wi-Fi network's name and password to connect to it and manage various network settings.
The Ports and VLANs screen contains the network port settings of the router's built-in switch.
In the IP Settings screen, you can change the local preset IP address of the router and the subnet address.
In the Network rules screen, you can enable or disable the Internet filter, create port forwarding and firewall rules, add and remove custom routes, and view active connections on the router.
The Management screen contains user settings, KeeneticOS upgrades or component installation/removal, system log, device reset and factory reset buttons.
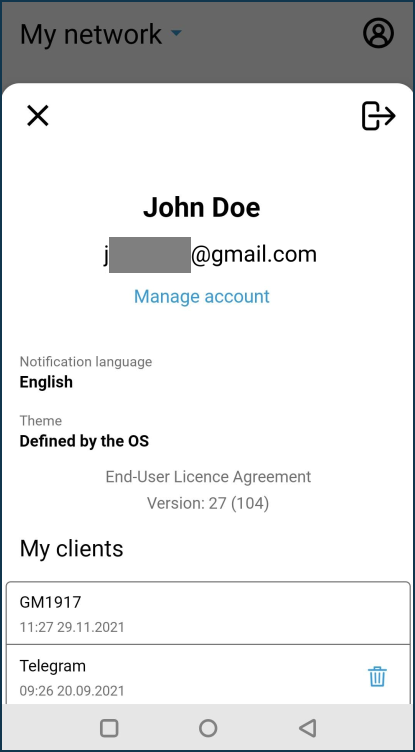
On the Sites screen, clicking on the profile icon (in the upper right corner) allows you to enter the account management settings to change your name or email address. Also, here you can change the notification language and the application's theme (light and dark interface available).
Updating KeeneticOS from the mobile app
We release regular updates, making your Keenetic's operating system faster, more functional and more secure. We recommend using the latest version of KeeneticOS. You can update KeeneticOS to the newest version via the Keenetic mobile app.
Важливо
To update KeeneticOS to the latest available version, the router must be connected to the Internet.
Launch the application. On the Sites screen, select the network to which you want to connect.
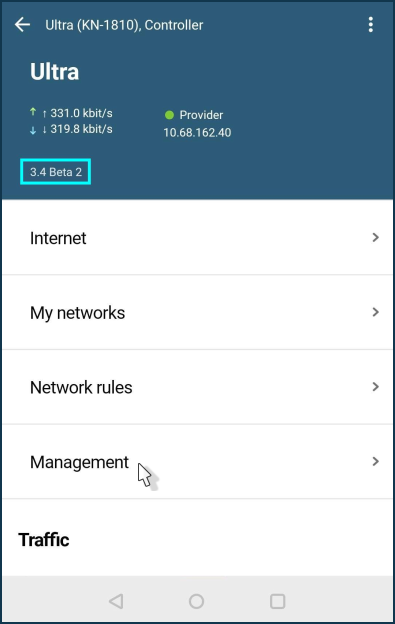
Make sure that your router is accessible and available for operation. If an update is available, an ! icon appears near the number of the currently installed version. Tap on the router name to go to its settings.
Click on the version number to go to the KeeneticOS screen. You can also access this screen by clicking on the Management menu and then KeeneticOS.
The current version, update channel and update availability status will be specified on the KeeneticOS screen. If an update is available, click the Install the update button.
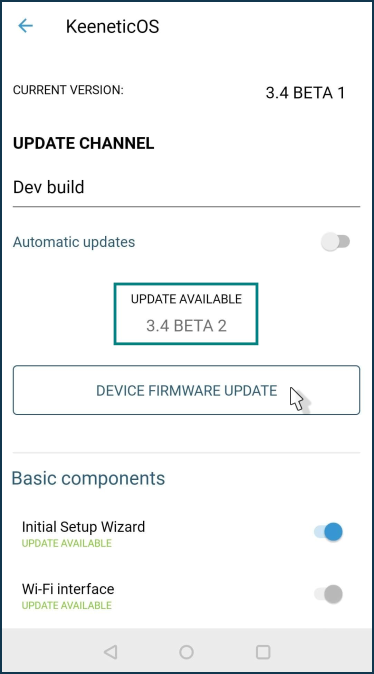
If necessary, you can manually change the update channel of KeeneticOS (for example, to install a preview or dev build). To do so, tap on the update channel name and select the required one.
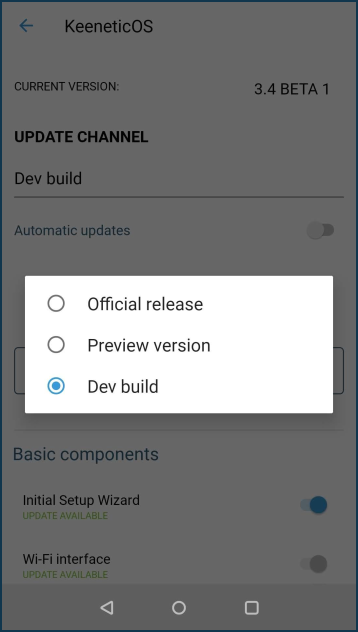
There are
four update channelsavailable:Main channel (Recommended): Updates in this channel have been fully tested and are recommended for all users. It's updated roughly every two months.
Preview channel: Select the Preview channel to be among the first to try the latest updates, performance improvements and new features with minimal risk. Preview versions are published twice a month.
Dev channel: The Dev channel is updated weekly and shows our community what we are working on right now. Dev builds may be less polished.
LTS: Long-term support. Updates in this channel include only security fixes, with no new features added.
Click the Update button to start the device update process. Before updating, we recommend make a backup of the operating system and device settings.
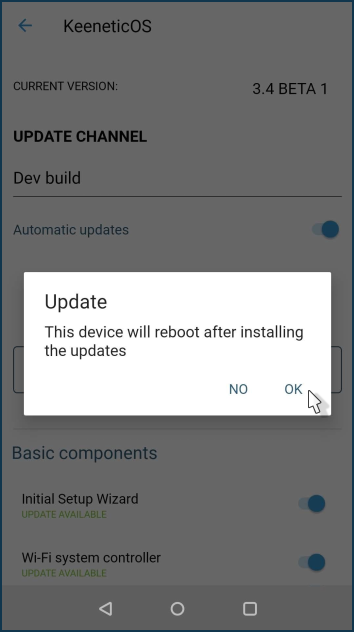
Важливо
The router will reboot during the operating system update. As a result, the connection to the router will be lost for a few minutes but will be restored after the device is rebooted.
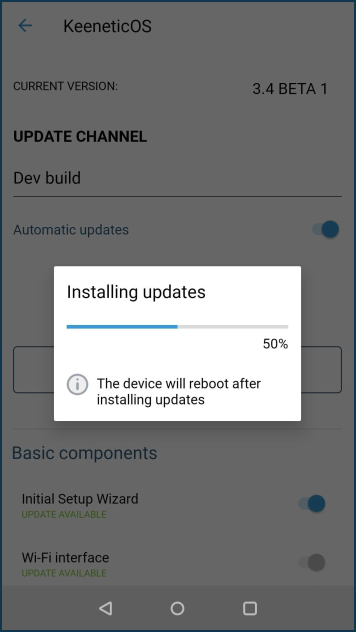
Wait for Keenetic to boot. In a
few minutes, it will be available for management from the application again. Go to its settings.
On the settings page, you will see the current version of the KeeneticOS. Make sure the router's operating system is updated to the latest version. Go to the KeeneticOS screen and ensure that there are no updates and that the device has the latest version of the operating system installed.
If you do not want to check and install updates yourself, we recommend that you enable the Automatic updates option. In this case, the latest version of KeeneticOS will always be installed on your router.
More information can be found in the KeeneticOS Автоматичне оновлення article.
You can create a schedule for this function to automatically update the operating system. In this case, the auto-update will occur at the specified time.
Family profiles (parental controls)
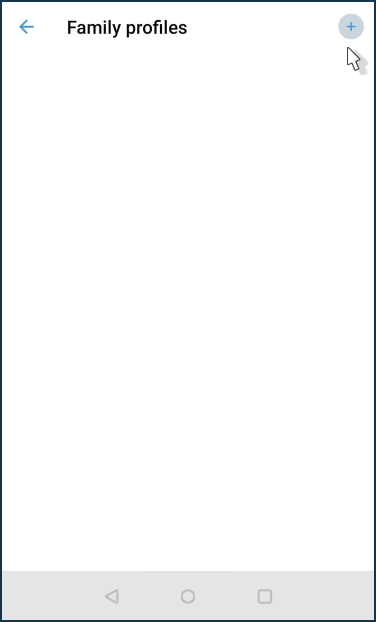
On the Family profiles screen, you can create and manage individual groups of connected devices in the Keenetic app.
This is especially useful for establishing parental controls. By creating a separate child's profile, you can add the devices you want to control (it can be mobile smartphones, tablets, or desktop computers), set a schedule for them (specify the allowed intervals of time during the day or certain days), enable Internet safety service, which blocks access to materials for adults, malicious and fraudulent sites.
When parents are not at home, they can observe what is happening on their home network through a mobile application (the family profile settings show the traffic from the devices included in this profile) and, if necessary, quickly (with one switch) deny Internet access.
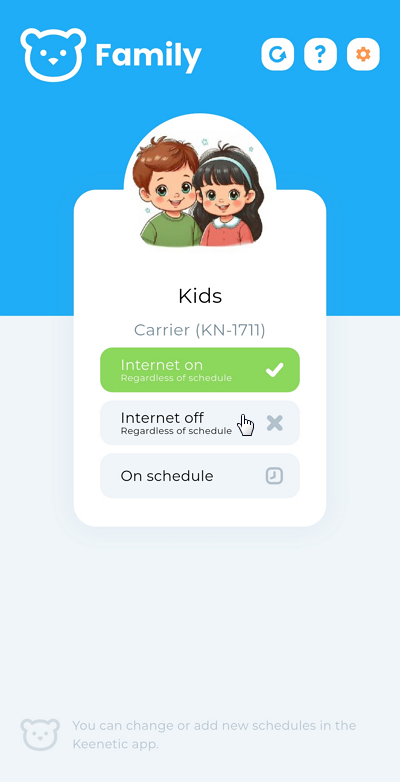
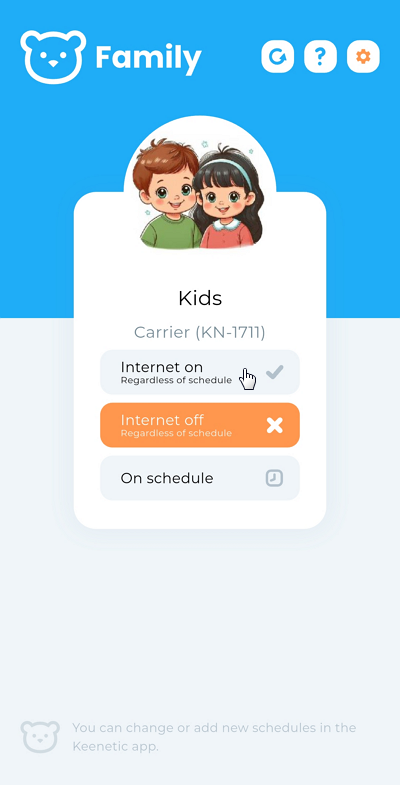
Let's take a look at an example of creating a family profile.
Start the application, and on the Sites screen, tap on the site for which you want to set up the profile.
Tap to Family profiles.
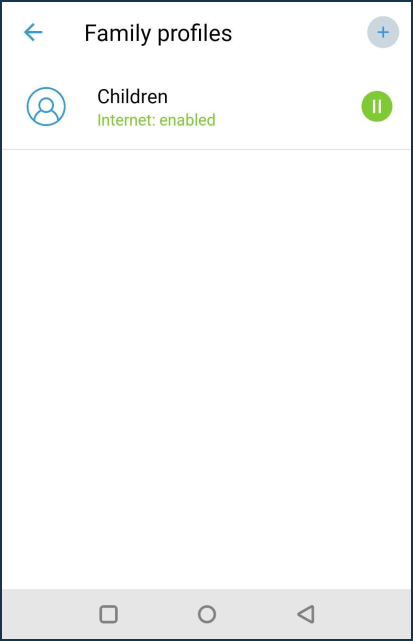
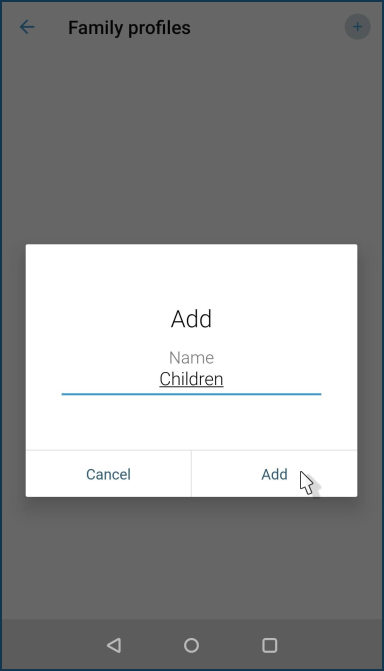
To create a new profile, click on the + icon in the upper right corner of the screen and name it.
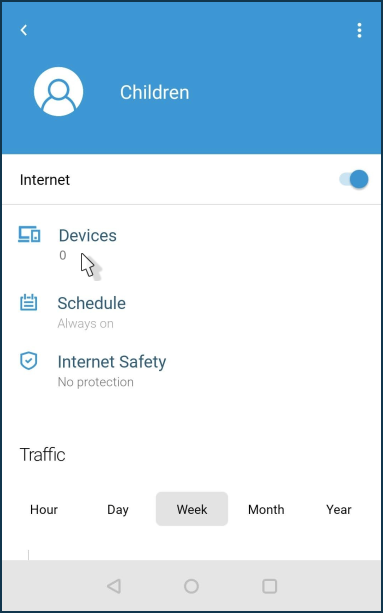
In our example, a family profile named Kids has been created. Click on the name of the created profile to proceed to its setting.
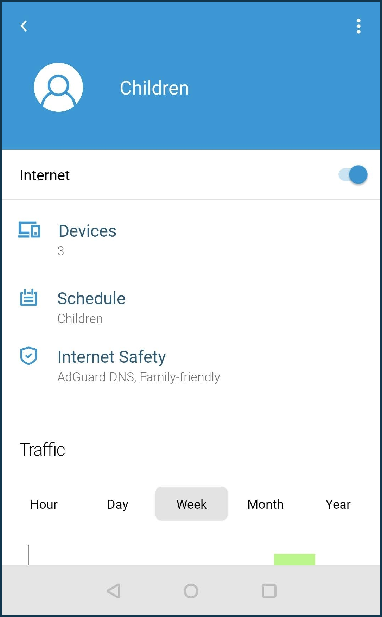
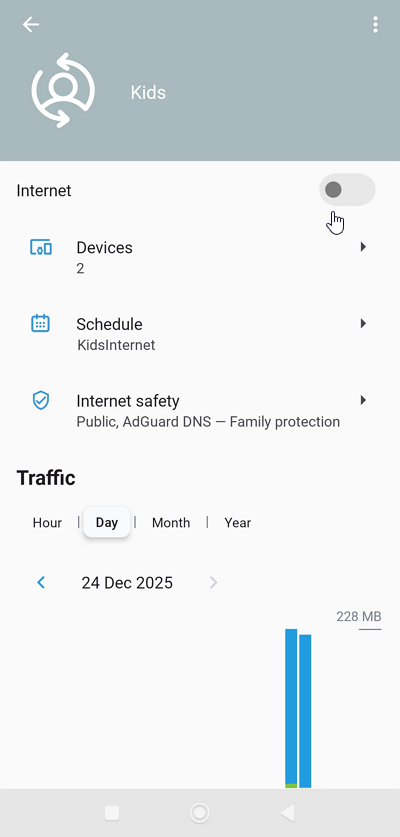
In the family profile, you can add devices, create a working schedule, enable an Internet safety service and view the traffic statistics for this group.
Click on Devices.
Click on the + icon in the upper right corner of the screen and add the devices to the profile (in this example, we have two devices — a smartphone and a tablet).
You can later remove devices from your profile or add new ones to it.
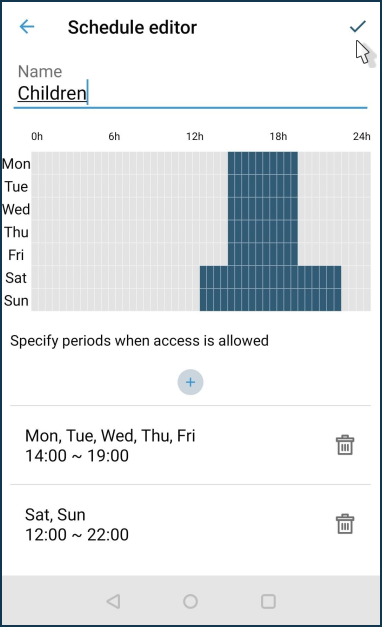
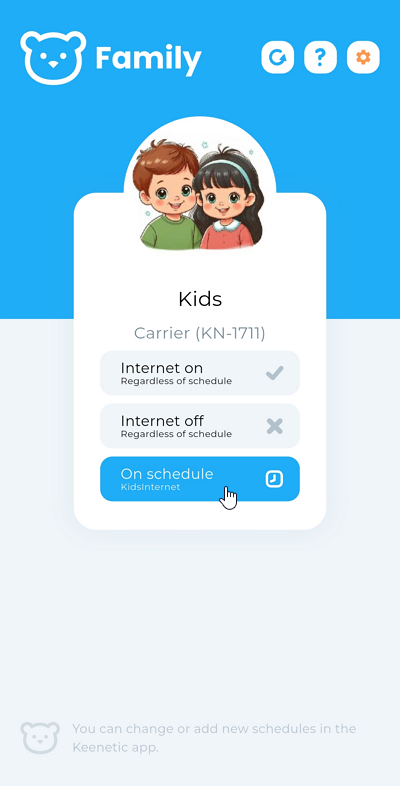
Click on Schedule to set the time intervals or days of the week when Internet access will be allowed.
In our example, we have created one schedule with named KidsInternet for access to the Internet on weekdays (Mon - Fri) from 18:00 to 20:00 and on weekends (Sat, Sun) from 17:00 to 18:00 and 20:00 to 22:00.
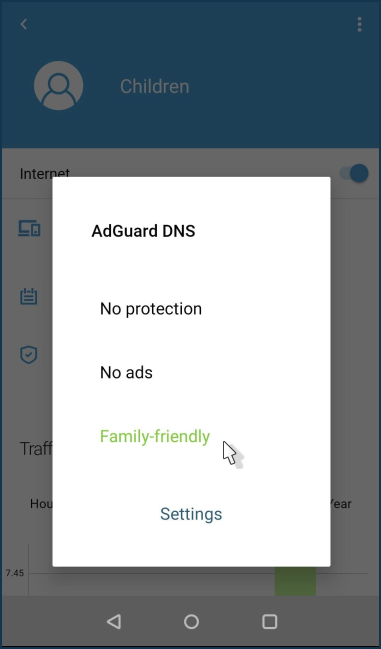
Click on Internet safety to enable one of the Internet safety services. You can use one of the suggested content filtering services.
In the family profile settings, click on Internet safety and then on Settings. Set the Filter mode to Public.
In the Default content filtering profiles section, you can select a profile that will be applied to all clients in the network segment.
In the Preset profile section, specify the profile that will be applied to all devices included in the family profile. In our example, we use the AdGuard DNS service with the strict Family protection profile.
We have created and configured a family profile for Kids, where we have added the necessary devices, created a work schedule (specified the hours and days of the week when children are allowed to access the Internet) and enabled a service for safe work on the Internet and to block access to adult websites.
The profile screen displays the volume of received and sent traffic of the devices included in the current profile. Traffic can be filtered out in an Hour, Day, Month, Year.
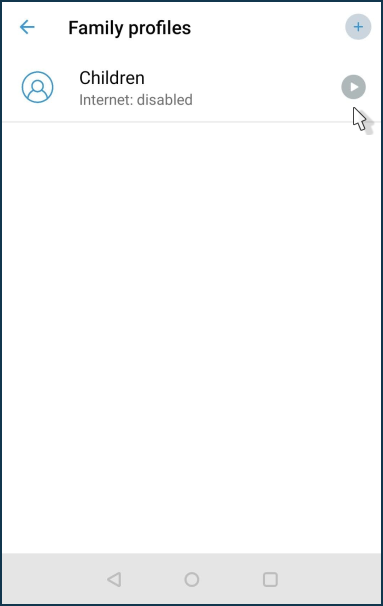
On the Family profiles screen, you can quickly, with one switch, deny Internet access to all devices in your current profile. Click on the play icon to suspend the profile.
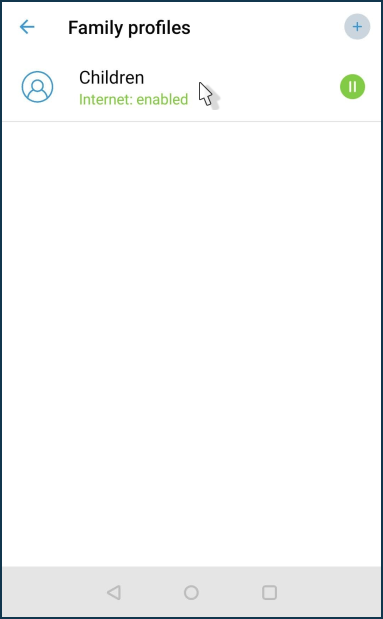
Clicking on the pause icon will activate the profile again.
You can also turn on or off the internet from the profile settings screen using the Internet toggle.
For devices added to the family profile, a smiley face icon  will appear in the Network clients list.
Застосунок Keenetic Family
Застосунок Keenetic Family для пристроїв Keenetic — це дуже простий застосунок, що дає змогу керувати доступом до Інтернету для членів вашої родини. Створивши сімейний профіль в основному застосунку Keenetic та додавши до нього всі клієнтські пристрої, наприклад, вашої дитини, ви можете вимкнути Інтернет одним натисканням або встановити розклад для всіх її гаджетів одночасно.
Застосунок Keenetic Family є доповненням до основного застосунку Keenetic. Використовуйте його самі або встановіть для дорослих членів вашої родини.
Застосунок Keenetic Family доступний у
|
|
Запустіть застосунок. Натисніть кнопку «Увійти», щоб увійти за допомогою свого облікового запису Keenetic (цей самий обліковий запис слід використовувати в основному застосунку).
Після успішної автентифікації ви побачите головний екран застосунку, на якому відображаються сімейні профілі.
Важливо
Щоб створювати та редагувати сімейні профілі й розклади, використовуйте основний застосунок Keenetic.
У цьому застосунку ви можете вмикати або вимикати доступ до Інтернету для пристроїв сімейного профілю одним натисканням, а також встановити розклад роботи.
Blocking Internet access using the Keenetic app
With the Keenetic mobile application, you can restrict Internet access to any device on your home network. For example, parents can block Internet access for their children's computers, tablets or smartphones. This can be done either from the home network or remotely over the Internet.
|
|
|
Launch the Keenetic app and on the Sites screen, click on the network name.
In the list of network clients, click on the device entry for which you want to block access to the Internet.
From the device options screen, set the Internet switch to Off.
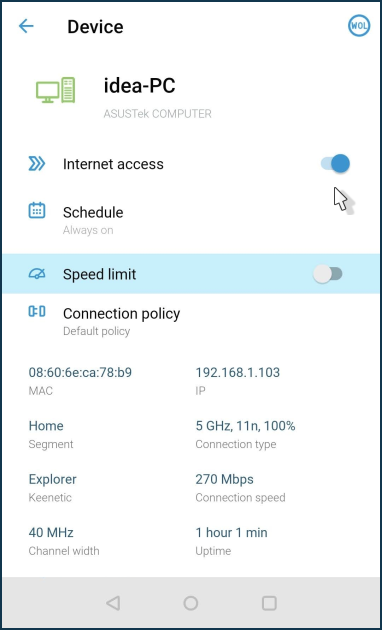
Internet access will be blocked immediately for this device. To restore access, set the Internet switch to On.
Важливо
If a work schedule is used for the device, it will prioritise the manual Internet access blocking.
It is currently impossible to manually restrict Internet access if that contradicts the current schedule to avoid conflicts of mutually exclusive rules for the same device or device groups. If you want to block access manually, you must disable the schedule before doing so.
The developers plan to implement a more flexible setting in future versions with the possibility of simultaneous manual control in conjunction with the current schedule.
If you want to disable Internet access for a group of home network devices at once, use Family profiles.

If you disable internet access in a family profile, the schedule stops working. On the Family profiles screen, tap the play icon to turn off the internet. For example:
Важливо
Switching off the Internet in the family profile will be applied to all devices in the current profile.
Pressing the pause icon again will turn on the Internet on the current profile devices.
Підказка
If you need to block internet access for just one device in the family profile, remove it from the profile, go to the Network clients screen, find the device, tap on its entry, and on the settings screen remove its schedule, then switch the Internet toggle to Off.
If you often need to disable/enable Internet access for individual devices on your home network rather than the entire family profile group, we recommend creating its own profile for each device so that you can separately manage Internet access for a particular device.
Setting notifications from your Keenetic
With the Keenetic mobile application, you can set up notifications to receive information about events on the router in a way that suits you best. For example, you can receive notifications about changes in the status of your router (online/offline) or when the router switches to a backup connection.
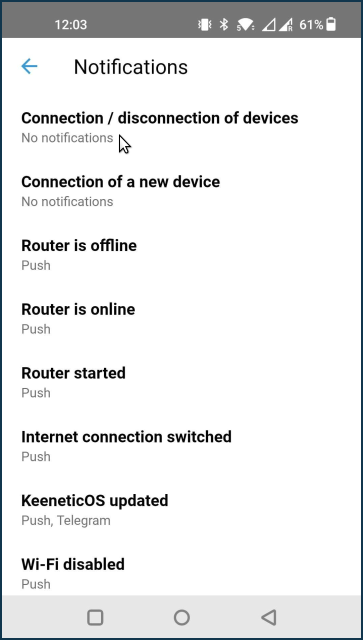
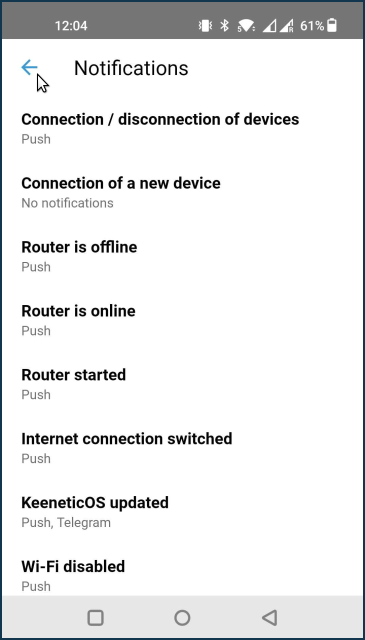
The following alerts are currently available:
Connecting/disconnecting network devices
A new device on the network
The Keenetic device is offline
The offline alert comes when no signals are received from the router to the cloud server. For example, it may be because the Internet is unavailable (no connection to the Keenetic Cloud server), the server waits for
10 minutesand then generates a notification.The Keenetic device is online
The online alert is received when a signal message from the router appears on the server after the Keenetic Offline event has been triggered. It is generated by the server as soon as the first signal message is received.
The device has been booted up
The router has been turned on/rebooted.
The Internet connection has switched
The alert comes when the WAN connection on the router is changed. For example, switching from the main to the backup channel and vice versa.
KeeneticOS has been updated
The notification comes when the KeeneticOS version on the router is changed.
Wi-Fi off / on
The status of the family profile has changed
Activating/deactivating the Internet for a family profile.
Security notifications (cannot be disabled):
Incorrect Keenetic device password entered to access from the Cloud
A manager has been added to the location
A manager has been removed from the location
Change of encryption key on Keenetic device
A new user has been added to a Keenetic device
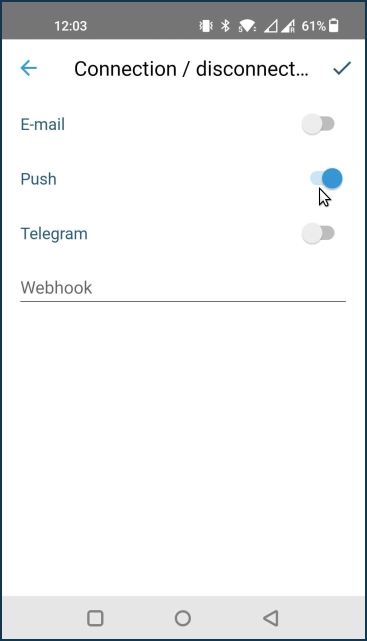
You can receive notifications in the following ways:
To an e-mail address
By push notifications (from the Keenetic application on a mobile device)
In the Telegram messenger
Install the Keenetic mobile application and add your device by following the instructions:
|
|
|
Launch the app and on the Sites main screen, tap on the site management settings icon  ('gear').
Click on Notification settings.
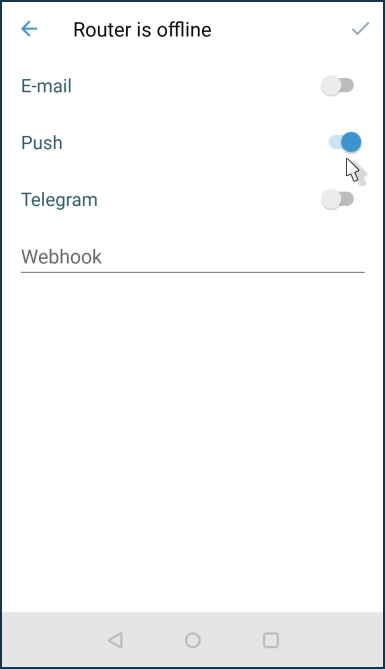
Select the events for which you want to be notified.

Please tap on the events that you want to be notified of when they occur. Select the notification methods. Tap a checkmark in the upper right corner of the screen to save the setting.
When you enable e-mail notifications, you will receive e-mails to the address you specified when registering your account. For example:

Підказка
If you want to set up notifications to different e-mail addresses, you must first create accounts for these addresses on Keenetic Account and then add them as Location Managers.
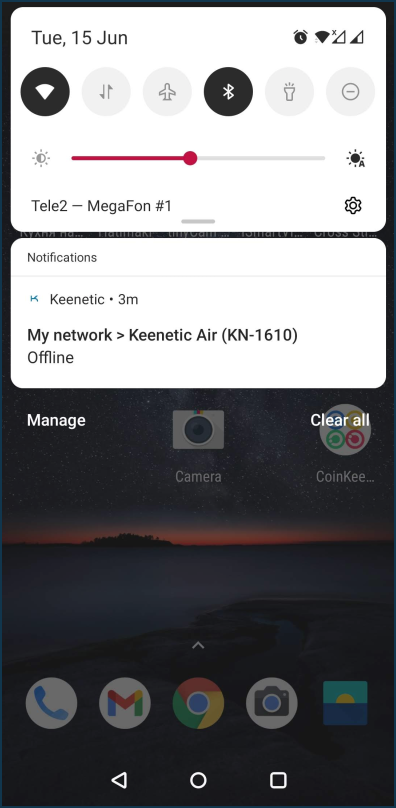
When push notifications are enabled, they will arrive at your mobile device, where the Keenetic application is installed. For example:
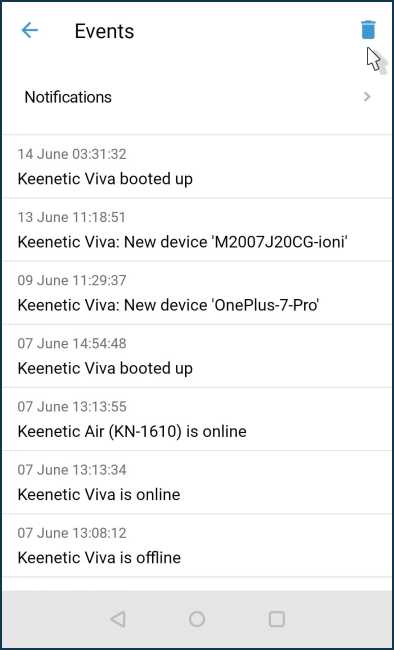
The Events screen keeps a log of completed notifications. To clear the log, press the icon  in the top right corner of the screen.
Configuring Telegram notifications
To set up notifications via Telegram Bot (https://t.me/KeeneticNotifierBot), mark the required notifications first.
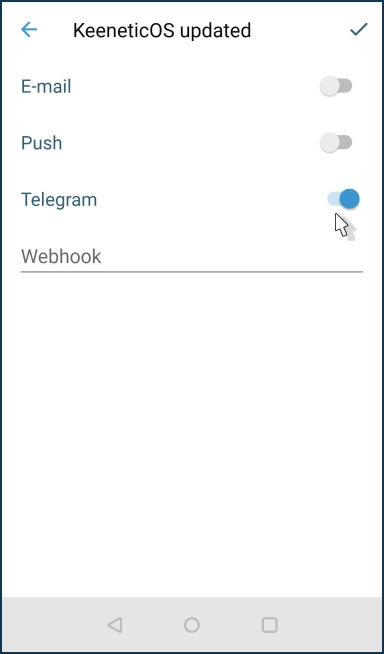
And then generate a unique code by clicking Connect.

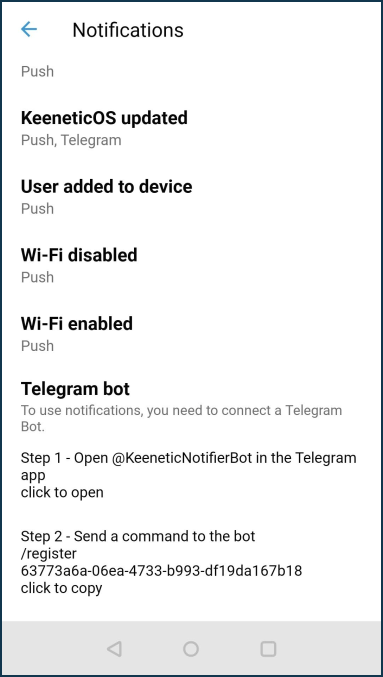
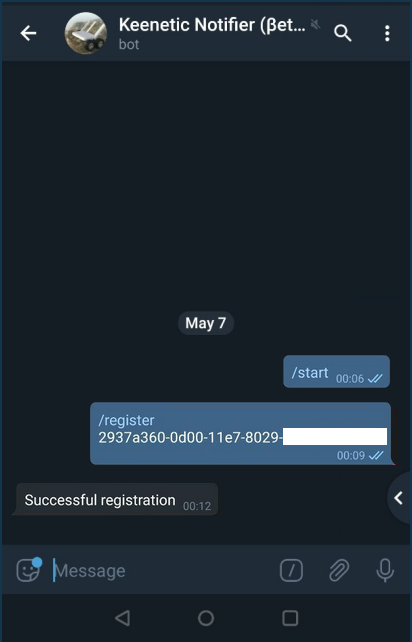
Then go to the https://t.me/KeeneticNotifierBot settings and register the obtained code. Copy the command /register [telegram-code] to the clipboard and then send it to the bot.
If you are successfully connected, you will see a confirmation message about registration Account connected to bot.
Важливо
If you get an invalid code message when registering the key, be sure to run the /unregister command and then register again. Also, make sure you copy the code without any extra characters, such as spaces.
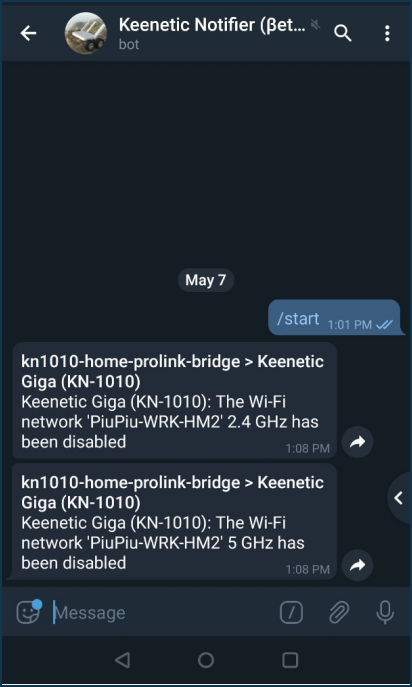
Check the notifications afterwards.
Примітка
If you want to make events come to your computer and be displayed in the system tray (notification area) of your Windows operating system, install the Telegram Desktop app on your PC. Event notifications will appear directly on top of open windows. In Telegram, this feature is enabled by default, and notifications appear in the lower right corner of the screen.
Setting up notifications for turning on/off a specific home network device
Using the Keenetic app, you can set up notifications on your phone about a specific device connecting to or disconnecting from your home router network.
Launch the app and select the required network from the Sites screen.
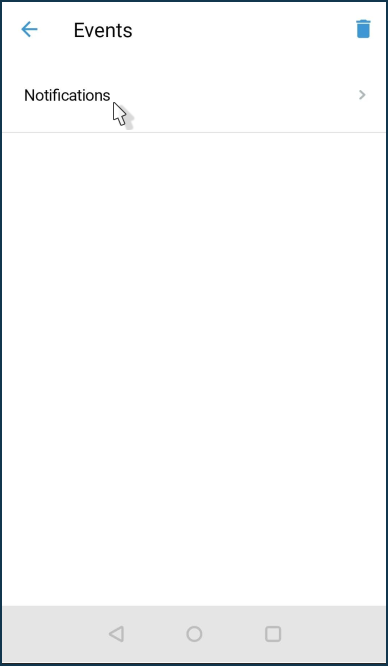
On the network settings screen, tap Events.

Tap Notification settings.
On the Notification settings screen, tap on the event you want to be notified about. In our example, this is Connection / disconnection of network clients.
Select the means of receiving notifications and save the setting. In our example, push notifications are enabled.
Важливо
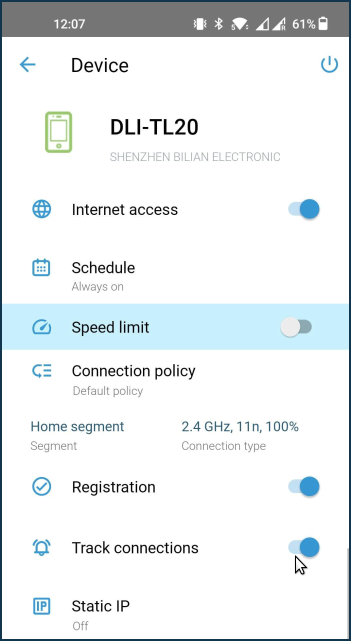
In order to receive notifications about client connections and disconnections, it is necessary not only to select the notification method on the Notification settings screen, but also to enable the Track connections option in the specific device's card.
Exit the Notification settings menu.
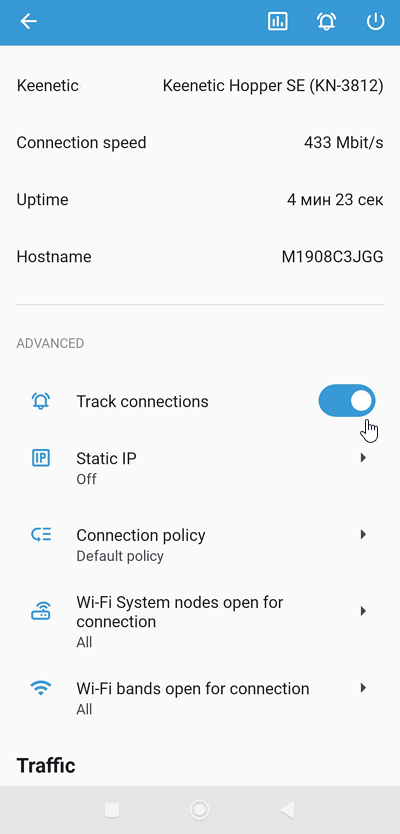
Go to Network clients section and tap on the required device. In our example, it is a smartphone named M1908C3JGG.
From the device options screen, activate the Track connections option.
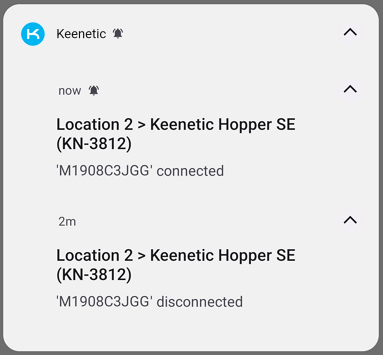
When push notifications are enabled, they will be sent to your mobile device on which the Keenetic app is installed. For example:
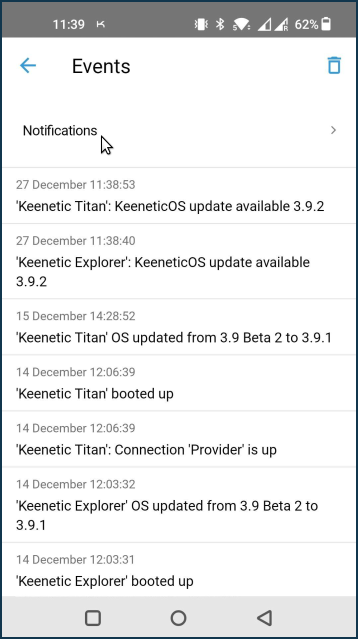
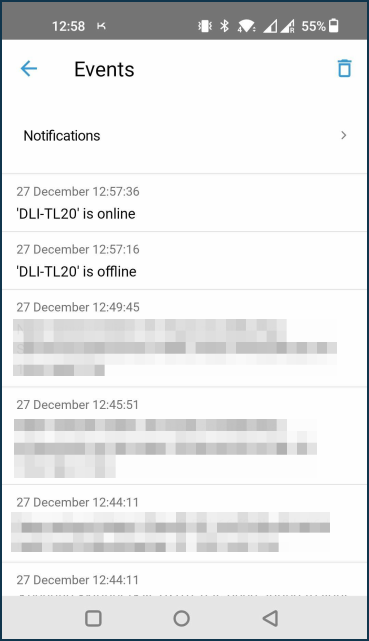
The Events screen keeps a log of completed notifications.
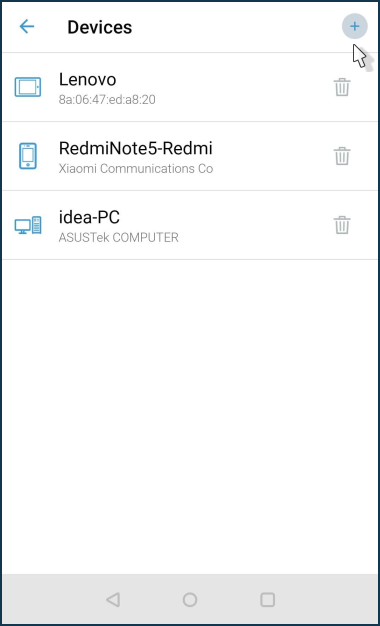
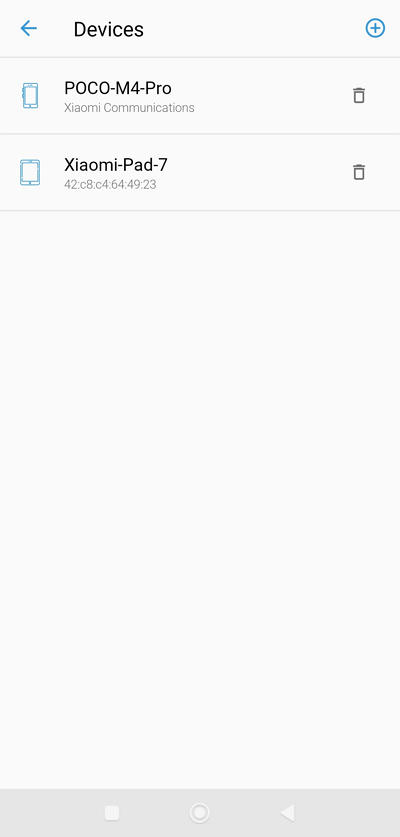
Removing an item from the client list
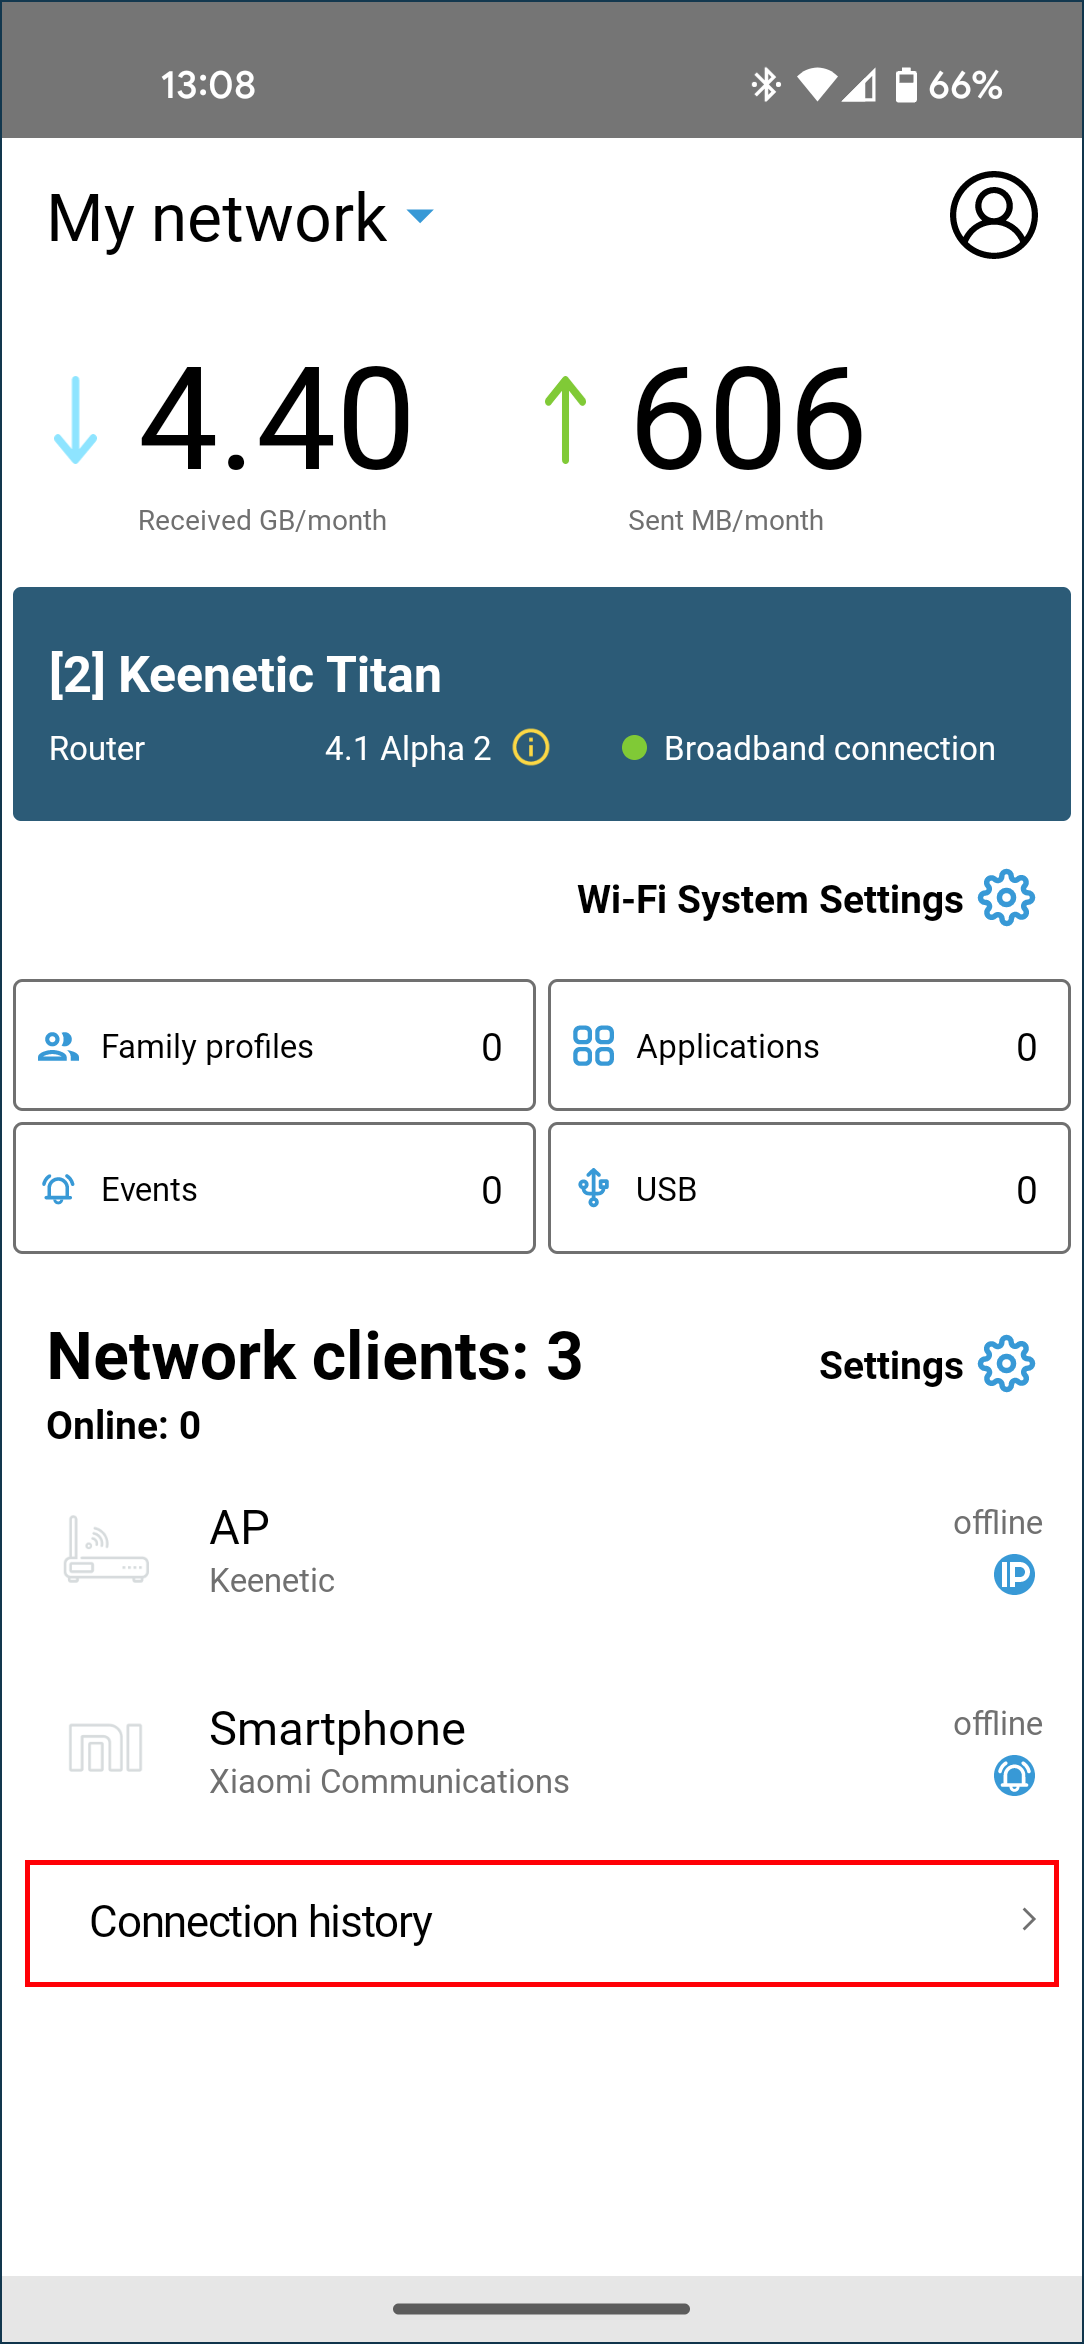
By default, the Keenetic mobile app stores all registered and previously connected (to the router) client devices in the Network clients list. If necessary, you can selectively remove clients from this list. The general procedure is as follows: first, you need to unregister a certain client, after which it will be automatically moved to the Connection history list, and then you can remove the client from this list or clear the whole list.
Let's show this with an example. Suppose we want to remove a client device named Notebook from the list of network clients.
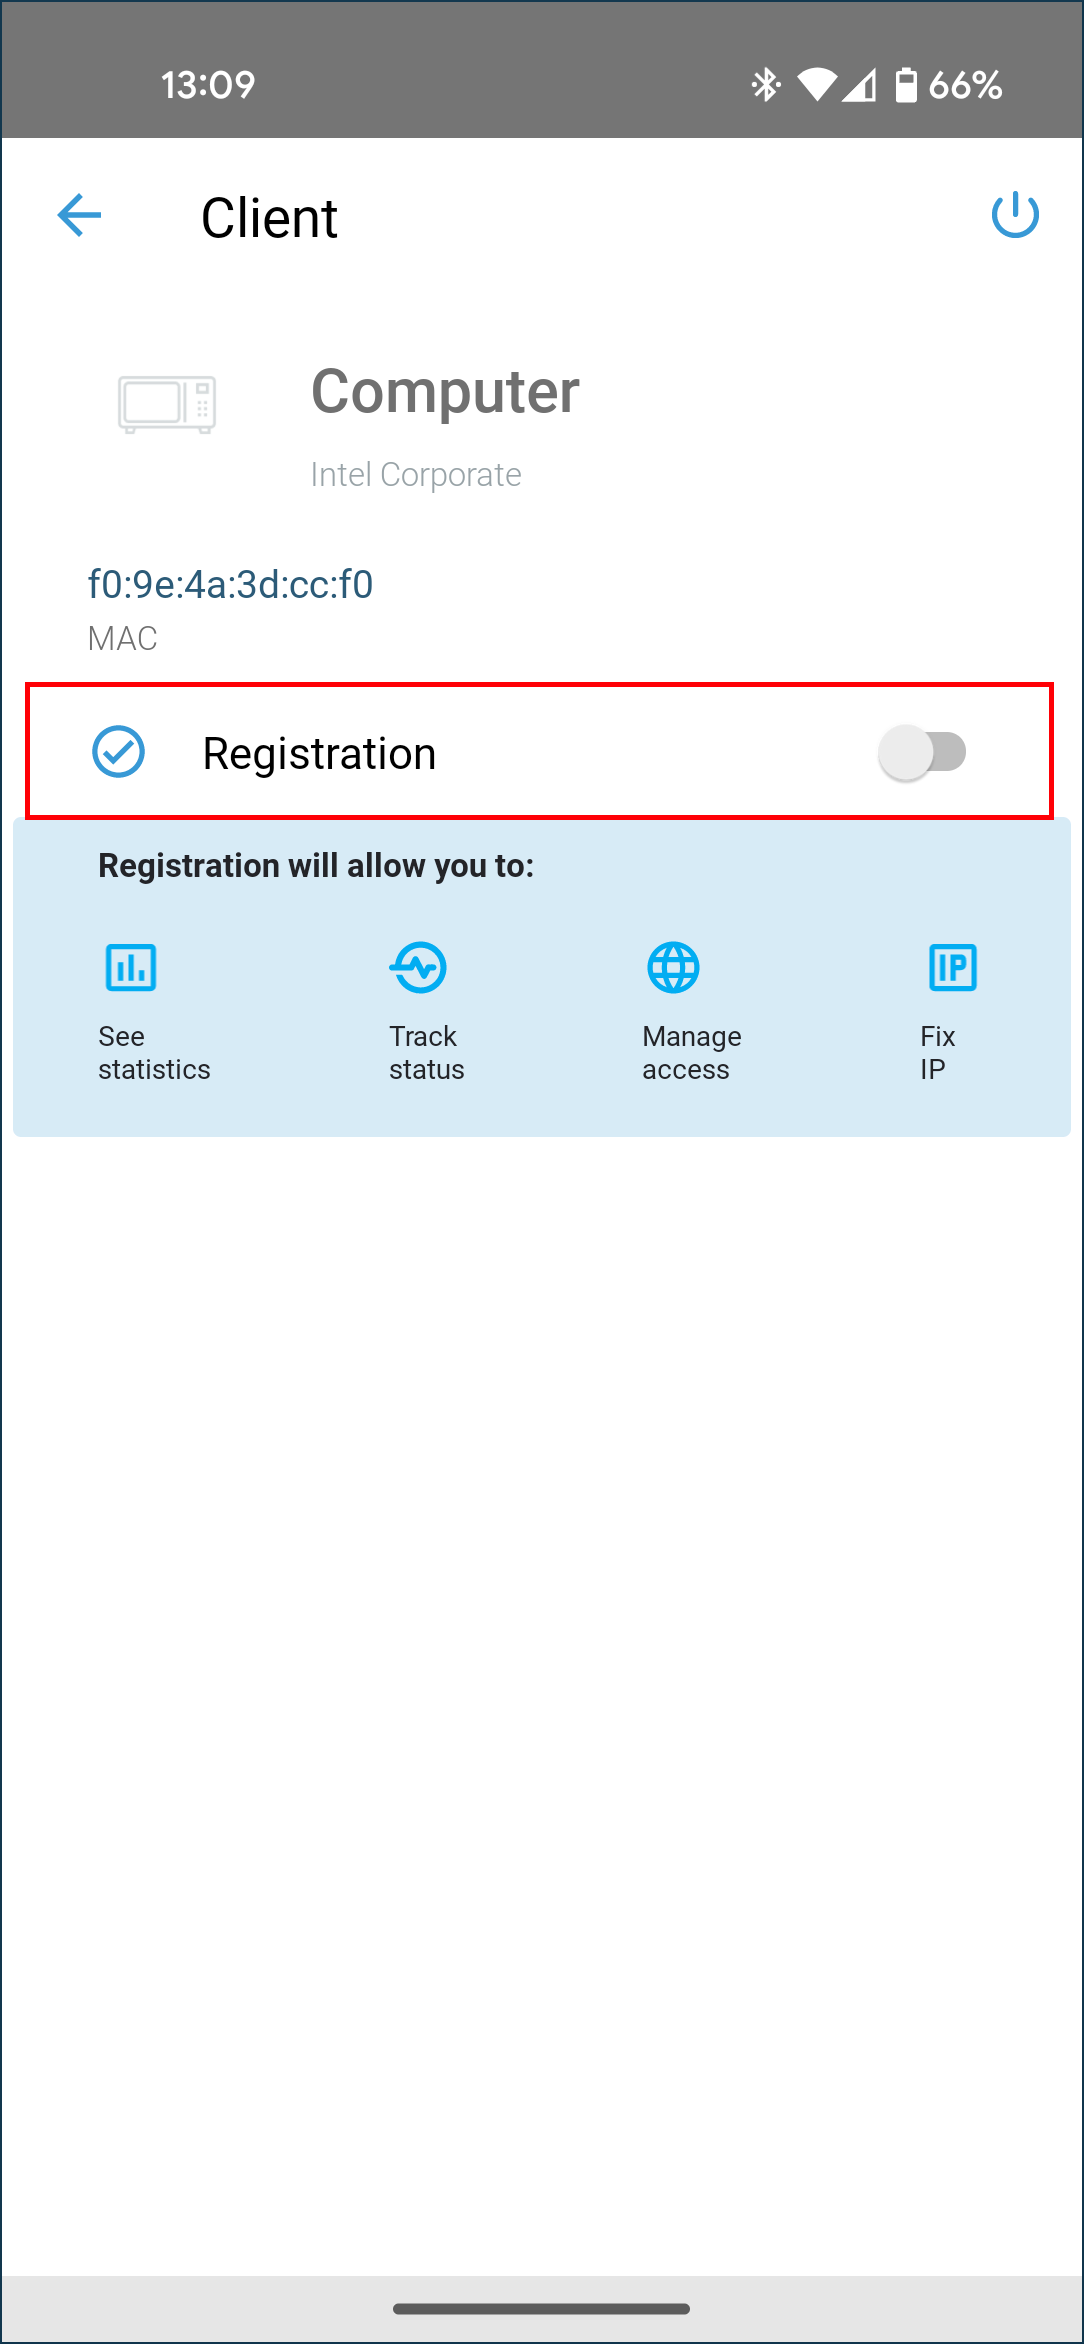
Click on this device's entry and disable registration.
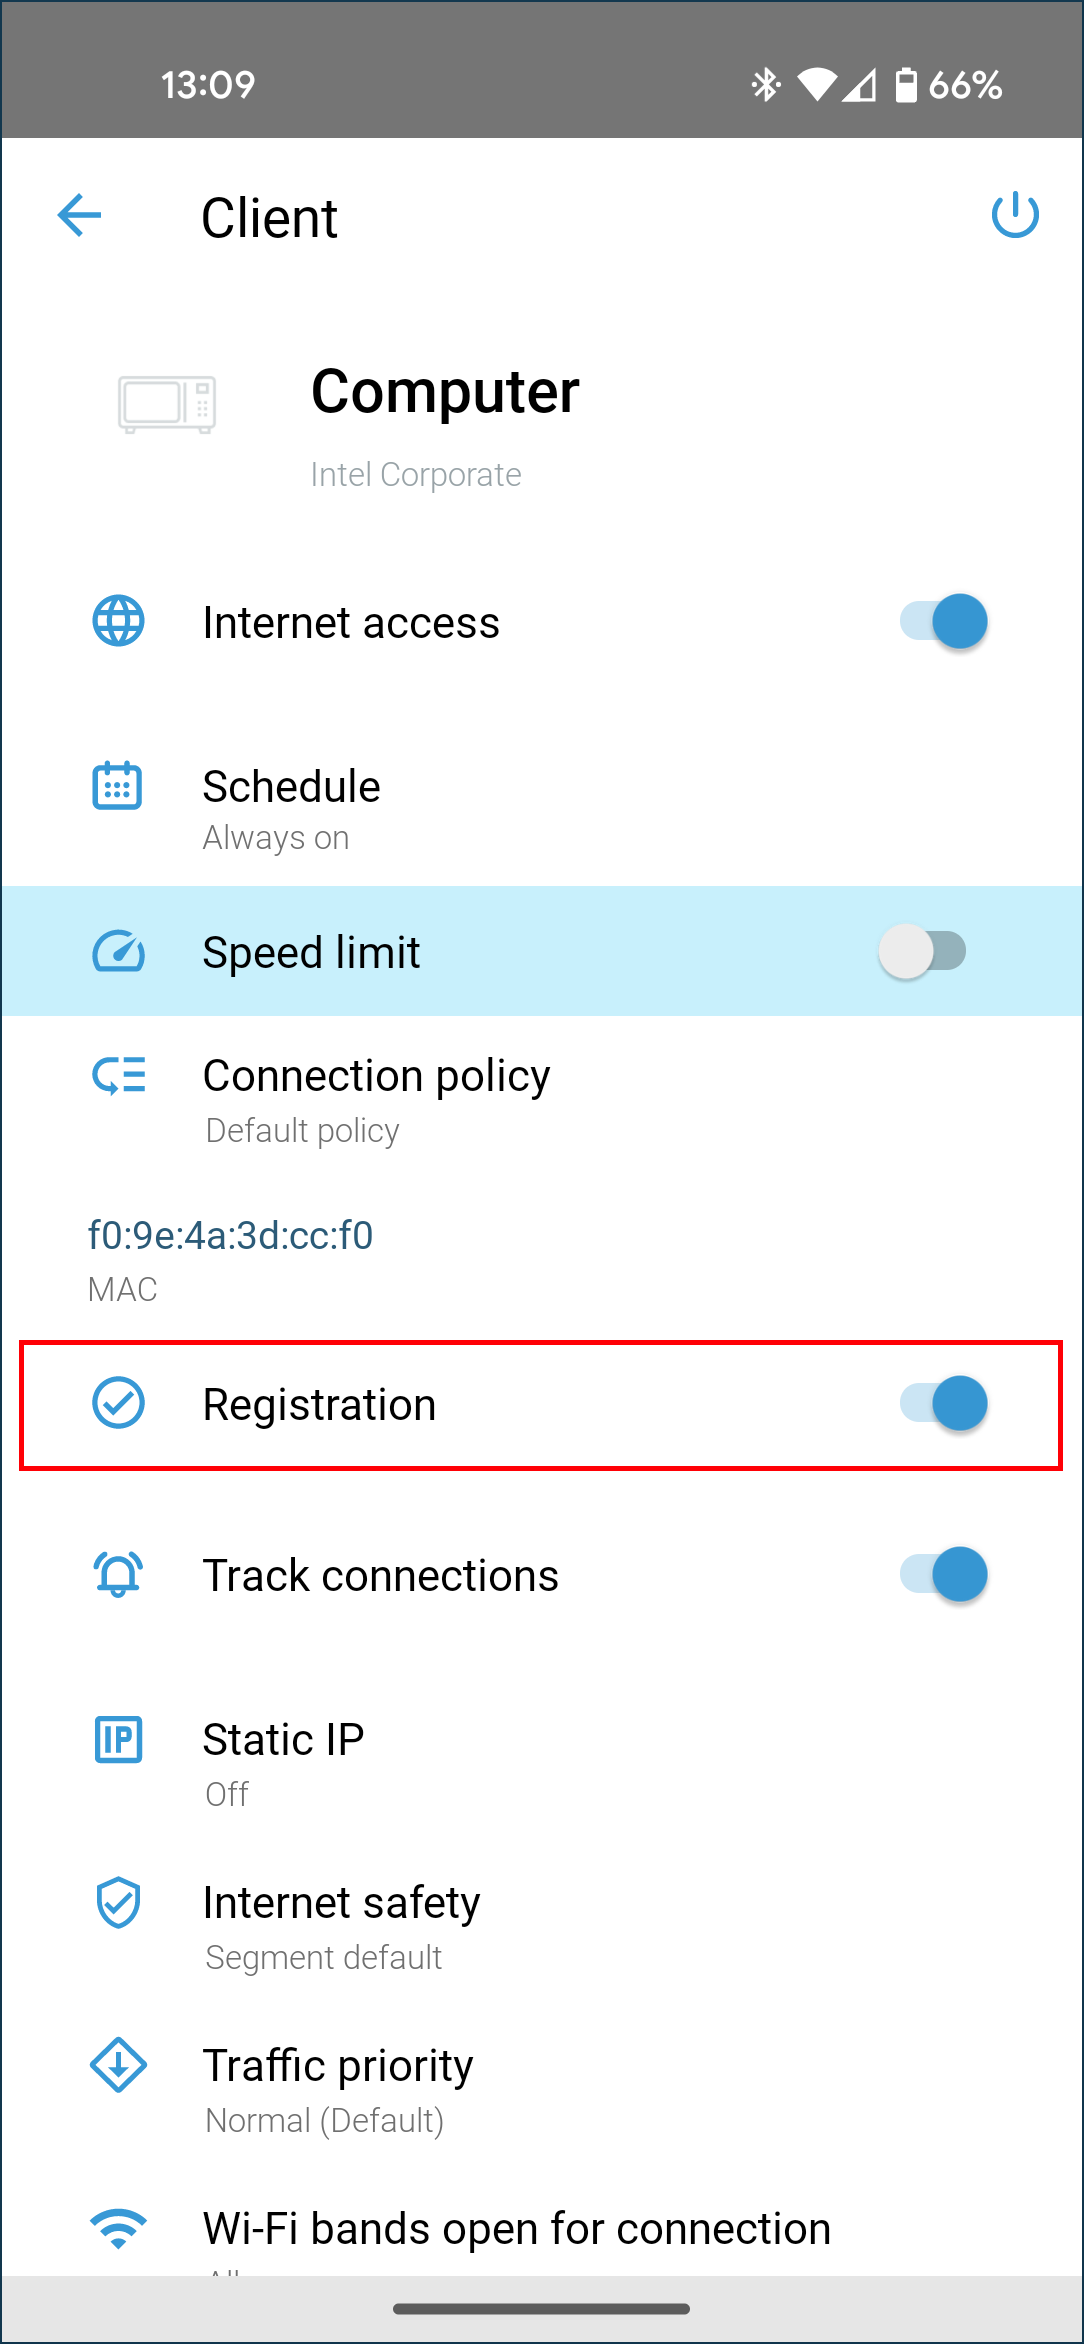
Scroll down the client settings card and click Unregister.
Then open the Connection history list (located at the bottom under the main Network clients list), as the client will automatically be in this list after unregister.
In the Connection history list, you will be able to remove a specific client. To do this, click on the client entry, and the Delete button will appear.
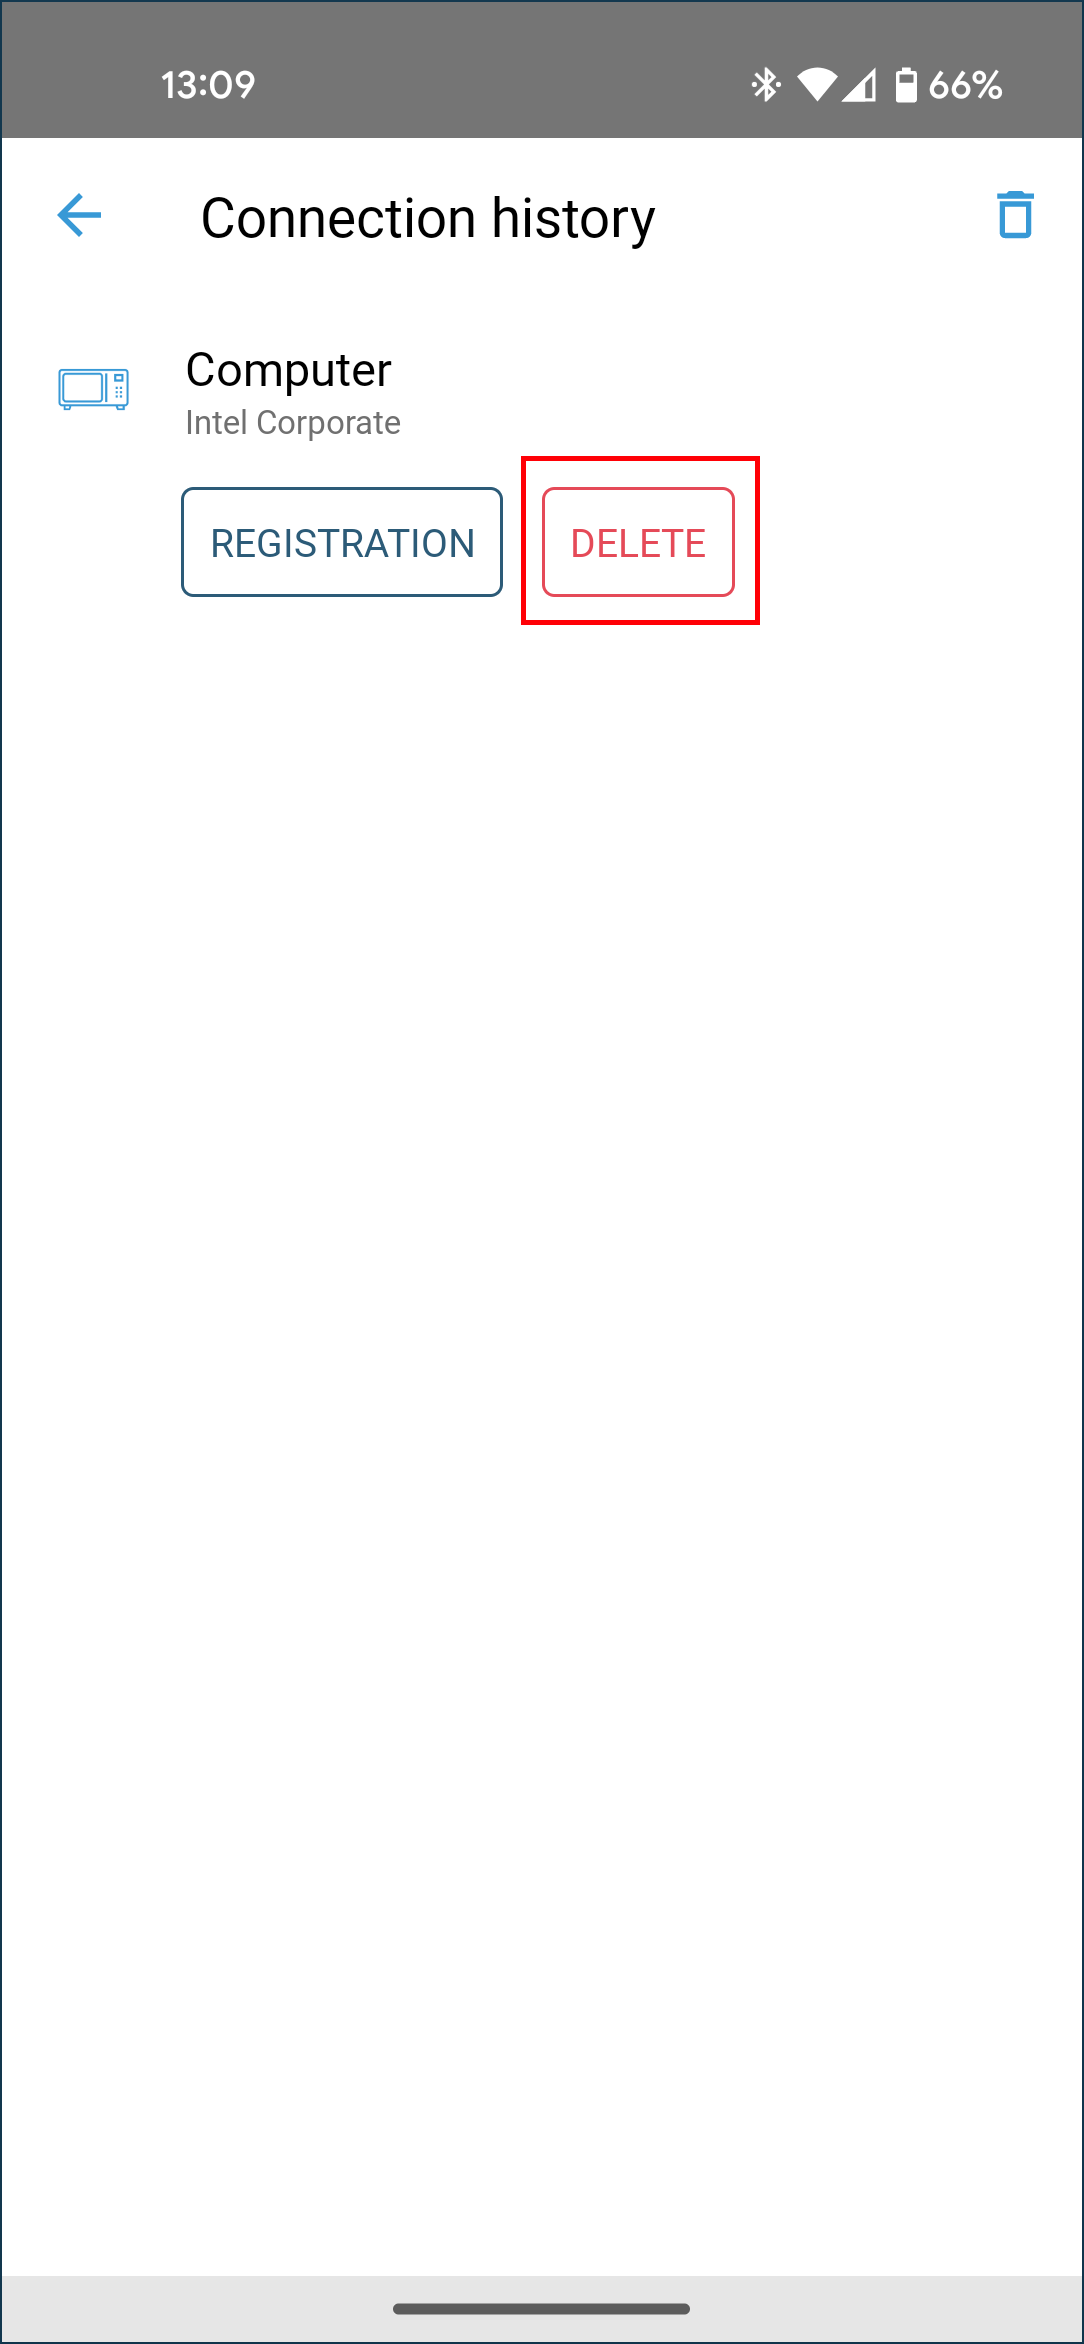
On this screen, you can also clear the entire list. To do this, click on the icon in the top right corner of the screen.
Changing Wi-Fi network name and password
By default, the Wi-Fi network name and password are preconfigured in the factory settings of a device. They are printed on the back label (on the bottom of the device case).
You can change the Wi-Fi network name and password if you wish.
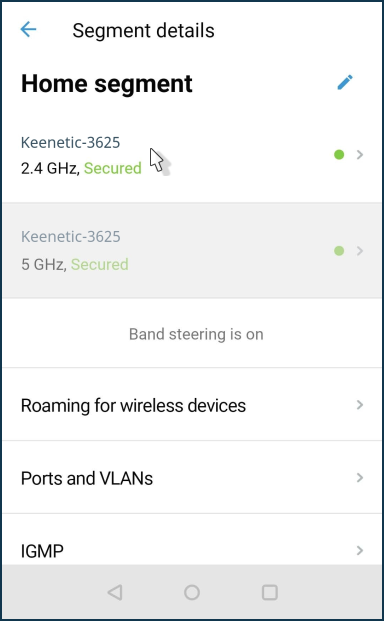
Launch the Keenetic application, on the Sites screen tap the name of the router, and tap on the router to go to its settings.
Then go to My networks.
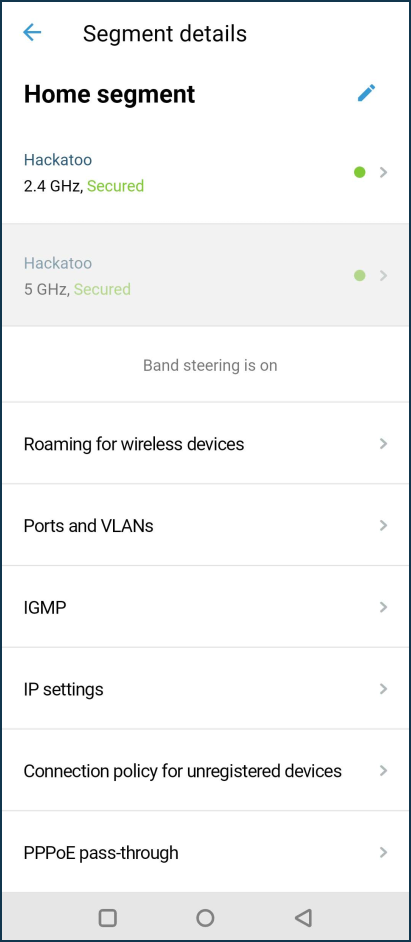
Click on the Home segment.
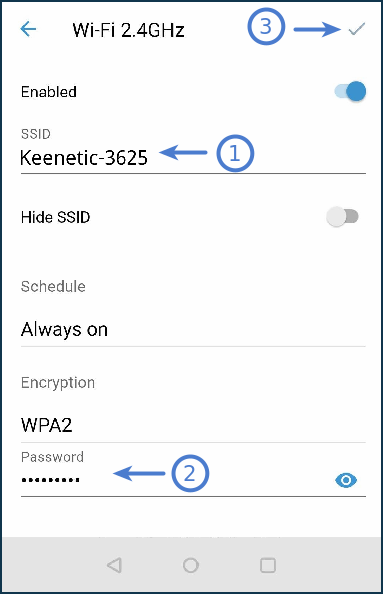
Choose the Wi-Fi network.
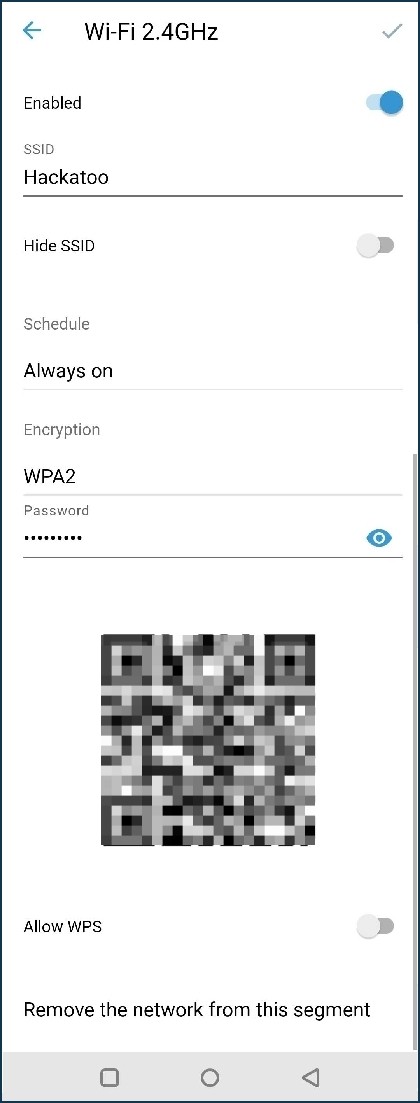
In the Wi-Fi network settings, you can enter a new name of your wireless network in the SSID field and enter a new password to access the Wi-Fi network in the Password field. The new password must be between 8 and 63 characters. Click the  icon on the right to check that the password is correct.
Click on the  icon in the upper right corner of the screen to save the settings.
Підказка
Use a complex (strong) password for your Wi-Fi network. A strong password is preset in router by default, which is difficult to guess and takes a long time to pick up by a brute force method.
Важливо
After changing your network name and password, you will need to reconnect your wireless devices to the router.
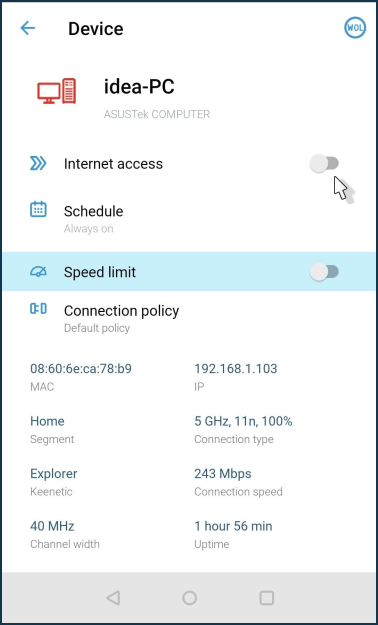
Waking up a computer with WoL from the Keenetic app
Using the Wake-on-LAN (WoL) technology, you can remotely 'wake up' (turn on) computers in your home network via a mobile app.
Wake-on-LAN is a function of the computer's BIOS that allows you to remotely turn on the computer by sending a particular signal (a so-called 'magic' packet) via the local network to the computer's network adapter. For example, when you are in the office, you can remotely turn on the computer in your home network (the computer must be in sleep mode, and Wake-on-LAN must be enabled on it beforehand)
Важливо
For Wake-on-LAN to work, your computer's motherboard and network adapter must support this function. Refer to your motherboard user's manual for information on configuring BIOS settings and enabling the Wake-on-LAN feature. BIOS, operating system and network adapter setup is for advanced computer users only. Our technical support is only available to help you set up your Keenetic device. For BIOS, operating system and network adapter settings, please contact the respective manufacturer's support service.
You need to set up your computer and enable the Wake-on-LAN related settings in BIOS and the PC operating system. Information on how to configure the PC is provided in the article Пробудження пристрою через мережу (Wake-on-LAN).
Put your computer into hibernation mode.
Launch the Keenetic app on your mobile device.
From the main Sites screen, select the required location.
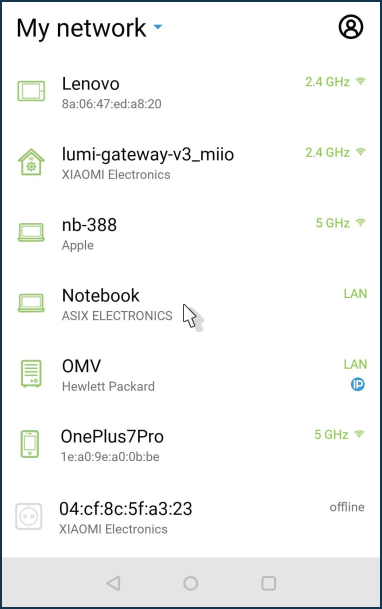
Under Network clients, click on the device you want to '
wake up'. In our example, it is a laptop connected to the router via Ethernet cable and is offline.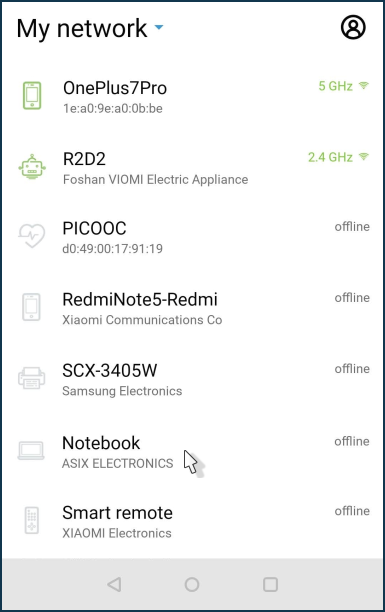
Press the
 icon in the top right corner of the screen.
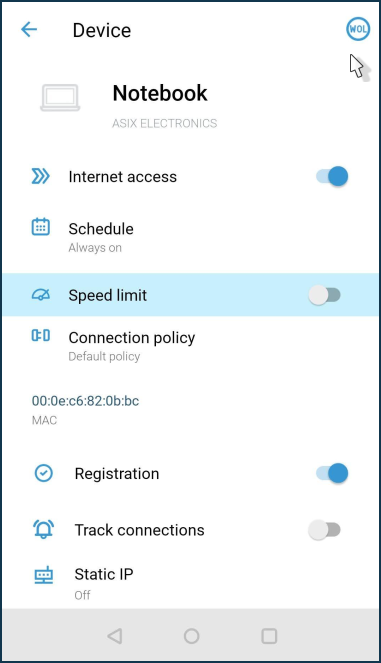
A particular WoL packet will be sent to the device.
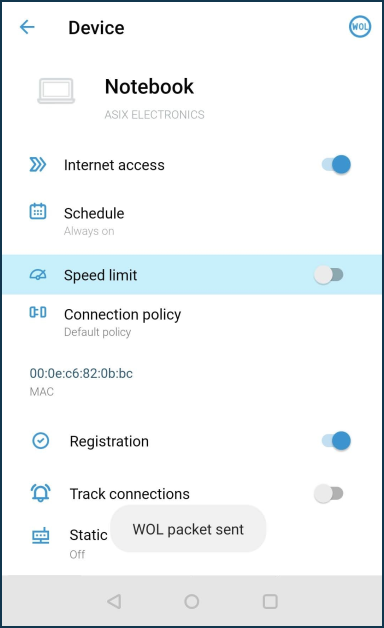
If the PC settings are correct, the device will wake up from hibernation mode and switch on.
After a short time, the laptop will appear in the Network clients section as online.
What login and password do I need to enter in the Keenetic app?
|
|
|
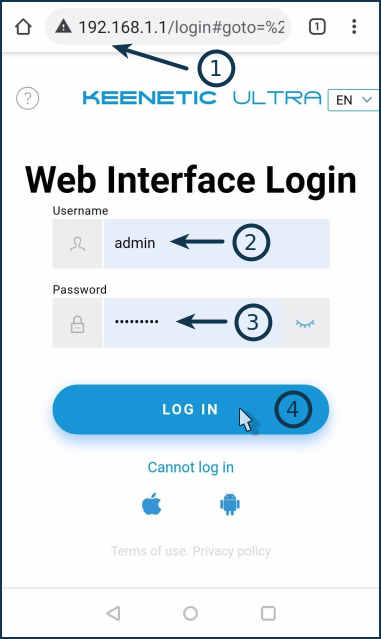
In the Keenetic mobile app, on the Connection screen, you need to enter the name and password for the administrator (admin) account of the router. These are the same username and password used to connect to the router's web interface through a web browser.
If you see a login screen, this means that a password was previously set in the router. Usually, the password is set during the initial configuration of the router. There is no administrator password in the factory settings.
If you do not remember the password or do not know the password (e.g. the router has not been configured by you), please perform a factory reset of the router.
Важливо
The administrator password for the router is not set by default (factory default), but is set by the user during initial setup. If you do not know or have forgotten the administrator password, please use the Reset button on the router.
When you perform a reset, all user settings will be deleted. After the reset, you will need to configure the router to connect to the Internet from scratch. Before resetting, ensure you have all the information you need to set up your connection. If you need to know what settings are used to connect to the Internet, contact your ISP to obtain this information.
After the factory reset, configure and connect the router to the Internet. During the setup process, set a password for the router's administrator account.
Then, connect to the router's Wi-Fi network. The network name and password for Wi-Fi are printed on the label located at the bottom of the router's case.
When you see the login and password prompt again, enter admin (in small English letters) in the Name field and the router administrator password you set during the initial setup in the Password field.
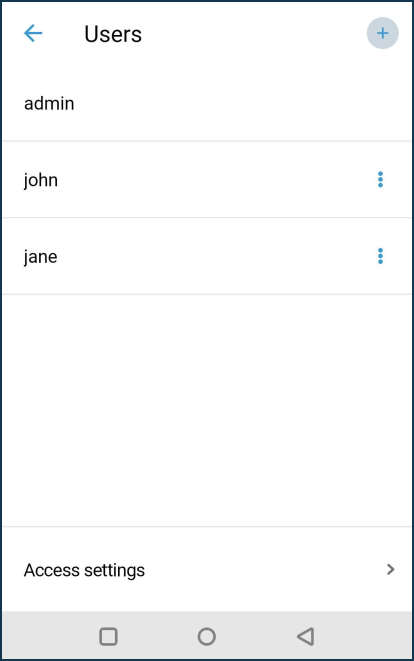
You can change the admin password at any time via the Keenetic mobile app (menu Management > Users > admin) or via the router's web interface.
Важливо
Remember or save the router administrator password. You will need it later to add the router to the Keenetic app and when you connect to the router's web interface.
Managing a router from different accounts with the Keenetic app
The Keenetic mobile app allows you to co-manage sites from different accounts and from different mobile devices.
|
|
|
Важливо
When you share control of the router, you delegate authority with administrator privileges. Do not delegate access to people who might compromise the operation of the device, Internet connection, or application.
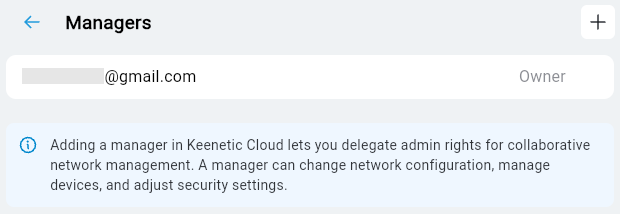
To share your router's management via the Keenetic mobile app, add a manager to whom you will delegate the management rights. If configured correctly, the router will automatically appear for management on the manager's device.
Setting up access to sites must be done by the administrator. Do not add or remove available sites in the manager account. If you delete a site in one account, it will become unavailable in all other accounts used for shared management.
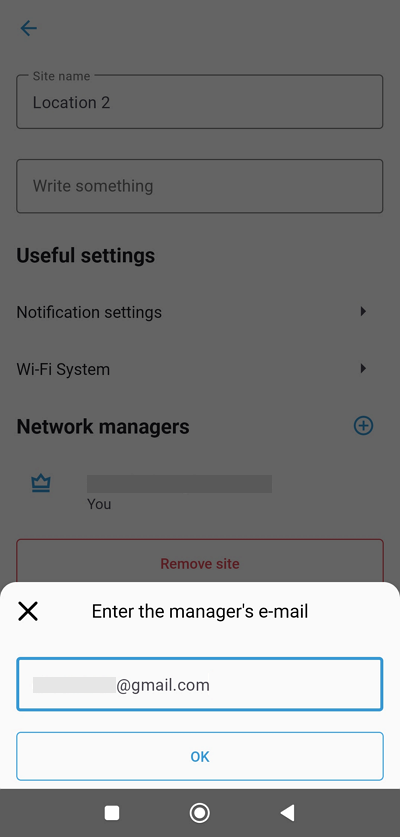
Here is an example. Suppose you want to share your router with someone else. Ask him to install the Keenetic mobile app on his mobile device, create his own account in it, and give you the e-mail address that was given during account registration. This account must be authorized in the Keenetic app at the moment of adding the manager.
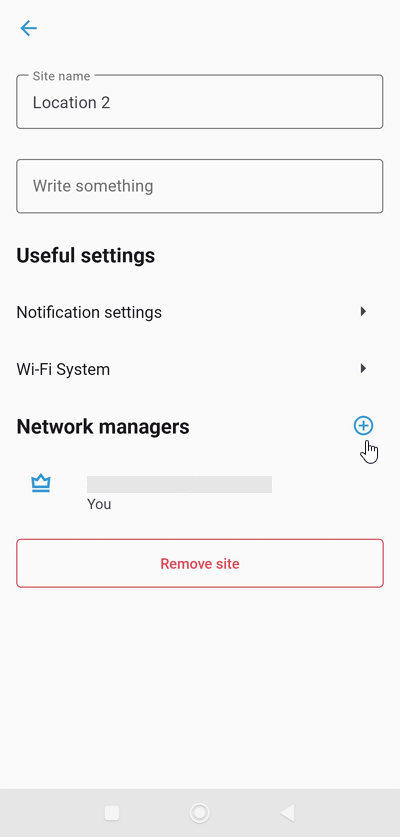
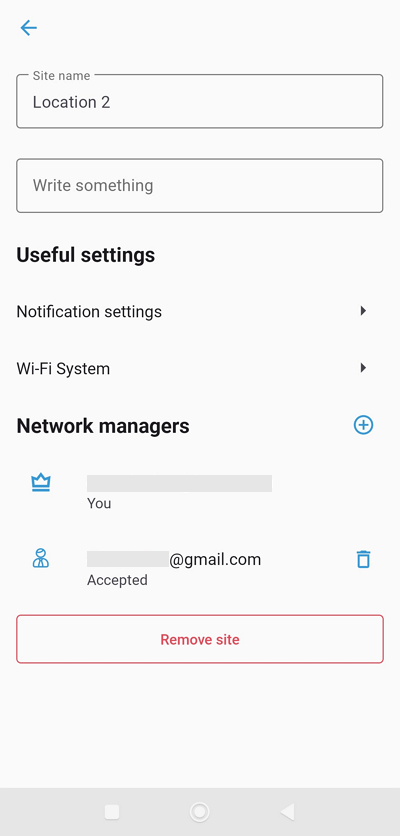
Next, on the Sites screen, click on the site management settings icon ('gear').

Under Network managers section, click + to add an account that will be allowed access to the router.
Enter the e-mail address of the second account that was previously authorized in the app on another mobile device.
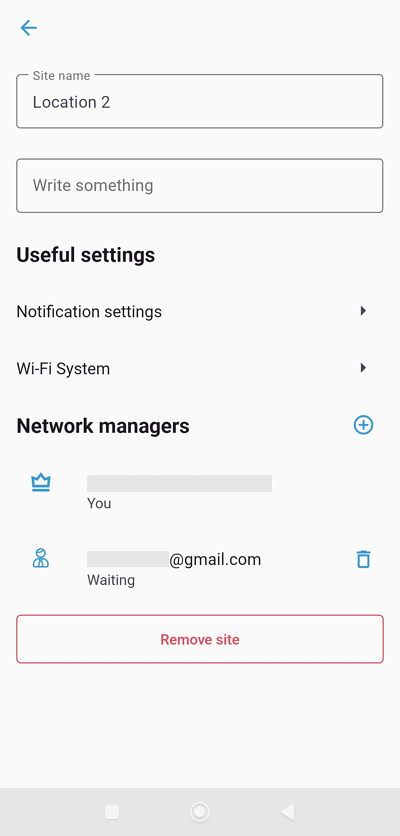
After adding the account, it will appear in the Managers section with the status Waiting.
To confirm the e-mail address, the following message will be sent to the specified e-mail address:
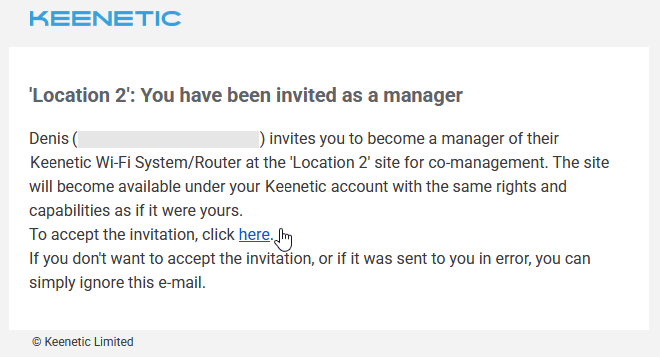
To accept the invitation, click the link to confirm your email.
After that, the manager's account status will change to Accepted.
The site with the router will appear automatically on the manager's mobile device. The management will be available in the Keenetic app and on the Keenetic Cloud web portal.
To remove a manager, go to the location management settings, click on icon, and access to the router will be denied to him.
Примітка
You can manage a router from different mobile devices under one account, but this is not the recommended method (we recommend adding a manager to give access to another user).
If you use different accounts, keep in mind that when you add a router (via the Add device button) to a new account, the router binding is removed from the old account. You can use this mechanism if, for some reason, you can't connect to your previously configured account. In this case, create a new account for the app, add the router to it, and it will be automatically removed from the old account.
Saving the self-test file with Keenetic app
Using the Keenetic mobile application, it is possible to upload the self-test.txt system file from the router.
Примітка
The self-test system file contains complete router system information (without passwords), diagnostic information, logs and current configuration. If you encounter a problem with your router or connection to your Internet service provider, you can send the self-test file to our Keenetic Support for analysis and diagnosis of the problem.
On the screen Sites, select the device whose settings you wish to connect to and then click on its name:
Go to Management:
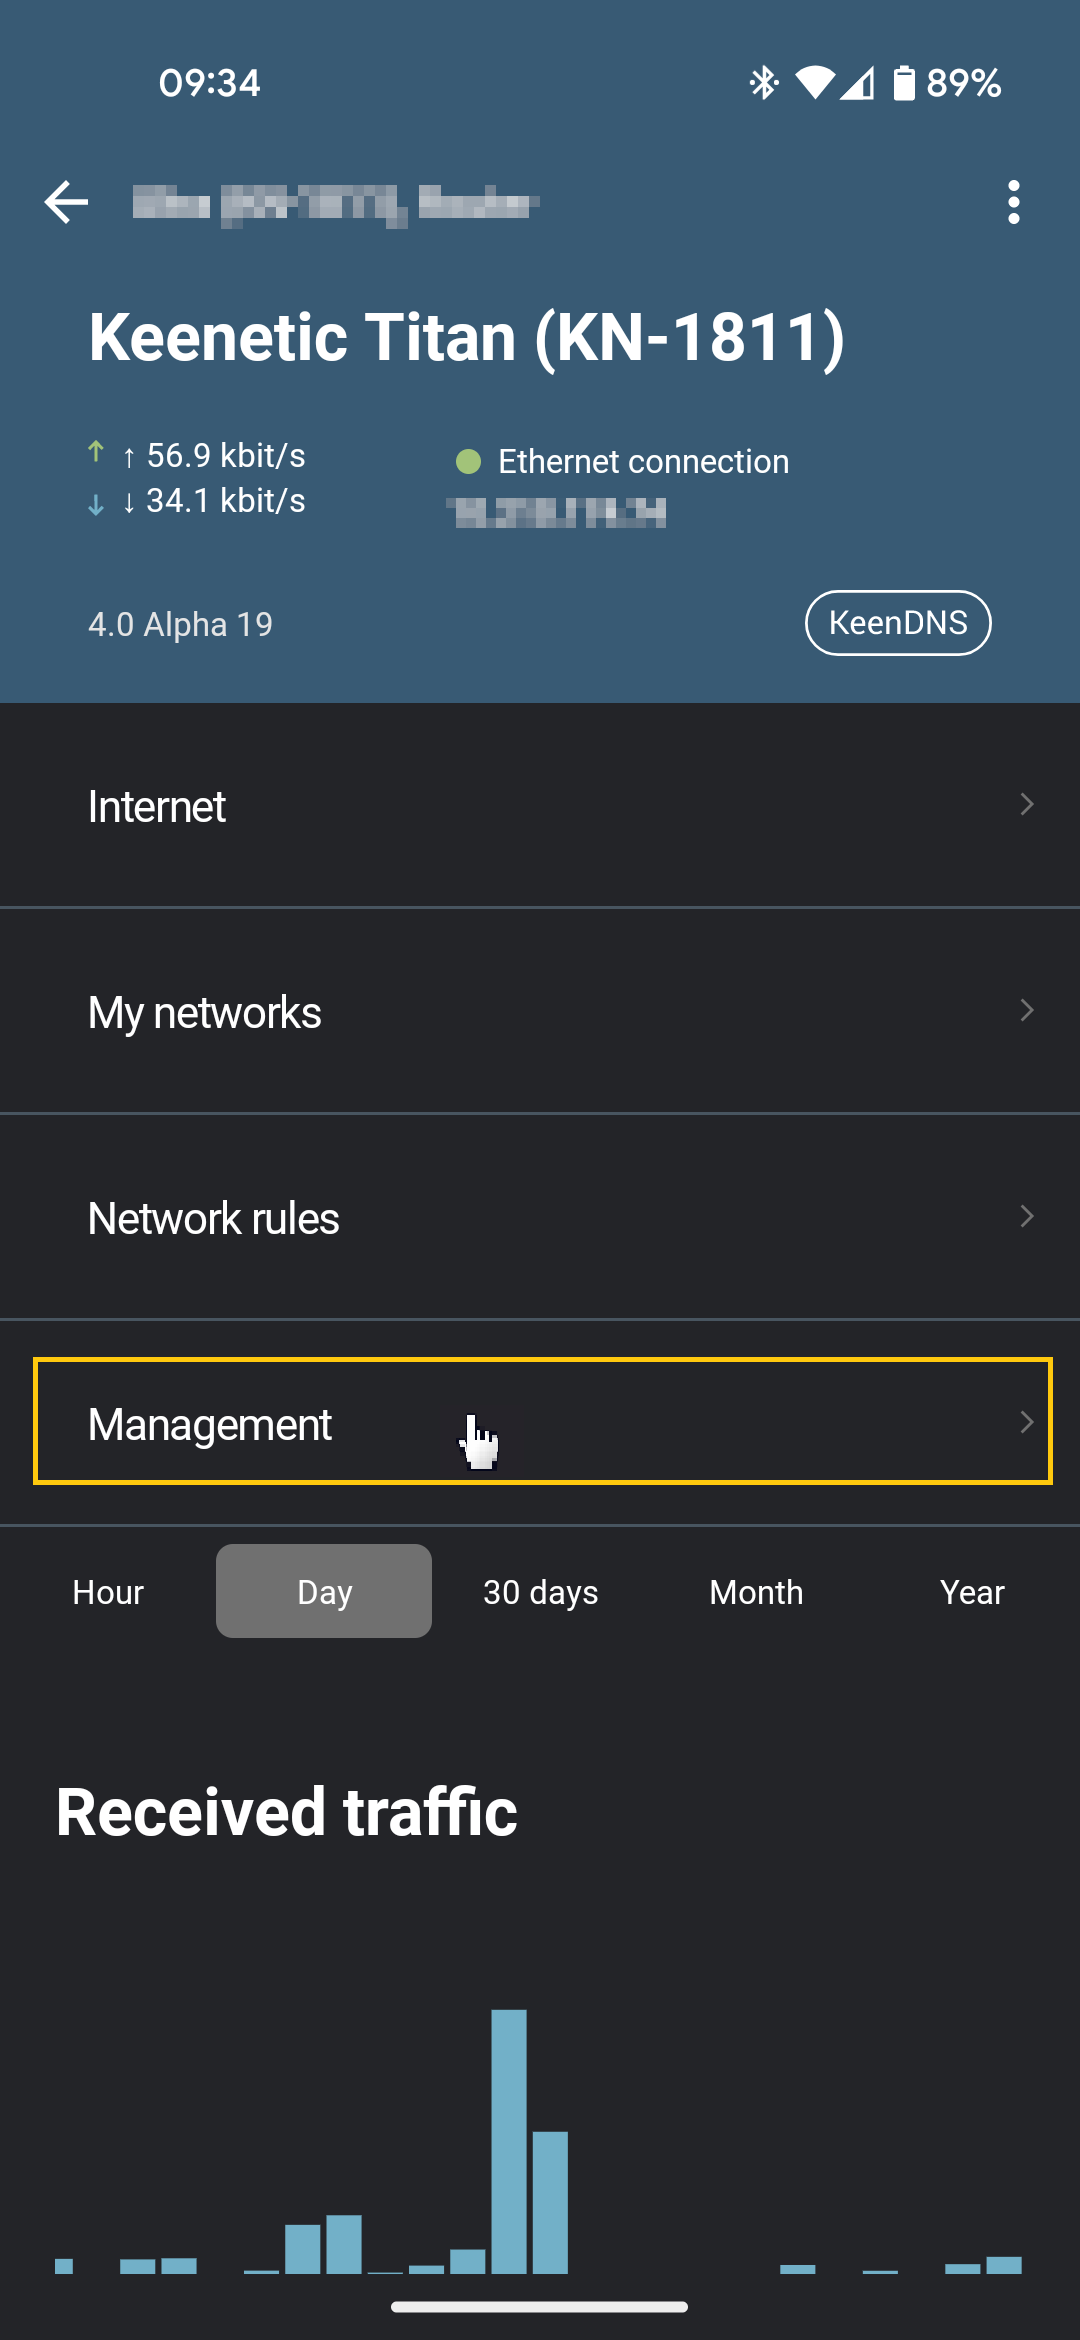
Click on the Download the self-test file button:
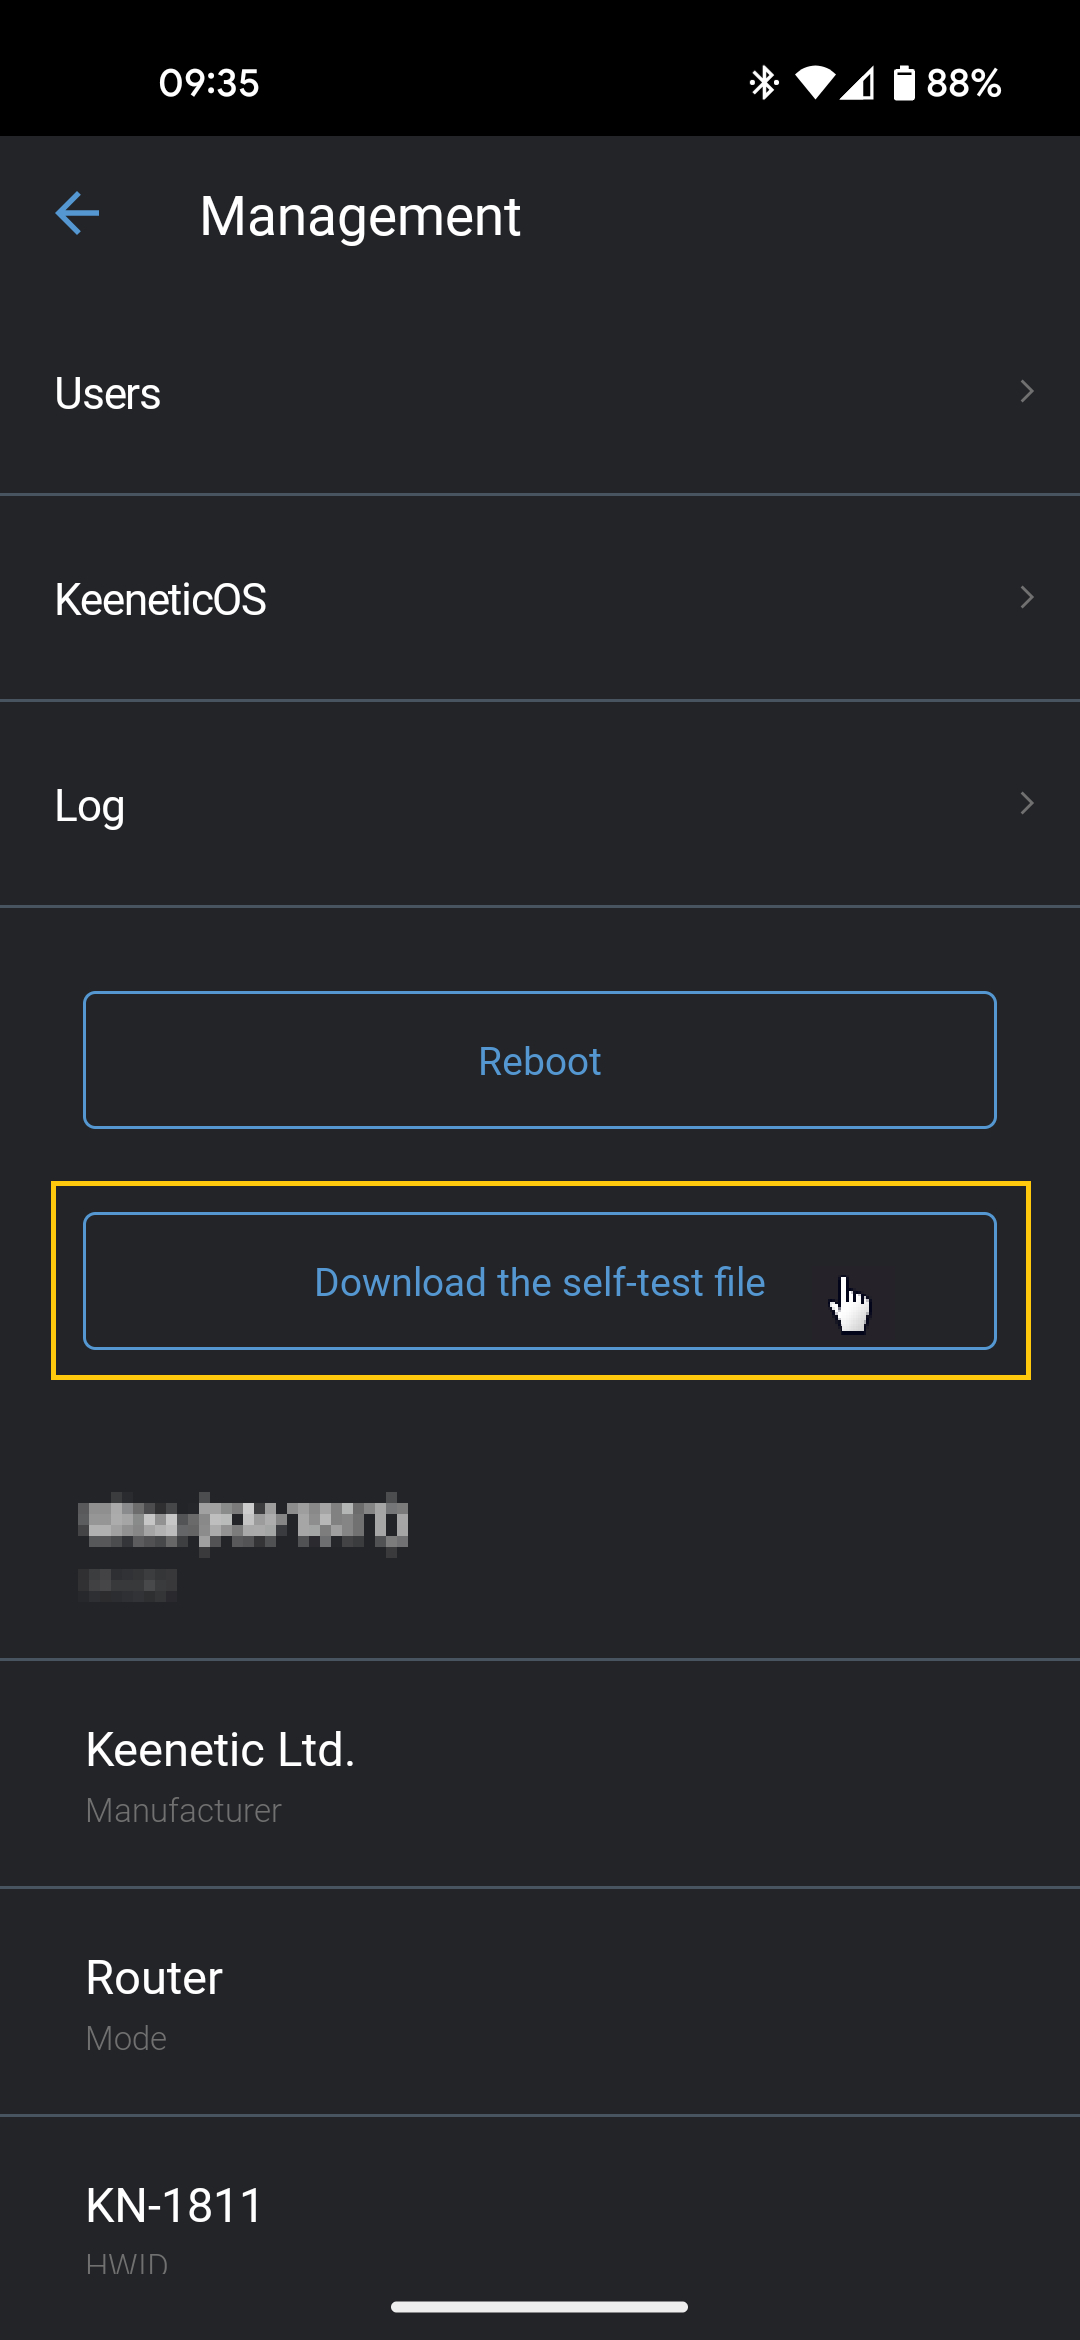
This will download the self-test.txt file from the router to your mobile device.
You can now send the saved file to technical support by email.
Важливо
If the purpose of saving the self-test.txt file is to determine the cause of an error or disconnection, you should wait until the error or disconnection occurs before saving the file.
Keenetic Cloud
Окрім мобільного застосунку Keenetic, існує спеціальний вебпортал під назвою Keenetic Cloud. Доступ до ваших пристроїв буде можливий не тільки через застосунок, але й через будь-який веббраузер.
Важливо
Функціональність вебпорталу не повністю дублює можливості мобільного застосунку. Вебпортал надає додатковий спосіб доступу до основних хмарних налаштувань, доступних у мобільному застосунку.
Наразі вебпортал Keenetic Cloud працює в тестовому режимі, тому його функціональність може змінюватися.
Для доступу до вебпорталу Keenetic Cloud і застосунку Keenetic використовується єдиний Keenetic Account.
Наразі ви можете додати свій пристрій Keenetic до вебпорталу, щоб згодом керувати ним через мобільний застосунок, переглядати стан підключення клієнтів і статистику трафіку, керувати сімейними профілями, налаштовувати сповіщення, вмикати та вимикати застосунки, перезавантажувати пристрої, отримувати файл діагностики, переглядати системний журнал та встановлювати оновлення.
Підключення до Keenetic Cloud
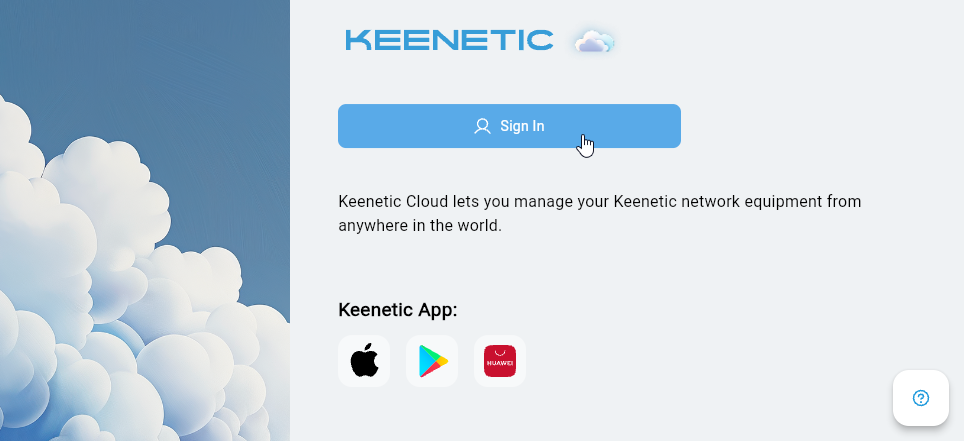
Запустіть веббраузер і введіть в адресний рядок адресу порталу keenetic.cloud.
Ви побачите сторінку входу у вебпортал. Натисніть «Увійти».
Підказка
Якщо ви користуєтеся мобільним застосунком Keenetic, у вас уже є обліковий запис користувача. Введіть адресу електронної пошти та пароль, які ви використовували під час реєстрації облікового запису.
Якщо ви не користувалися мобільним застосунком, зареєструйте обліковий запис.
Введіть свою «Електронну пошту» та «Пароль», а потім натисніть «Увійти».
Якщо ви не пам'ятаєте пароль свого облікового запису, натисніть «Забули пароль?». У цьому випадку на вказану вами адресу електронної пошти буде надіслано лист з інструкціями щодо відновлення пароля.
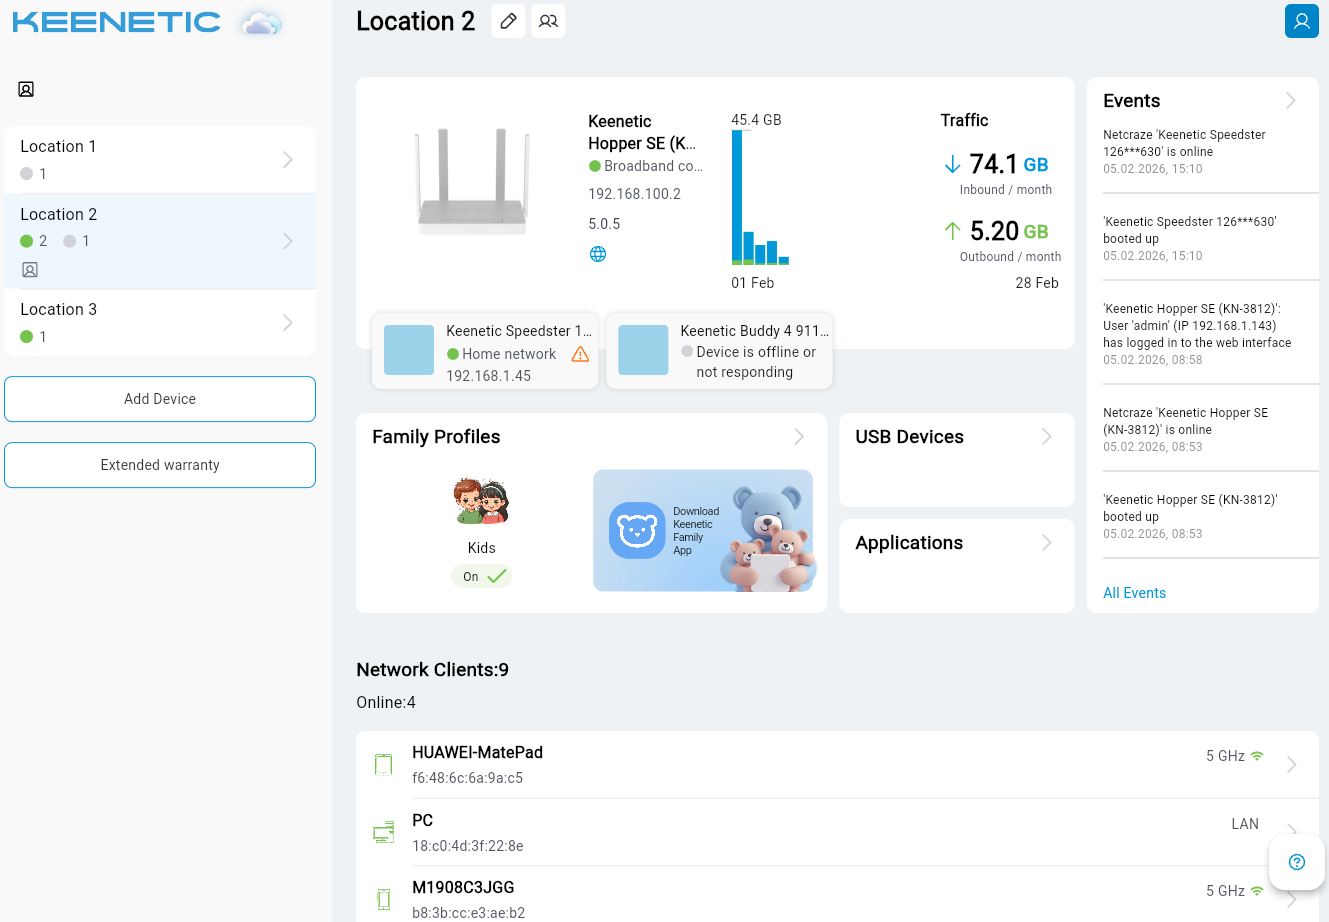
Після підключення ви побачите головний екран особистого кабінету на вебпорталі Keenetic Cloud. Тут будуть відображатися вже додані пристрої. Ви можете переглянути їхній поточний стан (онлайн/офлайн) і додати новий пристрій.
Додавання пристрою
Щоб додати новий пристрій, натисніть кнопку «Додати пристрій».
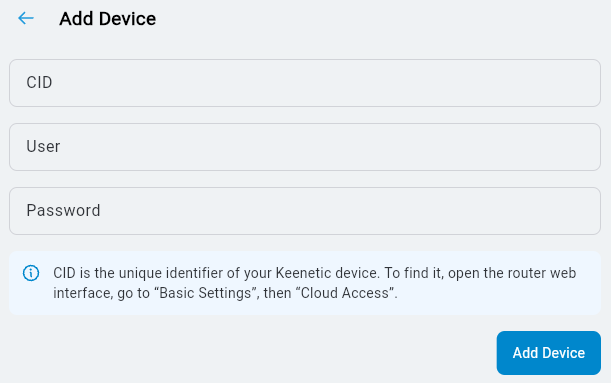
Вам знадобиться CID (унікальний хмарний ідентифікатор) маршрутизатора, який ви додаєте. Його можна знайти у вебінтерфейсі на сторінці «Загальні налаштування системи» в розділі «Хмарна служба для мобільних застосунків». Наприклад:
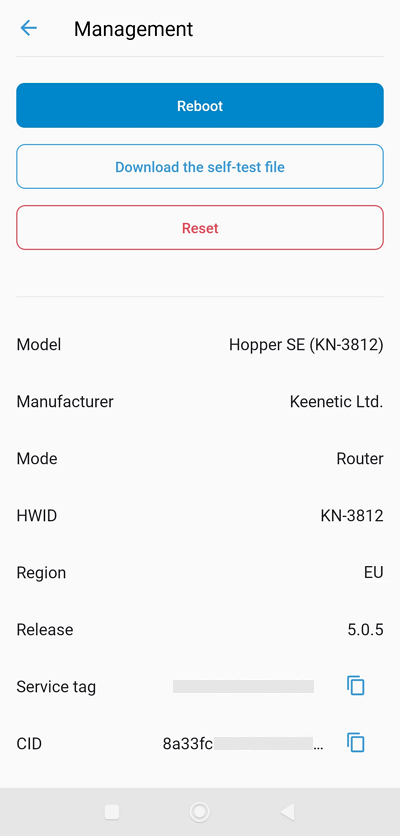
Або в застосунку Keenetic в налаштуваннях маршрутизатора в меню «Керування»:
У вікні «Додати пристрій» введіть CID, а також ім'я користувача та пароль облікового запису адміністратора пристрою.
Зміна назви сайту
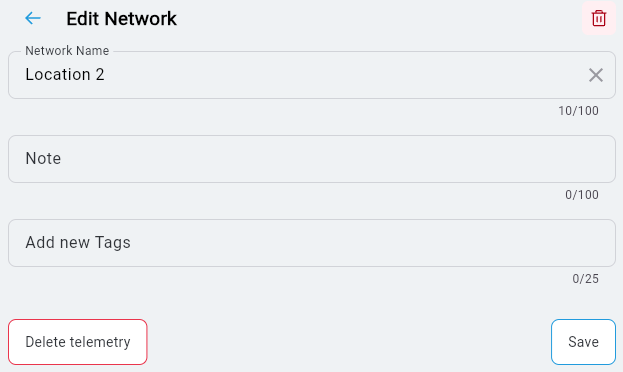
За потреби ви можете змінити назву сайту та додати опис (якщо у вас багато сайтів, це спростить їхню ідентифікацію). Поруч із назвою сайту натисніть кнопку «Редагувати мережу».

У вікні, що з'явиться, введіть нову назву сайту. Ви також можете додати короткий опис і теги.
Статистика трафіку
Натиснувши на назву пристрою, ви зможете переглянути детальну інформацію про пристрій і загальну статистику трафіку.
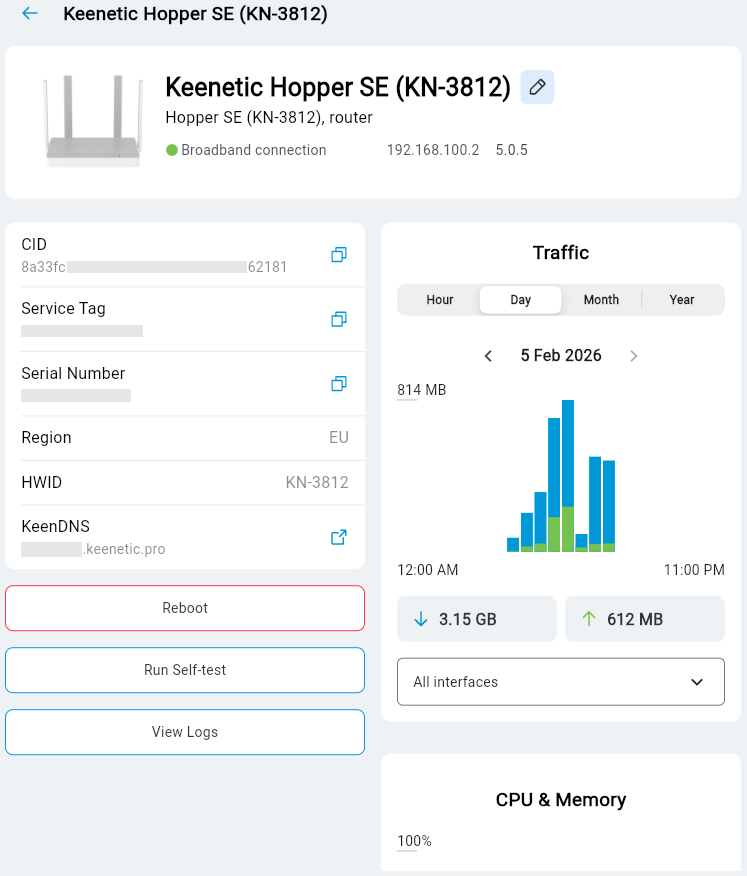
У цьому розділі відображається модель пристрою, режим роботи, IP-адреса WAN, версія ОС, CID, сервісний код, серійний номер, регіон та доменне ім'я служби KeenDNS, якщо воно було раніше зареєстроване на пристрої через вебінтерфейс.
У розділі «Трафік» відображається статистика споживання трафіку. Інформація подається за різні періоди часу: «Година», «День», «Місяць», «Рік».
Стан клієнтів мережі
У розділі «Клієнти мережі» відображається список клієнтів, що перебувають онлайн та офлайн, і їхній стан.
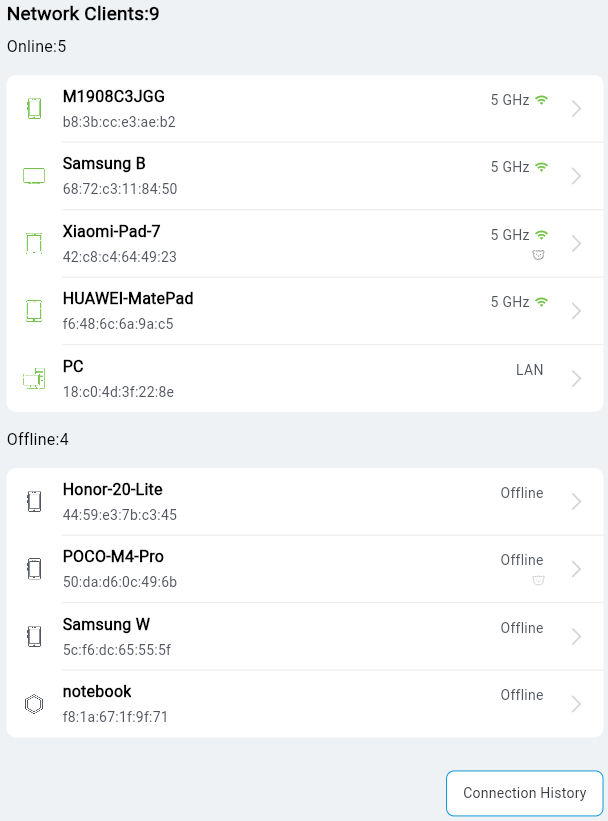
Натиснувши на запис клієнта, ви можете переглянути додаткову інформацію про підключення та статистику трафіку.
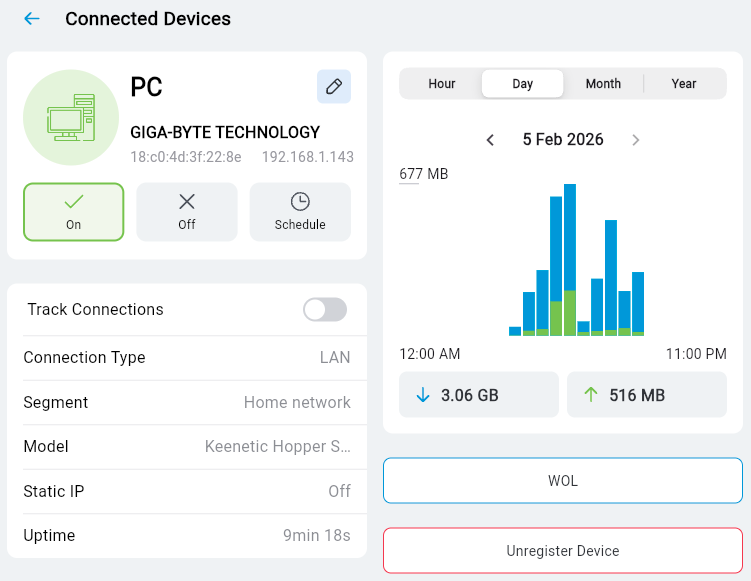
На екрані «Під’єднані пристрої» ви можете вимикати та вмикати доступ до Інтернету, вибирати розклад роботи, вмикати відстеження з’єднання (у цьому випадку сповіщення надсилатимуться, коли клієнт від’єднується та під’єднується), а також пробуджувати комп’ютер за допомогою WoL.
Сімейні профілі
Натиснувши «Сімейні профілі», ви перейдете до керування раніше створеними сімейними профілями.
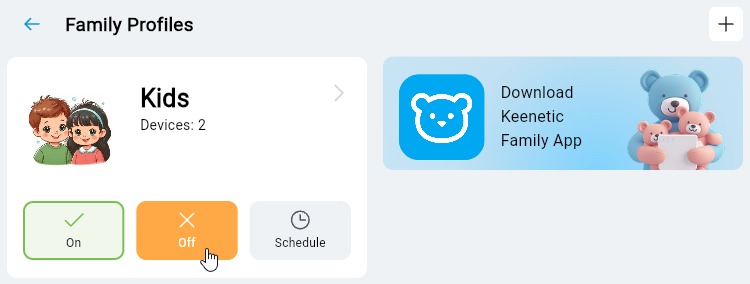
На екрані «Сімейні профілі» ви можете додати новий клієнтський пристрій до профілю або видалити його з профілю, а також переглядати активність і споживання трафіку контрольованими клієнтськими пристроями. Ви можете швидко вимкнути доступ до Інтернету для всіх пристроїв у поточному профілі одним перемикачем. Натисніть «Вимк.», щоб вимкнути доступ до Інтернету, і натисніть «Увімк.», щоб увімкнути доступ.
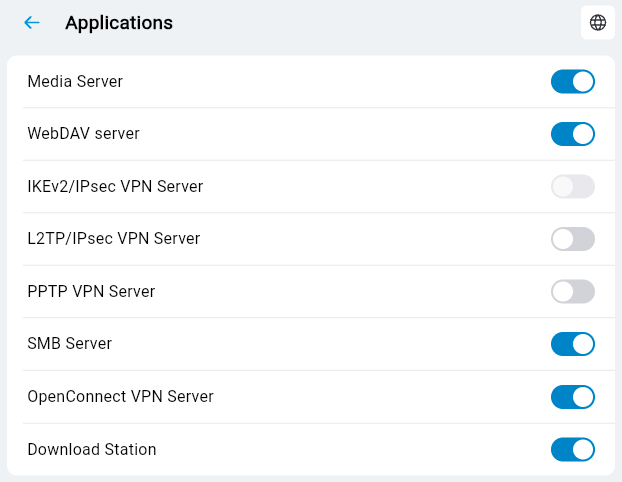
Застосунки
На екрані «Застосунки» ви можете керувати застосунками, встановленими на пристрої Keenetic. Ви можете вимикати та вмикати їх за допомогою перемикача.
Налаштування сповіщень
Натиснувши «Події», ви можете налаштувати сповіщення, які дозволять вам отримувати інформацію про події на вашому пристрої у зручний для вас спосіб. Наприклад, ви можете отримувати сповіщення про зміну стану пристрою (онлайн/офлайн) або про перемикання на резервне з’єднання.
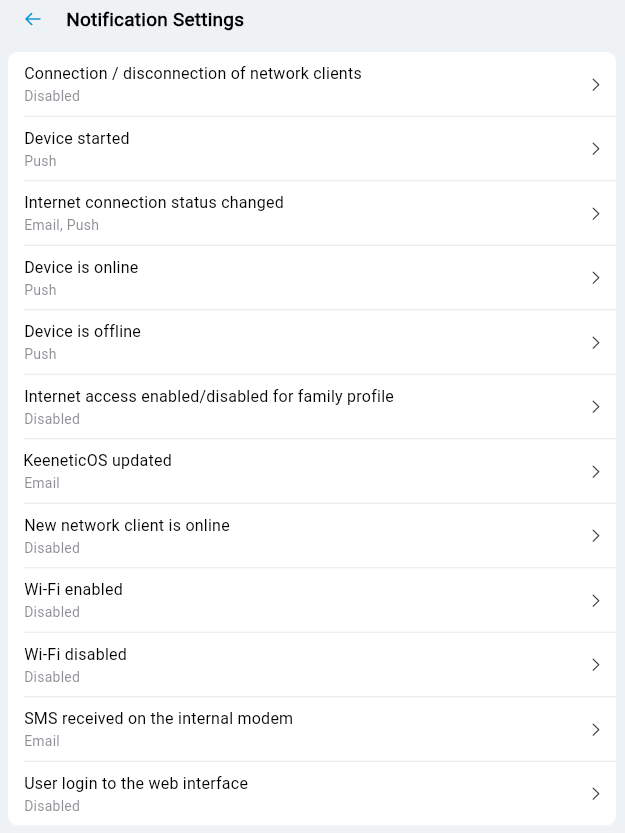
На екрані «Налаштування сповіщень» вкажіть, як ви бажаєте отримувати сповіщення:
«Електронна пошта» — сповіщення, що надсилаються на вашу адресу електронної пошти;
«Push-сповіщення» — сповіщення від застосунку на вашому мобільному пристрої;
«Telegram» — сповіщення в месенджері Telegram.
У розділі «Події» відображаються записи про події.
Обліковий запис
На екрані «Обліковий запис» ви можете змінити свої реєстраційні дані (ім'я та пароль облікового запису). Для цього натисніть кнопку «Керувати обліковим записом», і вас буде перенаправлено на вебсайт особистого кабінету Keenetic Account.
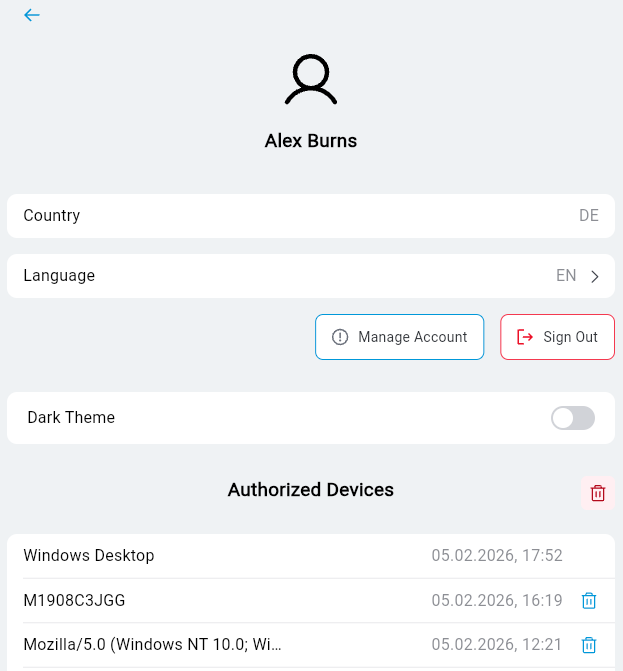
За потреби на цьому екрані можна змінити мову інтерфейсу та ввімкнути темну тему.
У розділі «Авторизовані пристрої» відображається історія входів у ваш обліковий запис.
Додавання менеджера
Якщо вам потрібно делегувати права адміністратора іншому користувачеві, наприклад, для спільного керування об'єктами, ви можете додати менеджера.
Поруч із назвою об'єкта натисніть кнопку «Менеджери».
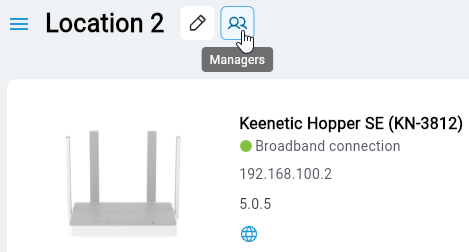
Натисніть кнопку «Додати менеджера», введіть адресу електронної пошти менеджера та виберіть потрібний «Сайт».
Для отримання додаткової інформації про спільне керування сайтом дивіться інструкції Managing a router from different accounts with the Keenetic app.